- Contents
- Index
- A -
Apple CoreStorage/FileVault/Fusion Drive Volumes
- B -
Bad Sectors settings
Set default read retries count for all drives
Binary (byte to byte copy)
BitLocker System Drive Encryption
Broken File Name
Rename and change all invalid symbols to:
Broken File Name options
Button
Buttons
Create virtual volume sets or RAIDs
- C -
Connect to R-Studio settings
Contact information and technical support
Find Previous Versions of the File
Find Template Signature Previous
Remove All Scanned Information
Contextt menu
Create menu
Creating and saving your own RAID configuration
Creating Startup Disks for Mac and Linux Computers
- D -
Data Copy in Text/hexadecimal editor
Data Recovery on HFS/HFS+ File System
Description Files for Various RAID Configurations
Devices to Store Recovered Files
Dialog box
Dialog boxes
Edit Block RAID Layout Presets
Please configure R-Studio Agent for Mac
Please configure R-Studio Agent for Windows
R-Studio Agent for Linux Configuration
There is not enough space on the disk
Drive menu
- E -
Edit menu
Find Template Signature Previous
Editor tabs
Exclusive Region options
- F -
Fast Search for Lost Partitions
File Already Exists
File Information (R-Studio Technician/T80+)
File mask options
File menu
File Systems settings
Default encoding for Ext2/Ext3/Ext4/UFS volumes
Default encoding for HFS volumes
File Type Signature Specification
File Types
Find options
Find/Mark options
Find/mark objects only in real paths, ignore links to folders
Finding Previous File Versions
Forensic Data Collection Audit Log
- H -
Hidden Attribute
- I -
Image options
Image type:
Byte to byte image to a physical disk
Compressed image (R-Drive Image compatible)
VMDK (VmWare Virtual Machine Disk)
- K -
Known File Types settings
- L -
Log settings
Maximum messages in the Event Log
- M -
Main settings
Reset all hidden notifications
Messages
Double-click a logical disk...
- N -
Nested and Non-Standard RAID Levels
- O -
Opening several disks/partitions in one tab
Opening Virtual Disks from the Files Panel
- P -
Panels
Panes
Properties tab
- Q -
- R -
Recover options
Condense successful restoration events:
Open local folder (folders) when done
Recover alternative data streams:
Recover real folders structure
Region options
Contact information and technical support
Installing R-Studio Agent Emergency Startup Media Creator
Starting a Computer with the R-Studio Agent Emergency Startup Disk
R-Studio Agent for Mac main panel
R-Studio Agent for Windows main panel
Contact Informaiton and Technical Support
Installing R-Studio Emergency Startup Media Creator
Properties and Text/Hexadecimal Viewer
Starting a Computer with the R-Studio Emergency Startup Disks
R-Studio Emergency Startup Media Creator
- S -
Scan options
Search options
Settings
Shortcut menu
Smart drive copy
Copy all partitions onto original places
Expand/Shrink partition to whole disk
Smart partition copy
Startup Media Troubleshooting Options
Symbolic Links
Don't show symbolic links by default (Technician version)
Recovery as it is (Technician version)
Show folder symbolic links as links to their targets, without target content (Technician version)
Symbolic links display settings
Symbolic links recovery options
Syntaxis of a Description File for RAID Configurations
- T -
Tabs
Technical Information and Troubleshooting
Tools menu
- U -
- V -
Various Disk and Volume Managers
View menu
Volume Sets, Stripe Sets, and Mirrors
- W -
Window
Working with RAID 6 Presets
Runtime Imaging
Runtime imaging is image creation for a drive object performed simultaneously with other data read operations from this drive. When R‑Studio for Linux reads data from a certain area of the source (a drive, partition , or region), it writes the data to the target which can be either a dedicated drive or an image file. When the data from this area is needed again, R‑Studio for Linux reads it from the target rather than the source thus reducing access to the source. This is very important for faulty or unstable drives which health may be constantly deteriorating during data recovery operations.
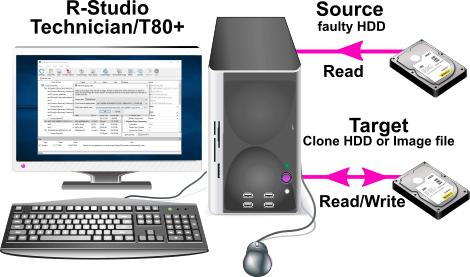
R‑Studio for Linux also creates a sector map file during runtime imaging.
To start runtime imaging of an object,
using a plain image file
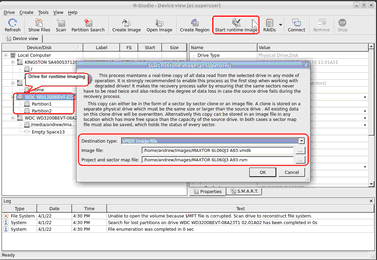
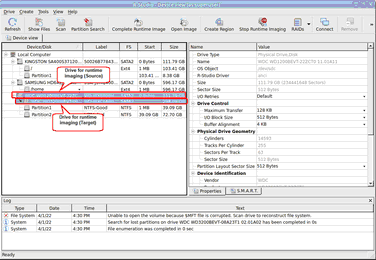
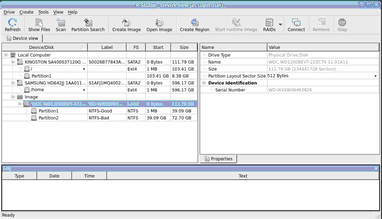
| 1 | Select a drive object on the R‑Studio for Linux 's Drives panel and click the Set Runtime Image button, |
or right-click the object and select Set Runtime Image on the context menu.
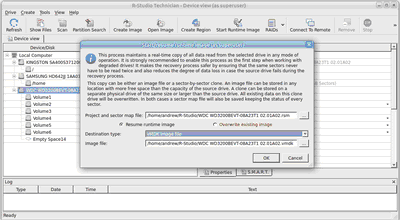
Select Plain or another image type in the Image type field, specify the file name and path for the image and sector map files, and click the OK button. Don't select the VMDK image file unless you can disable writing to the drive later. Cloning to a physical drive is not recommended because Windows can write some data to the drive corrupting the imaged data when the image has been completed and runtime imaging is over.
Plain image file requires immediate allocation of disk space equal to the object size, whereas VMDK image file is growing gradually upon imaging progress.
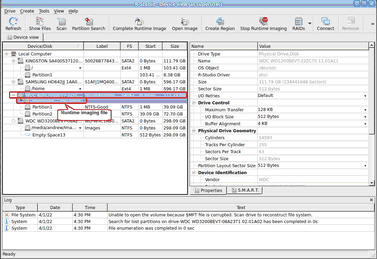
| > | R‑Studio for Linux will turn on runtime imaging. |
Select the object and click the Stop Runtime Imaging button or this item in the context menu turn runtime imaging off.
using a physical drive
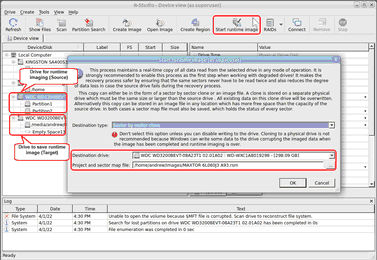
| 1 | Select a drive object on the R‑Studio for Linux 's Drives panel and click the Set Runtime Image button, |
or right-click the object and select Set Runtime Image on the context menu.
Select Physical drive in the Image type field, specify the name and path for the sector map file, and click the OK button.
Note: all data on the drive will be destroyed.
| > | R‑Studio for Linux will turn on runtime imaging. |
Select the object and click the Stop Runtime Imaging button or item in the context o menu turn runtime imaging off.
R‑Studio for Linux stores the information about runtime configurations and asks the users whether they want to keep runtime imaging or discard it during its startup.
and this configuration will appear in R‑Studio for Linux .
Completing Runtime Image
You may complete the runtime image without browsing through the entire file system on the disk.
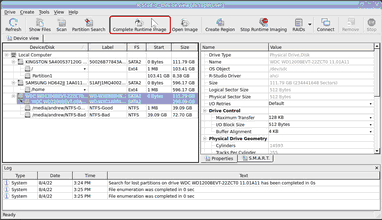
| 1 | Select the object being imaged and click the Complete Runtime Image button, |
or right-click the object and select Complete Runtime Image on the shortcut menu.
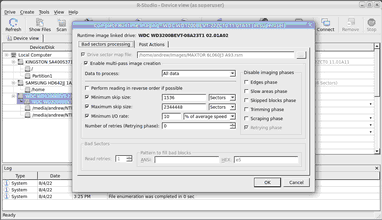
| > | The Complete Runtime Imaging dialog box will appear. |
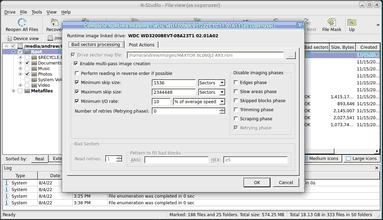
Select the necessary parameters of multi-pass imaging and select the OK button.
| > | R-Studio for Linux will complete the creation of the runtime image. |
If the runtime image has not been completed, you may resume it next time you start runtime imaging.
Creating runtime image for individual files
You may create a runtime image containing only individual files rather than all data on the disk.
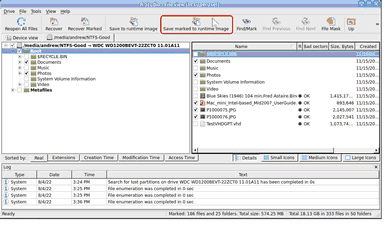
| 1 | Establish a runtime imaging for the disk with the files, open the disk, mark the files, and click the Save marked to runtime image button. |
or right-click on the right pane, and select Save Marked to Runtime Image on the shortcut menu.
| > | The Complete Runtime Imaging dialog box will appear. |
Select the necessary parameters of multi-pass imaging and select the OK button.
| > | R-Studio for Linux will complete the creation of the runtime image. You may Skip files with bad sectors if necessary. |
You may open such images as regular ones.
Such image contains information about the entire file system, but if a non-imaged file is opened, it'll contain only zeros.
- R-Studio Technician: activation using a USB stick
- Data Recovery Guide
- Why R-Studio?
- R-Studio for Forensic and Data Recovery Business
- R-STUDIO Review on TopTenReviews
- File Recovery Specifics for SSD devices
- How to recover data from NVMe devices
- Predicting Success of Common Data Recovery Cases
- Recovery of Overwritten Data
- Emergency File Recovery Using R-Studio Emergency
- RAID Recovery Presentation
- R-Studio: Data recovery from a non-functional computer
- File Recovery from a Computer that Won't Boot
- Clone Disks Before File Recovery
- HD Video Recovery from SD cards
- File Recovery from an Unbootable Mac Computer
- The best way to recover files from a Mac system disk
- Data Recovery from an Encrypted Linux Disk after a System Crash
- Data Recovery from Apple Disk Images (.DMG files)
- File Recovery after Re-installing Windows
- R-Studio: Data Recovery over Network
- How To Use R-Studio Corporate Package
- Data Recovery from a Re-Formatted NTFS Disk
- Data Recovery from an ReFS disk
- Data Recovery from a Re-Formatted exFAT/FAT Disk
- Data Recovery from an Erased HFS Disk
- Data Recovery from an Erased APFS Disk
- Data Recovery from a Re-Formatted Ext2/3/4FS Disk
- Data Recovery from an XFS Disk
- Data Recovery from a Simple NAS
- How to connect virtual RAID and LVM/LDM volumes to the operating system
- Specifics of File Recovery After a Quick Format
- Data Recovery After Partition Manager Crash
- File Recovery vs. File Repair
- Data Recovery from Virtual Machines
- How to Recover Files from a Remote Computer Using R-Studio Standalone License and Its Network Capabilities in Demo Mode
- How to Connect Disks to a Computer
- Emergency Data Recovery over Network
- Data Recovery over the Internet
- Creating a Custom Known File Type for R-Studio
- Finding RAID parameters
- Recovering Partitions on a Damaged Disk
- NAT and Firewall Traversal for Remote Data Recovery
- Data Recovery from an External Disk with a Damaged File System
- File Recovery Basics
- Default Parameters of Software Stripe Sets (RAID 0) in Mac OS X
- Data Recovery from Virtual Hard Disk (VHD/VHDX) Files
- Data Recovery from Various File Container Formats and Encrypted Disks
- Automatic RAID Parameter Detection
- IntelligentScan Data Recovery Technology
- Multi-pass imaging in R-Studio
- Runtime Imaging in R-Studio
- Linear Imaging vs Runtime Imaging vs Multi-Pass Imaging
- USB Stabilizer Tech for unstable USB devices
- Joint work of R-Studio and PC-3000 UDMA hardware
- Joint work of R-Studio and HDDSuperClone
- R-Studio T80+ - A Professional Data Recovery and Forensic Solution for Small Business and Individuals Just for 1 USD/day
- Backup Articles
- R-Drive Image Standalone and Corporate license transferring
- Fixing Windows update error 0x80070643 with R-Drive Image
- Backup with Confidence
- R-Drive Image as a free powerful partition manager
- Computer Recovery and System Restore
- Disk Cloning and Mass System Deployment
- Accessing Individual Files or Folders on a Backed Up Disk Image
- R-Drive Image startup / bootable version
- File Backup for Personal Computers and Laptops of Home and Self-Employed Users
- Creating a Data Consistent, Space Efficient Data Backup Plan for a Small Business Server
- How to Move the Already Installed Windows from an Old HDD to a New SSD Device and Create a Hybrid Data Storage System
- How to Move an Installed Windows to a Larger Disk
- How to Move a BitLocker-Encrypted System Disk to a New Storage Device
- How to backup and restore disks on Linux and Mac computers using R-Drive Image
- R-Drive Image and Virtual Machines
- Undelete Articles
- Get Deleted Files Back
- Free Recovery from SD and Memory cards
- R-Undelete: Video Recovery
- Recovery from an External Device with a Damaged File System
- File recovery from a non-functional computer
- Free File Recovery from an Android Phone Memory Card
- Free Photo and Video File Recovery Tutorial
- Easy file recovery in three steps

