- PRODUCTSFREEWAREFOR COMMERCIAL USEFOR PERSONAL AND BUSINESS USEBackup and System Restore:PC Privacy and Security:
- BUY ONLINE
- DISTRIBUTION


-
Multi-pass imaging in R-Studio


R-Studio Technician versions can perform three types of object imaging:
- Linear imaging (from the drive beginning to its end)
- Runtime imaging (drive imaging in parallel with other drive operations)
- Multi-pass imaging (performing drive imaging through several passes)
Their comparison chart can be reviewed in our article, Linear Imaging vs Runtime Imaging vs Multi-pass imaging.
Conventional drive imaging programs read a drive sequentially from the beginning to the end by sector blocks, or groups of consecutive drive sectors, that are read in one go. When they encounter areas with bad or slow sectors, they still try to read them entirely. That may lead to a complete loss of data from such blocks, or cause the program to switch to reading individual sectors - thus greatly reducing reading speed. Moreover, the program may eventually get stuck into areas while reading those bad sectors again and again, though such intensive reading from bad sectors may severely damage the drive surface, its heads, and other drive mechanics. As a result, the drive may die before the program starts reading data from the good parts of the drive.
Instead, a program using multi-pass imaging tries to extract data from drive's good parts first, ultimately leaving the bad and slow areas for later. Shortly thereafter, when it comes to a bad or slow sector block, it drops it and jumps to another area until it finds a block with no bad or slow sectors. It then continues reading data until it runs into another bad or slow block, where the process repeats. When the good areas have been read, the program starts reading data from slow and bad sectors. This approach maximizes the amount of data that can be recovered from a failing drive.
R-Studio can perform multi-pass imaging in its Technician and T80+ versions. Moreover, multi-pass imaging can be used together with special data recovery hardware like DeepSpar USB Stabilizer, which greatly increases chances for successful data recovery - even from drives in very poor hardware condition.
The multi-pass imaging implemented in R-Studio consists of four phases:
PHASE 1. Copying good data from the drive.
R-Studio reads data from the drive by sector blocks in this phase. The phase is performed in several steps.
Step 1. R-Studio reads data from the drive until it runs into a block with at least one bad sector. Then it skips a certain number of sectors and tries to read data at the new position. If it runs into another block with a bad sector, it increases the number of sectors to skip and repeats the process until it finds a block with no bad sectors. Then R-Studio continues reading the data until it runs into another block with a bad sector.

Click image to enlarge
R-Studio processes slow sectors in the same way.
When this step is completed, R-Studio has read data from most good areas and found the front blocks (edges) of bad and slow sector areas.
Step 2. R-Studio finds the rear edges of bad sector areas. It reads the skipped area from its rear, working backwards until it runs into a block with a bad sector. Then, R-Studio jumps to another bad sector area and the process is repeated until all bad sector areas have been processed.

Click image to enlarge
When this step is completed, R-Studio has read data from some good areas and detected the front and rear blocks (or edges) of all bad sector areas.
In the next two steps, R-Studio processes slow sector areas without checking read speed against minimum I/O rate.
Step 3. R-Studio reads data from slow sector areas. It does this similarly to the process for bad sector areas.
It reads a slow sector area by blocks until it runs into a block with a bad sector. Then it skips a certain number of sectors, and so on, until it finds a block without bad sectors. It then continues reading data until it runs into another block with bad sector, and the process is repeated until all slow sector areas have been processed.

Click image to enlarge
Once this step is completed, R-Studio has effectively read data from all slow sector areas and detected the front blocks, or edges, of all bad sector areas within slow sector areas.
Step 4.. R-Studio finds the rear edges of bad sector areas in slow sector areas. It reads the skipped area from its end, working backwards until it runs into a block with a bad sector. Then, R-Studio jumps to another bad sector area and the process is going on until all bad sector areas have been processed.

Click image to enlarge
Once this step is completed, R-Studio has read some new data from slow areas and detected the front and rear blocks, or edges, of all bad sector areas within slow sector areas.
Step 5.. R-Studio tries to read all skipped sector blocks. This is done without skipping bad sector blocks and checking read speed against minimum I/O rate.
When Phase 1 is completed, R-Studio has read most of the readable data and detected front and rear edges of all bad sector areas.
In the upcoming phases, R-Studio tries to read the rest of data and does that sector by sector rather than by sector blocks.
PHASE 2. Trimming.
R-Studio detects the front and rear sectors of bad sector areas in this phase. It reads the front block of a bad sector area by sectors until it runs into a bad sector. Then it reads the rear block of the bad sector area and works backwards until it runs into a bad sector.
![]()
Click image to enlarge
When this phase is completed, R-Studio has read some new data from bad sector areas and detected the front and rear sectors of all bad sector areas.
PHASE 3. Scraping.
R-Studio tries to read data from bad sector areas sector by sector in this phase. There may be good or bad sectors in these areas.

Click image to enlarge
When this phase is completed, R-Studio has read all readable data from the entire drive.
PHASE 4. Retrying (optional).
R-Studio tries to read data from bad sectors through several attempts in this phase.
You may control parameters of multi-pass imaging on the Bad sector processing tab of the Create Image dialog box.
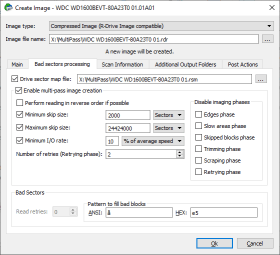
Click image to enlarge
| Image filename | Specifies the name and path for the image file |
| Image type: |
Compressed image (R-Drive Image compatible): If this option is selected, R-Studio will create an image file which can be compressed, split into several parts, and password-protected. This image file is fully compatible with the images created by R-Drive Image, but incompatible with previous versions of R-Studio. Byte-by-byte image: If this option is selected, R-Studio will create a simple exact copy of the object. VMDK (VMware Virtual Machine Disk) image: If this option is selected, R-Studio will create an image of the VMware virtual disk type. |
| Drive sector map file | A file with the sector map of the object to image. Optional for the RDI image type, mandatory for the byte-by-byte and VMDK image types. |
| Enable multi-pass image creation | Turns multi-pass imaging on and off. |
| Perform reading in reverse order if possible | Switches the direction of all phases/steps to reverse. |
| Minimum skip size | Minimum size of drive area to skip when a bad sector is encountered. |
| Number of retries (Retrying phase) | The number of read attempts in the Retrying phase. |
| Disable imaging phases | Multi-imaging phases that can be skipped. |
R-Studio shows multi-pass imaging progress and the statistics of multi-pass imaging during the process.

Click image to enlarge
Conclusions:
Multi-pass imaging is a very powerful tool for creating images of failing hard drives. In addition to extracting more good data from the drive, it also minimizes wear and tear of drive hardware - greatly reducing chances for the drive to completely fail during the process of its imaging. R-Studio implements in the most advanced way, ultimately providing a very flexible adjustment for all necessary imaging parameters.
- R-Studio Technician: activation using a USB stick
- Data Recovery Guide
- Why R-Studio?
- R-Studio for Forensic and Data Recovery Business
- R-STUDIO Review on TopTenReviews
- File Recovery Specifics for SSD devices
- How to recover data from NVMe devices
- Predicting Success of Common Data Recovery Cases
- Recovery of Overwritten Data
- Emergency File Recovery Using R-Studio Emergency
- RAID Recovery Presentation
- R-Studio: Data recovery from a non-functional computer
- File Recovery from a Computer that Won't Boot
- Clone Disks Before File Recovery
- HD Video Recovery from SD cards
- File Recovery from an Unbootable Mac Computer
- The best way to recover files from a Mac system disk
- Data Recovery from an Encrypted Linux Disk after a System Crash
- Data Recovery from Apple Disk Images (.DMG files)
- File Recovery after Re-installing Windows
- R-Studio: Data Recovery over Network
- How To Use R-Studio Corporate Package
- Data Recovery from a Re-Formatted NTFS Disk
- Data Recovery from an ReFS disk
- Data Recovery from a Re-Formatted exFAT/FAT Disk
- Data Recovery from an Erased HFS Disk
- Data Recovery from an Erased APFS Disk
- Data Recovery from a Re-Formatted Ext2/3/4FS Disk
- Data Recovery from an XFS Disk
- Data Recovery from a Simple NAS
- How to connect virtual RAID and LVM/LDM volumes to the operating system
- Specifics of File Recovery After a Quick Format
- Data Recovery After Partition Manager Crash
- File Recovery vs. File Repair
- Data Recovery from Virtual Machines
- How to Recover Files from a Remote Computer Using R-Studio Standalone License and Its Network Capabilities in Demo Mode
- How to Connect Disks to a Computer
- Emergency Data Recovery over Network
- Data Recovery over the Internet
- Creating a Custom Known File Type for R-Studio
- Finding RAID parameters
- Recovering Partitions on a Damaged Disk
- NAT and Firewall Traversal for Remote Data Recovery
- Data Recovery from an External Disk with a Damaged File System
- File Recovery Basics
- Default Parameters of Software Stripe Sets (RAID 0) in Mac OS X
- Data Recovery from Virtual Hard Disk (VHD/VHDX) Files
- Data Recovery from Various File Container Formats and Encrypted Disks
- Automatic RAID Parameter Detection
- IntelligentScan Data Recovery Technology
- Multi-pass imaging in R-Studio
- Runtime Imaging in R-Studio
- Linear Imaging vs Runtime Imaging vs Multi-Pass Imaging
- USB Stabilizer Tech for unstable USB devices
- Joint work of R-Studio and PC-3000 UDMA hardware
- Joint work of R-Studio and HDDSuperClone
- R-Studio T80+ - A Professional Data Recovery and Forensic Solution for Small Business and Individuals Just for 1 USD/day
- Backup Articles
- R-Drive Image Standalone and Corporate license transferring
- Fixing Windows update error 0x80070643 with R-Drive Image
- Backup with Confidence
- R-Drive Image as a free powerful partition manager
- Computer Recovery and System Restore
- Disk Cloning and Mass System Deployment
- Accessing Individual Files or Folders on a Backed Up Disk Image
- R-Drive Image startup / bootable version
- File Backup for Personal Computers and Laptops of Home and Self-Employed Users
- Creating a Data Consistent, Space Efficient Data Backup Plan for a Small Business Server
- How to Move the Already Installed Windows from an Old HDD to a New SSD Device and Create a Hybrid Data Storage System
- How to Move an Installed Windows to a Larger Disk
- How to Move a BitLocker-Encrypted System Disk to a New Storage Device
- How to backup and restore disks on Linux and Mac computers using R-Drive Image
- R-Drive Image and Virtual Machines
- Undelete Articles
- Get Deleted Files Back
- Free Recovery from SD and Memory cards
- R-Undelete: Video Recovery
- Recovery from an External Device with a Damaged File System
- File recovery from a non-functional computer
- Free File Recovery from an Android Phone Memory Card
- Free Photo and Video File Recovery Tutorial
- Easy file recovery in three steps
Rating: 4.8 / 5
R-TT may not be the easiest or most user-friendly solution, but the algorithm used for the renaming saved me THOUSAND of hours of opening ...