- PRODUCTSFREEWAREFOR COMMERCIAL USEFOR PERSONAL AND BUSINESS USEBackup and System Restore:PC Privacy and Security:
- BUY ONLINE
- DISTRIBUTION
-
Emergency Data Recovery over Network


R-Studio Emergency, included with all R-Studio license packages, is the top choice for emergency data recovery from an unbootable licensed computer you have physical access to. However, when you encounter an issue with a remote computer that cannot be booted and R-Studio Emergency cannot be directly run on the affected computer, you can consider using R-Studio Agent Emergency.
The R-Studio Agent Emergency license is included with all R-Studio licenses that have full network capabilities, such as the R-Studio Technician/T80+ and Corporate licenses. This article discusses using the more affordable R-Studio Corporate license to recover data from a remote computer that cannot be booted in a network environment of the software licensee.
* If you experience a similar issue with only an R-Studio Standalone license, please read our article How to Recover Files from a Remote Computer Using R-Studio Standalone License and Its Network Capabilities in Demo Mode, which might help you resolve the problem without needing to upgrade to a more expensive license.
The general concept of emergency data recovery over network is simple: You have the host computer (where R-Studio Corporate is running) and the remote computer (where the files to recover reside) on the same network. Start the remote computer with R-Studio Agent Emergency, establish a connection between them, and recover files as if R-Studio were running on the remote computer. You may learn more about this concept in our article Data Recovery over Network.
We'd also like to emphasize the platform-independence of this concept. You may run R-Studio Agent Emergency on any computer, provided that it's built on compatible hardware (Intel and PowerPC) and uses a supported file system (FAT12, FAT16, FAT32, NTFS, NTFS5, exFAT, Ext2/3/4FS, HFS, HFS+, HFSX, APFS, and UFS1, UFS2, UFS Big Endian). Windows, Linux, and Mac OS versions of R-Studio Corporate can be used to recover files over network.
In this article, we present step-by-step instructions for performing emergency network-based data recovery. To do so, we'll use the same computer we used in the article Emergency File Recovery Using R-Studio Emergency: a Windows 11 computer that cannot start due to an OS failure. The system disk has a BitLocker-encrypted file system, in relatively good condition, but the file system on the second disk is damaged beyond recognition. We will use a previously created backup file with the BitLocker Drive Encryption recovery key to unlock this file system.
We need to copy the user's files from the system disk and recover files from the second one. R-Studio Emergency Corporate will be used for this case, and recovered files will be saved to an external USB drive.
We also assume that your copy of R-Studio is properly registered and you have some basic knowledge of how to use R-Studio for data recovery. If necessary, you may consult its online documentation:
R-Studio online help
R-Studio downloadable manual
You may also join the discussion of emergency data recovery over network on our forum.
Important! If you believe that the hard drive in the computer is malfunctioning, use R-Studio Agent Emergency create an image of the hard drive. DO NOT ATTEMPT TO DO ANYTHING ELSE WITH IT BY YOURSELF! Don't try to run a scan or recovery procedure. Don't try using any other data recovery software. Remember, tampering with a drive in this condition will surely cause further damage to your files.
At best, you'll have to pay extra money to a professional data recovery service. At worst, you'll lose all your data for good. Bring the drive to qualified data recovery professionals. They have special equipment, software, and, most importantly, the required skills to work with such drives.
Moreover, it is a good practice to always create images and recover files from them, even if the hard drive and other hardware work normally. This keeps your data safe from accidental data corruption.
If no hardware problems are detected on the remote computer, we can proceed with the actual data recovery.
Preparation for Data Recovery
We'll need some additional materials for data recovery:
1. A host computer connected to the local network with R-Studio installed. We'll use it to create an R-Studio Agent Emergency startup disk and to control the data recovery process. It can be used to store scan info, disk images, and possibly recovered files. Below, we'll explain how.
2. A place on the remote computer to store recovered files and other information like scan info and disk images. We can use:
- A formatted USB flash drive. This is the best choice if its size is large enough to store all recovered files. This flash drive may be one where you have installed R-Studio Agent Emergency.
- An external USB hard drive formatted as FAT/exFAT, NTFS, or Ext2/3fs device.
Please note:
a. A FAT-formatted device cannot store files larger than 2 GB. If you need to store larger files, format the drive as exFAT.
b. An NTFS hard drive should be properly disconnected from a Windows computer through the Safely Remove Hardware icon on the tray menu rather than by simply unplugging it from the computer. If you haven't properly disconnected the USB drive, R-Studio Emergency will see it as a read-only disk. To correct the situation, you may connect the USB disk to a Windows computer and properly disconnect it using the Safely Remove Hardware icon in the system tray.
c. An Ext2/3fs hard drive requires some additional third-party drivers to read data on it if it's connected to a non-Linux computer, like a Windows or a Mac machine.
In our example, we'll use an external USB hard drive formatted as an NTFS volume.
And always remember the most important rule: NEVER TRY TO SAVE RECOVERED FILES/FOLDERS ON THE SAME LOGICAL DISK WHERE THEY RESIDE!!! Or you may obtain unpredictable results and lose all your data.
Creating R-Studio Agent Emergency Startup Disks
You may download the R-Studio Agent Emergency ISO Image for Macintosh, UNIX, Linux, and Windows users (Intel- or PowerPC-based) and create a startup USB disk using some ISO to USB software. Also, you can burn a DVD/CD disc if you have a DVD/CD burner.
Windows users can also download R-Studio Agent Emergency Startup Media Creator to install it and create a startup disk on FAT/FAT32-formatted removable media, most likely, a USB flash drive, or even a CD/DVD disc. The creation process is simple, and you may find detailed instructions in R-Studio help: Installing R-Studio Agent Emergency Startup Media Creator. The advantage of using the R-Studio Agent Emergency Startup Media Creator is that you only need to enter the registration code once during disk creation.
You may download the required files either from our Client Portal or from the download page.
Starting the Remote Computer Using R-Studio Agent Emergency Startup Devices
Before you start the remote computer with R-Studio Agent Emergency, check that:
- Secure boot is disabled. Secure boot is almost always enabled in computers running under Windows 10/11.
- the BIOS of the remote computer is configured to start the computer from the device that has R-Studio Agent Emergency installed. See the computer's documentation for details;
- an external USB disk is connected and turned on, if necessary.
To start the remote computer with R-Studio Agent Emergency,
1. Connect the R-Studio Agent Emergency Startup USB drive, and start the computer.
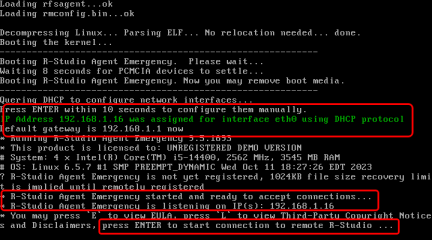
> R-Studio Agent Emergency will start and show its prompt.
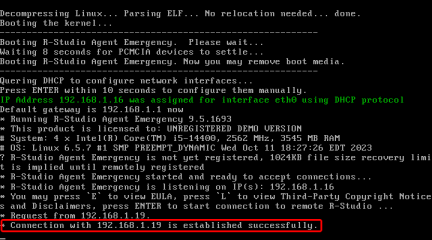
Then the program will start querying the network DHCP server for an IP address. If it acquires the address, it shows it on the screen.
Click image to enlarge
You may interrupt this process by pressing the Enter key and specify the IP address manually.
If R-Studio Agent Emergency can't automatically configure its network settings via DHCP, you will need to do it manually. Press Enter to set these settings.
Once the network setup on the remote computer is complete, R-Studio Agent Emergency will indicate that it is ready to accept connections from R-Studio.
Establishing a connection between R-Studio and R-Studio Agent Emergency
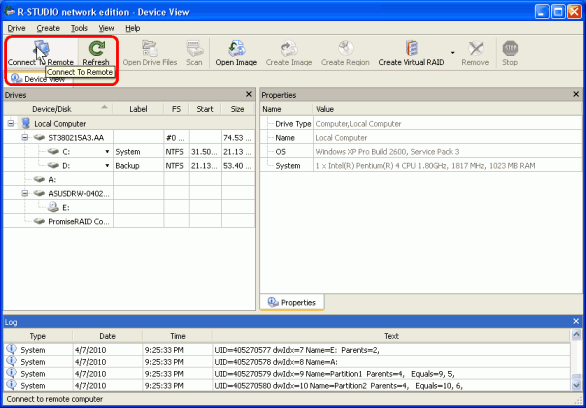
2. Click the Connect to Remote button or select Connect to Remote on the Drive menu.
Click image to enlarge
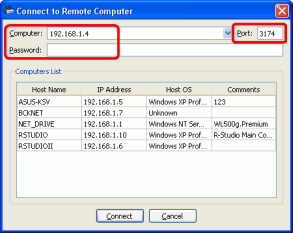
3. Enter the IP address of the remote computer in the Connect to Remote Computer dialog box. Leave the Password field blank and 3174 in the Port field.
Click image to enlarge
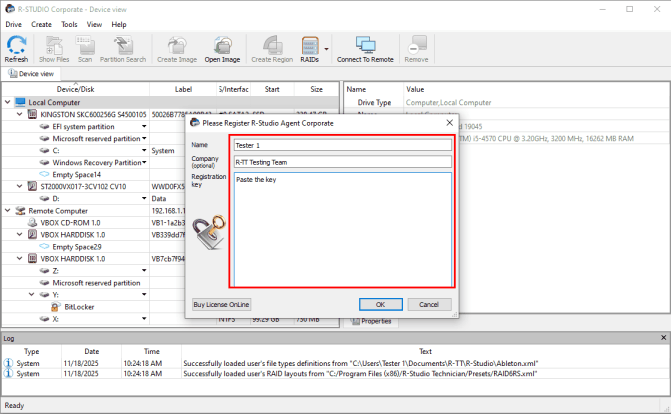
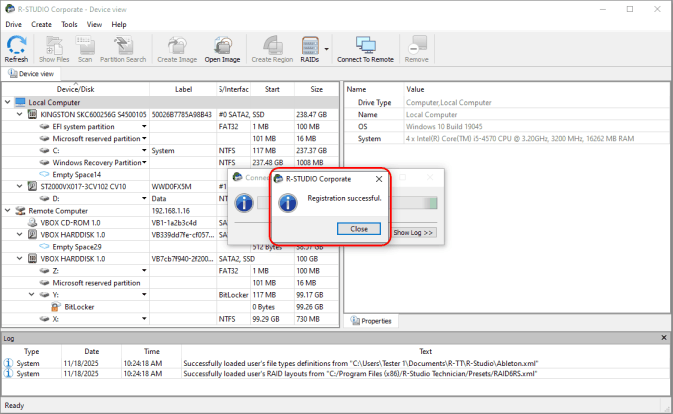
4. Register R-Studio Agent Emergency, if necessary, with a registration key for R-Studio Agent, not for R-Studio itself.
Click image to enlarge
Without registration, R-Studio will work in Demo mode in network recovery.
> Upon successful registration, R-Studio will send a special message and connect to the remote computer.
Click image to enlarge
R-Studio Agent Emergency will also show that it's connected with the host computer.
Click image to enlarge
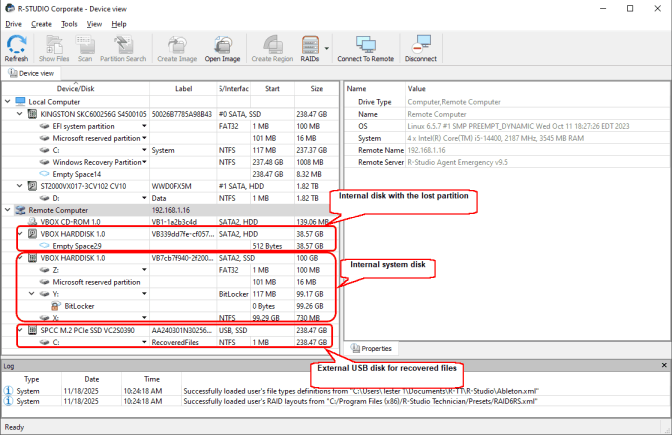
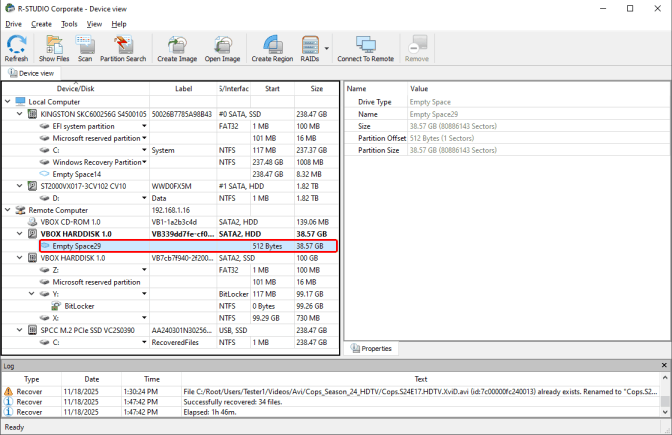
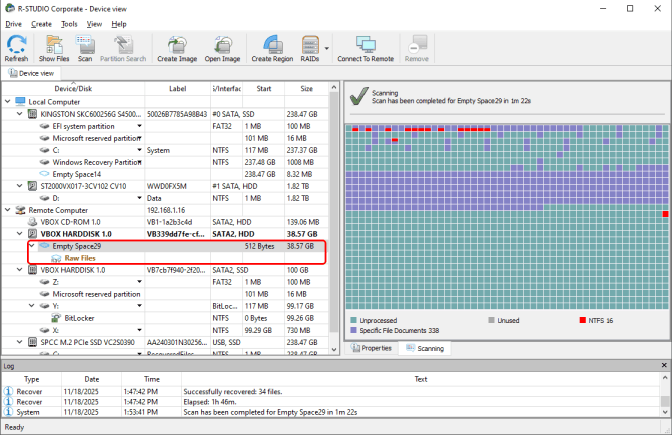
Inspecting the Damaged Computer
Looking at the panel, you may see the computer's hardware and estimate which data on the hard drive is damaged.
Click image to enlarge
There are two internal hard drives: one with a valid, BitLocker-encrypted file system, and the other is a lost partition shown as the Empty Space29 object.
File Recovery We need to perform two data recovery tasks:
1. Copy existing files from the system disk with an intact file system encrypted with BitLocker.
2. Recover files from a lost logical disk.
Copying files from the BitLocker-encrypted system disk
We start with recovering files from the encrypted system disk.
1. Double-click the BitLocker container and enter the proper recovery key.
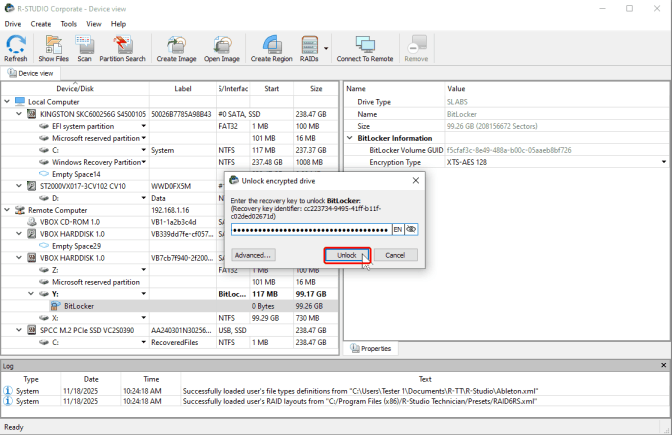
Click image to enlarge
> R-Studio will enumerate the files.

Click image to enlarge
and show the folder/file structure on this partition.
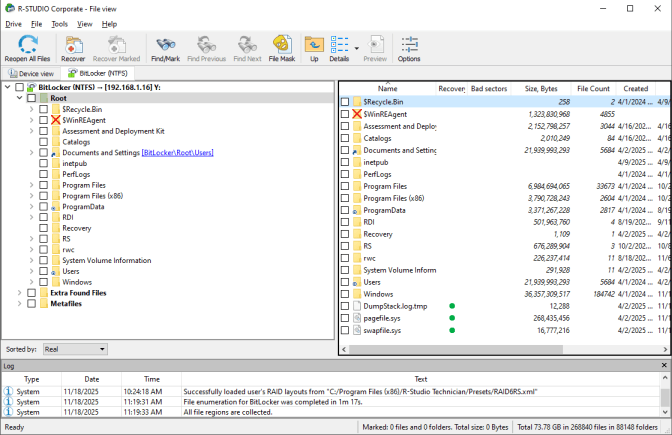
Click image to enlarge
You may sort files by type (extension) and time (Creation, Modification, Access), and search for individual or groups of files when necessary.
You may estimate the chances of recovering files using the powerful built-in previewer. You may do it either by double-clicking the selected file, whether it's a deleted or existing one,
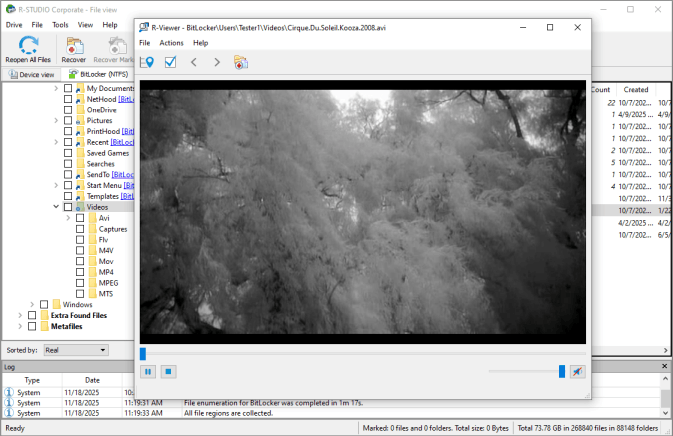
Click image to enlarge
or by switching to the icon view.
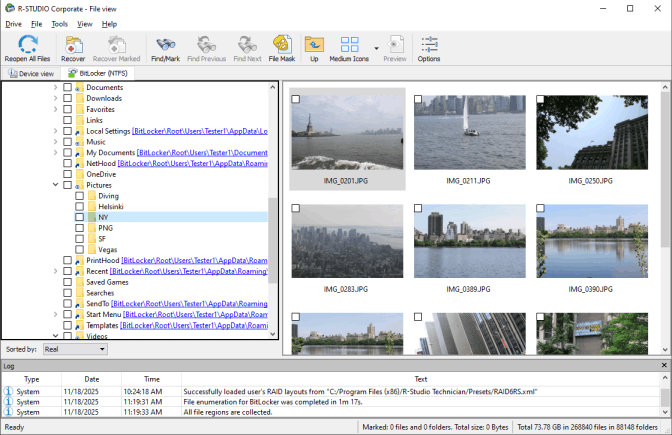
Click image to enlarge
2. If you've found all the files you want and they are satisfied with their previews, mark them for recovery,
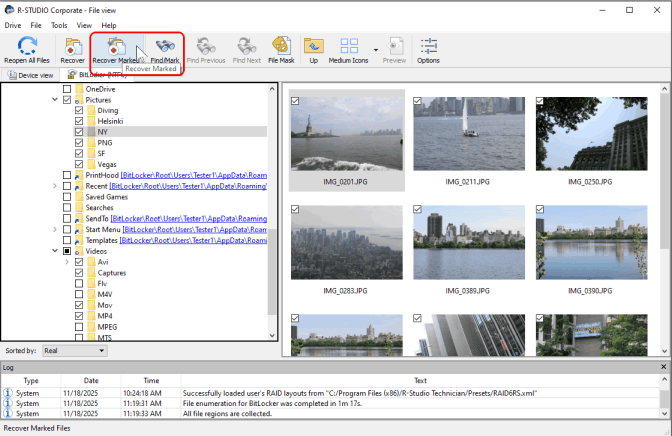
Click image to enlarge
then click the Recovery Marked button.
> The Recover dialog will appear.
Click image to enlarge
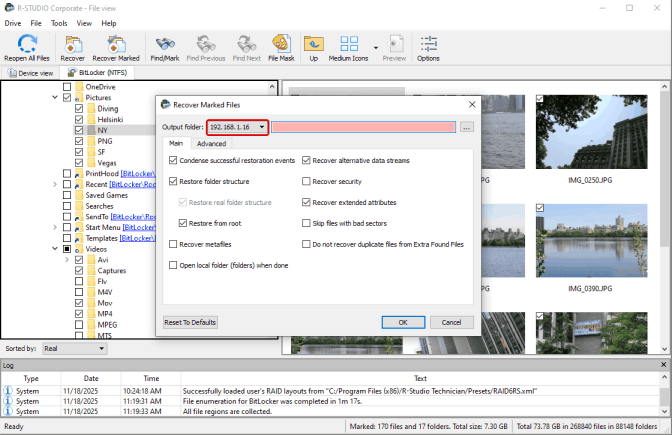
3. Specify the remote computer as a place to save the recovered files, the exact location on it,
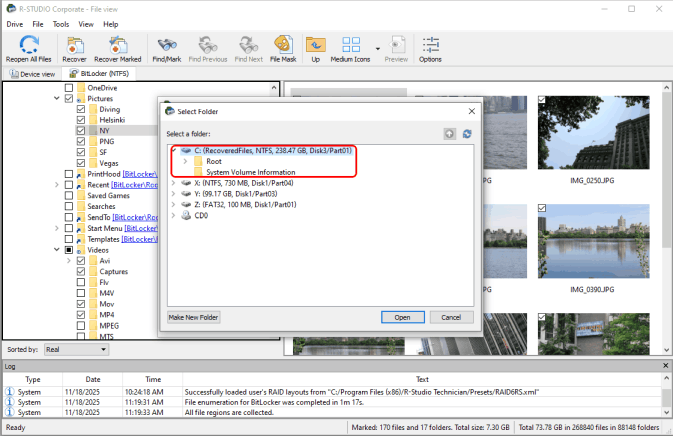
Click image to enlarge
and other recovery options,
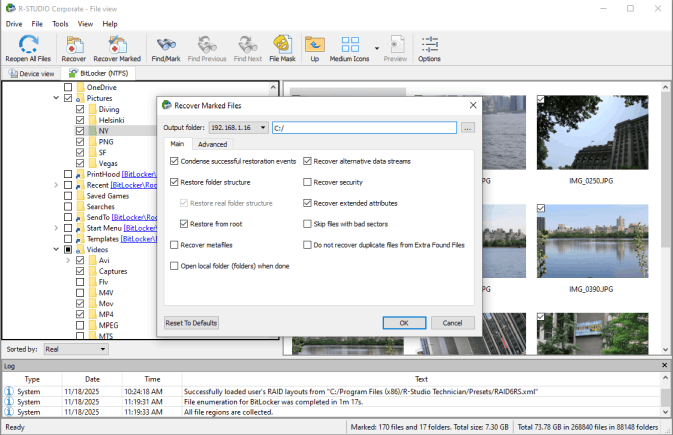
Click image to enlarge
then click OK.
You may find more information on these options in the R-Studio online help: Basic File Recovery.
> R-Studio will start recovering files and display its progress.
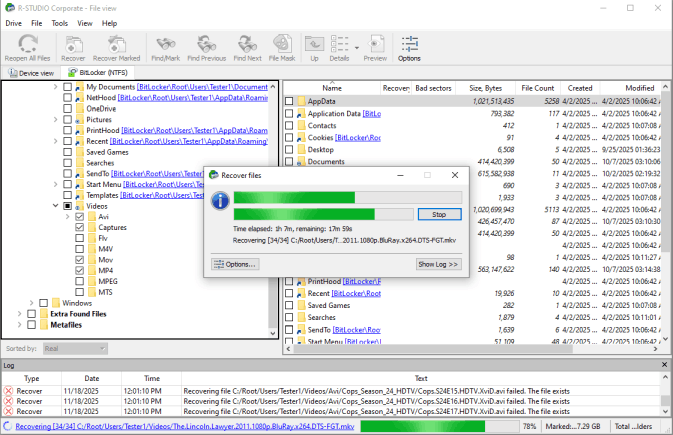
Click image to enlarge
When this process is over, R-Studio will show its results.
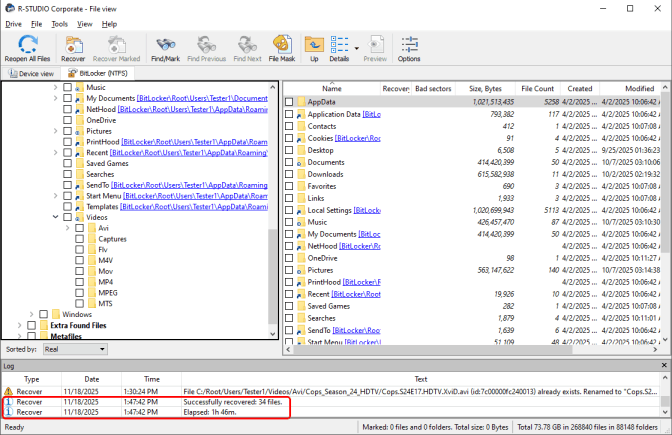
Click image to enlarge
File Recovery from the lost logical disk
Now we'll continue file recovery and recover files from the lost logical disk on the Empty Space29 object.
First, run R-Studio to scan the object and determine which information remains on the disk. When the scan is finished, R-Studio will display one or more recognized partitions, so you can choose the correct one and recover files from it, as described in the File Recovery from the BitLocker-encrypted system disk section. Sometimes, no recognized partitions are found, and R-Studio must rely solely on the raw files (Scan for Known File Types).
1. Select the Empty Space29 object and click the Scan button.
Click image to enlarge
>. The Scan dialog box will appear.
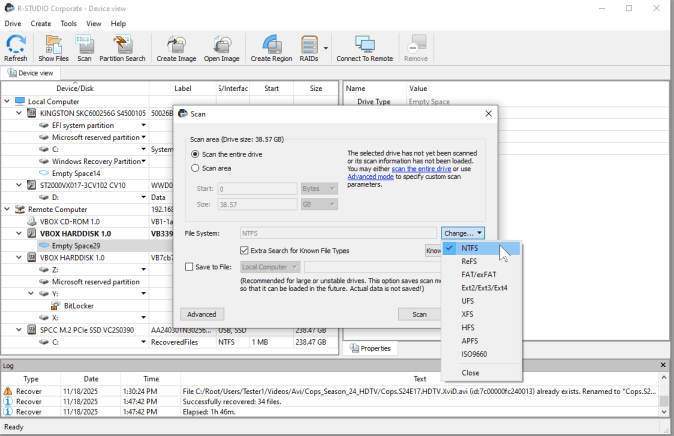
Click image to enlarge
2. Leave selected only the necessary file system, specify other parameters, and click the Scan button.
You may read more about the scan parameters in the R-Studio online help: Drive Scan.
> R-Studio will start scanning the object and display its progress.
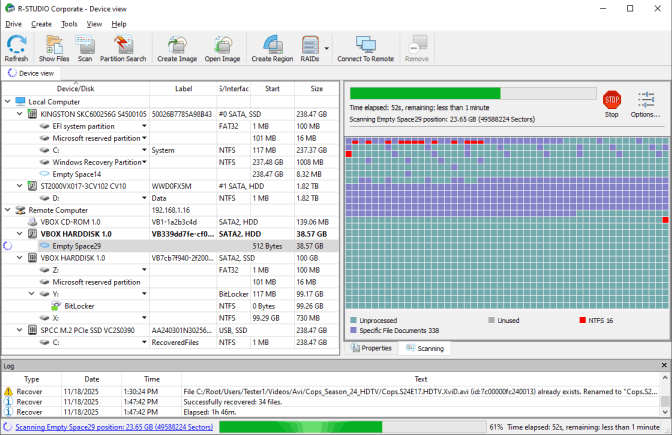
Click image to enlarge
Only Raw Files have been discovered after this scan.
Click image to enlarge
3. Double-click Raw Files, inspect the found files, and preview them if necessary.
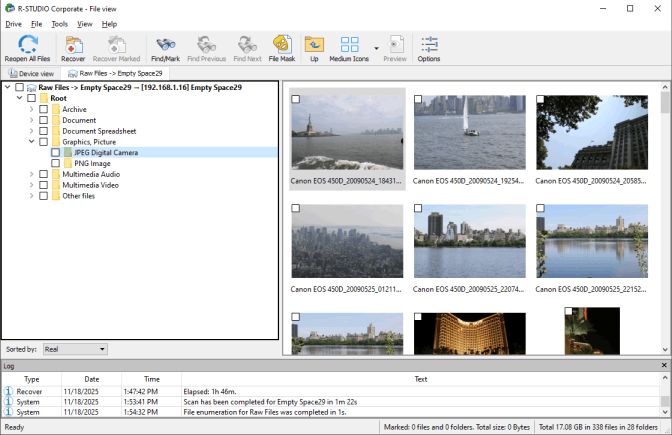
Click image to enlarge
4. Mark the files for recovery, then click the Recovery Marked button.
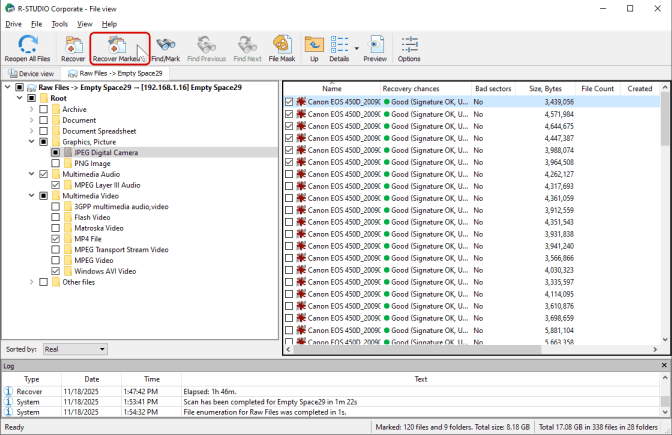
Click image to enlarge
> The Recover dialog will appear.
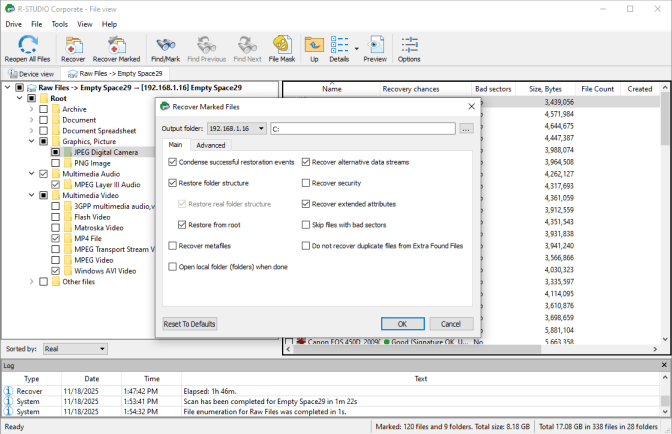
Click image to enlarge
5. Specify the recovery parameters, then click OK.
> R-Studio will start file recovery and display its progress.
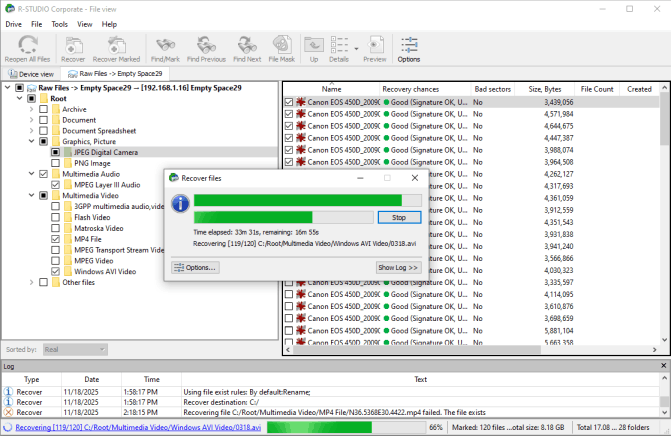
Click image to enlarge
When this process is over, R-Studio will show its results.
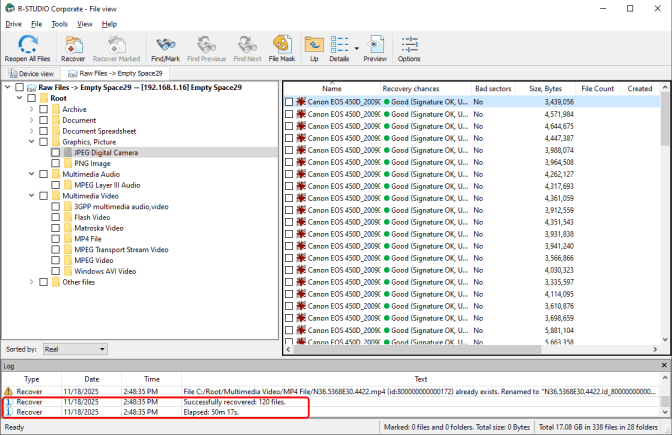
Click image to enlarge
Computer Shutdown
When you finish file recovery, remove the USB disk and turn your computer off manually.
- R-Studio Technician: activation using a USB stick
- Data Recovery Guide
- Why R-Studio?
- R-Studio for Forensic and Data Recovery Business
- R-STUDIO Review on TopTenReviews
- File Recovery Specifics for SSD devices
- How to recover data from NVMe devices
- Predicting Success of Common Data Recovery Cases
- Recovery of Overwritten Data
- Emergency File Recovery Using R-Studio Emergency
- RAID Recovery Presentation
- R-Studio: Data recovery from a non-functional computer
- File Recovery from a Computer that Won't Boot
- Clone Disks Before File Recovery
- HD Video Recovery from SD cards
- File Recovery from an Unbootable Mac Computer
- The best way to recover files from a Mac system disk
- Data Recovery from an Encrypted Linux Disk after a System Crash
- Data Recovery from Apple Disk Images (.DMG files)
- File Recovery after Re-installing Windows
- R-Studio: Data Recovery over Network
- How To Use R-Studio Corporate Package
- Data Recovery from a Re-Formatted NTFS Disk
- Data Recovery from an ReFS disk
- Data Recovery from a Re-Formatted exFAT/FAT Disk
- Data Recovery from an Erased HFS Disk
- Data Recovery from an Erased APFS Disk
- Data Recovery from a Re-Formatted Ext2/3/4FS Disk
- Data Recovery from an XFS Disk
- Data Recovery from a Simple NAS
- How to connect virtual RAID and LVM/LDM volumes to the operating system
- Specifics of File Recovery After a Quick Format
- Data Recovery After Partition Manager Crash
- File Recovery vs. File Repair
- Data Recovery from Virtual Machines
- How to Recover Files from a Remote Computer Using R-Studio Standalone License and Its Network Capabilities in Demo Mode
- How to Connect Disks to a Computer
- Emergency Data Recovery over Network
- Data Recovery over the Internet
- Creating a Custom Known File Type for R-Studio
- Finding RAID parameters
- Recovering Partitions on a Damaged Disk
- NAT and Firewall Traversal for Remote Data Recovery
- Data Recovery from an External Disk with a Damaged File System
- File Recovery Basics
- Default Parameters of Software Stripe Sets (RAID 0) in Mac OS X
- Data Recovery from Virtual Hard Disk (VHD/VHDX) Files
- Data Recovery from Various File Container Formats and Encrypted Disks
- Automatic RAID Parameter Detection
- IntelligentScan Data Recovery Technology
- Multi-pass imaging in R-Studio
- Runtime Imaging in R-Studio
- Linear Imaging vs Runtime Imaging vs Multi-Pass Imaging
- USB Stabilizer Tech for unstable USB devices
- Joint work of R-Studio and PC-3000 UDMA hardware
- Joint work of R-Studio and HDDSuperClone
- R-Studio T80+ - A Professional Data Recovery and Forensic Solution for Small Business and Individuals Just for 1 USD/day
- Backup Articles
- R-Drive Image Standalone and Corporate license transferring
- Fixing Windows update error 0x80070643 with R-Drive Image
- Backup with Confidence
- R-Drive Image as a free powerful partition manager
- Computer Recovery and System Restore
- Disk Cloning and Mass System Deployment
- Accessing Individual Files or Folders on a Backed Up Disk Image
- R-Drive Image startup / bootable version
- File Backup for Personal Computers and Laptops of Home and Self-Employed Users
- Creating a Data Consistent, Space Efficient Data Backup Plan for a Small Business Server
- How to Move the Already Installed Windows from an Old HDD to a New SSD Device and Create a Hybrid Data Storage System
- How to Move an Installed Windows to a Larger Disk
- How to Move a BitLocker-Encrypted System Disk to a New Storage Device
- How to backup and restore disks on Linux and Mac computers using R-Drive Image
- R-Drive Image and Virtual Machines
- Undelete Articles
- Get Deleted Files Back
- Free Recovery from SD and Memory cards
- R-Undelete: Video Recovery
- Recovery from an External Device with a Damaged File System
- File recovery from a non-functional computer
- Free File Recovery from an Android Phone Memory Card
- Free Photo and Video File Recovery Tutorial
- Easy file recovery in three steps
Rating: 4.8 / 5
R-TT may not be the easiest or most user-friendly solution, but the algorithm used for the renaming saved me THOUSAND of hours of opening ...