- PRODUCTSFREEWAREFOR COMMERCIAL USEFOR PERSONAL AND BUSINESS USEBackup and System Restore:PC Privacy and Security:
- BUY ONLINE
- DISTRIBUTION
-
How to connect virtual RAID and LVM/LDM volumes to the operating system


In this article we'd like to draw the attention of data recovery specialists to R-Studio Technician feature that allows to connect any virtual object that exists in its Device view panel to the operating system. This feature allows you to connect any virtual object that exists in its Device view panel to the operating system. That object can be a simple disk image, a virtual RAID, any volume created by supported logical volume managers, or any combinations thereof. Once connected, such objects appear in the operating system either as a read-only virtual physical disk or partition. Files on those disks / partitions become accessible to the operating system and to any program installed in the system
This option has two main purposes:
- Quite often the task isn't about recovering files from such object, but rather to browse through the folder structure, look at the files using their native applications, copy them to another place, and so on. For example, you have an image of an old disk and you need to copy several particular files that can be played back only by a specific application. Or you may need to find a certain video or music project. Instead of copying all such projects by R-Studio to another place, you can just browse through the image connected as a partition and find the needed project using its native application.
- Sometimes R-Studio Technician can successfully create a very complex virtual object that other data recovery program cannot. On the other hand, such objects may have file systems that R-Studio Technician doesn't currently support. In this case, R-Studio Technician can create that virtual object and connect it to the host operating system. Another data recovery program that supports that file system can be then used to actually recover the files.
Below, we'll show you how to connect such virtual objects created in R-Studio Technician to the host operating system and then to use another data recovery program to get access to the files on that object.
Test setup
For clearness and simplicity, we use a very simple virtual object layout in our example. In real cases, such an object may be very complex.
The test object is a RAID 1 (mirror) consisting of a linear (sequential) LVM2 volume of two 320 GB HDDs and a 500 GB HDD. It was created in Openmediavault; open-source NAS software.
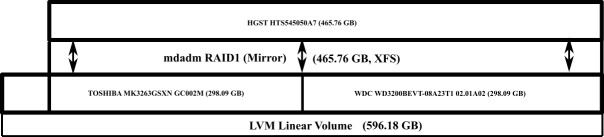
Virtual object layout
Click image to enlarge
The RAID was formatted as an XFS volume.
Next, the 500 GB HDD was removed from the layout leaving only the LVM volume available. The task is to get access to the files on this volume.
We will use Active@ UNERASER (Freeware) as an XFS-compatible data recovery program from other vendor. We chose it because of its simple interface and reliable performance. You may use any other data recovery software that you prefer.
Creating the virtual physical disk in the host operating system
1. Connect the two disks to the computer with installed R-Studio Technician, turn the computer on, and start R-Studio Technician.
We recommend you to use images rather than actual hard drives in real data recovery cases.
Upon its startup, R-Studio Technician will automatically assemble the LVM volume. However, it cannot access its files because it cannot recognize XFS volumes.
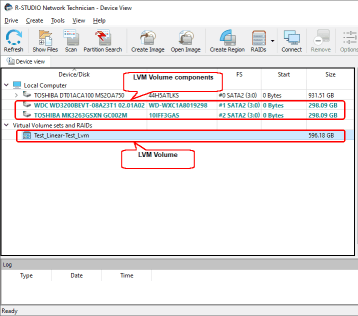
LVM volume assembled in R-Studio Technician
Click image to enlarge
Now we need to connect this LVM object to the system in order to make it accessible for other software that should be capable of processing XFS volumes.
2. Right-click the object and select Mount in the shortcut menu. The "Mount as a virtual drive" dialog box will appear.
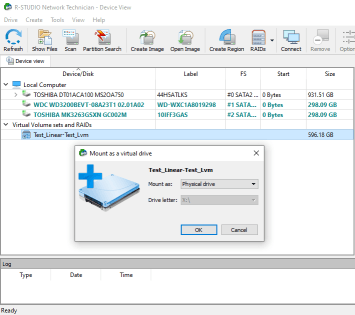
Connecting a virtual object to the system
Click image to enlarge
3. Select "Mount as: Physical drive" and click the OK button. You may also connect an object as a partition, if necessary. Read R-Studio Technician's online help to learn which option is more suitable for your case: R-Studio On-line Help documentation Connecting Virtual Objects to the System as Virtual Drives.
* The connected virtual object will appear as a separate object in the R-Studio Technician's Device view pane.
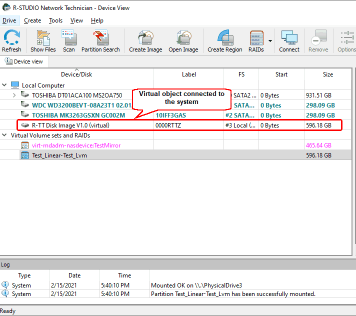
Virtual object connected to the system as a virtual physical disk
Click image to enlarge
This object will also appear on the Disk Management tab in Computer Management.
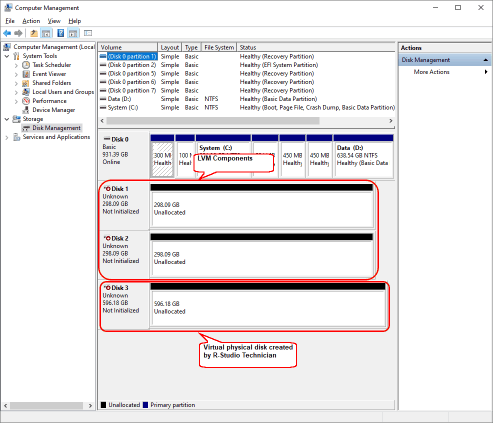
Virtual object created by R-Studio Technician
Click image to enlarge
Next, R-Studio Technician needs to be closed to prevent it from interfering with the work of other software that will access the connected objects. R-Studio Technician will show a warning message that some of its objects remain connected to the system.
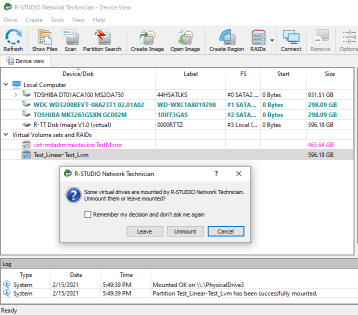
Objects that will remain connected after closure of R-Studio Technician.
Click image to enlarge
Gaining access to the files on the virtual physical disk
1. Start Active@ UNERASER and locate the virtual physical disk created by R-Studio Technician and the LVM object created by Active@ UNERASER itself.
Please note that Active@ UNERASER could not find any traces of the XFS partition in the LVM object it created.
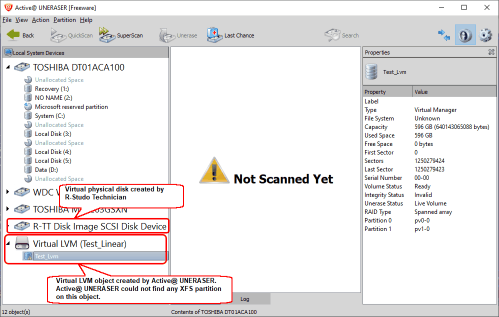
LVM objects in Active@ UNERASER
Click image to enlarge
On the contrary, Active@ UNERASER found some signs that there are possibly partitions on the virtual physical disk created by R-Studio Technician.
2. Click QuickScan Now
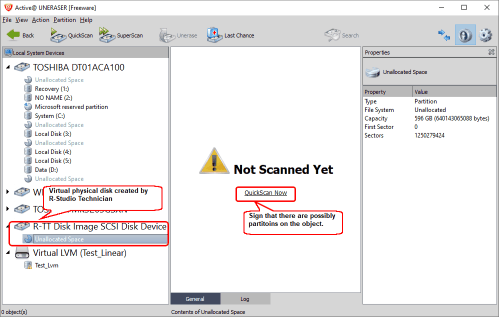
Virtual physical disk created by R-Studio Technician
Click image to enlarge
Now wait for QuickScan to complete.
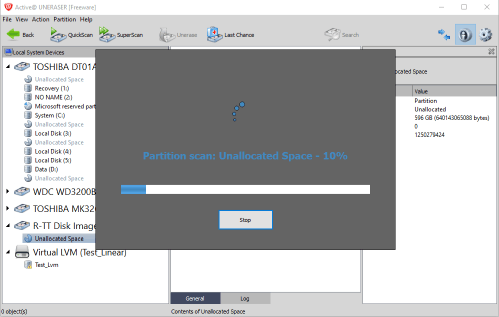
QuickScan progress
Click image to enlarge
By the way, QuickScan may not be always quick.
3. Locate the found XFS partition
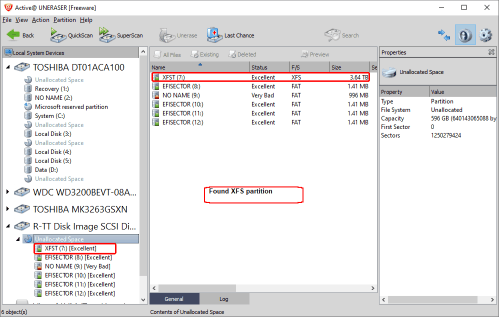
Found XFS partition
Click image to enlarge
4. Select the XFST partition and click "Scan Volume"
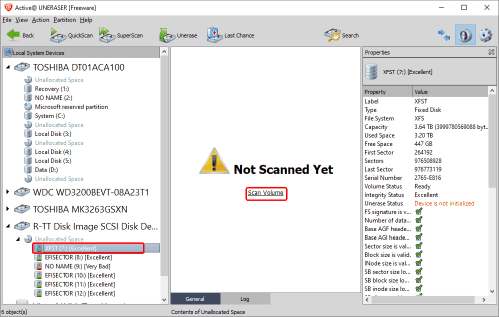
XFST partition
Click image to enlarge
* Active@ UNERASER will show folders and files found on the partition.
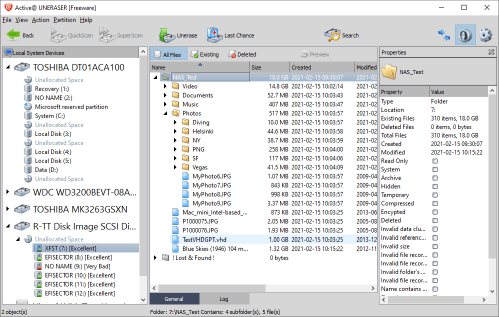
Files found on the partition
Click image to enlarge
We can browse through the folders and preview files by double-clicking them. This lets us ensure that the file system on the virtual physical disk created by R-Studio Technician is restored successfully.
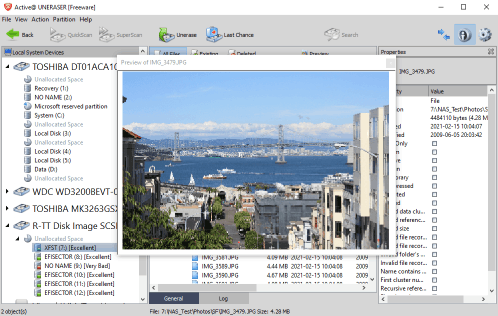
File preview
Click image to enlarge
You need to start R-Studio Technician again to disconnect the virtual physical disk. To do so, click the connected disk and select "Unmount" from the shortcut menu..
Conclusions
This article has shown that R-Studio can connect virtual objects it has created to the system and make them accessible to the system itself as well as other software, including alternative data recovery programs.
- R-Studio Technician: activation using a USB stick
- Data Recovery Guide
- Why R-Studio?
- R-Studio for Forensic and Data Recovery Business
- R-STUDIO Review on TopTenReviews
- File Recovery Specifics for SSD devices
- How to recover data from NVMe devices
- Predicting Success of Common Data Recovery Cases
- Recovery of Overwritten Data
- Emergency File Recovery Using R-Studio Emergency
- RAID Recovery Presentation
- R-Studio: Data recovery from a non-functional computer
- File Recovery from a Computer that Won't Boot
- Clone Disks Before File Recovery
- HD Video Recovery from SD cards
- File Recovery from an Unbootable Mac Computer
- The best way to recover files from a Mac system disk
- Data Recovery from an Encrypted Linux Disk after a System Crash
- Data Recovery from Apple Disk Images (.DMG files)
- File Recovery after Re-installing Windows
- R-Studio: Data Recovery over Network
- How To Use R-Studio Corporate Package
- Data Recovery from a Re-Formatted NTFS Disk
- Data Recovery from an ReFS disk
- Data Recovery from a Re-Formatted exFAT/FAT Disk
- Data Recovery from an Erased HFS Disk
- Data Recovery from an Erased APFS Disk
- Data Recovery from a Re-Formatted Ext2/3/4FS Disk
- Data Recovery from an XFS Disk
- Data Recovery from a Simple NAS
- How to connect virtual RAID and LVM/LDM volumes to the operating system
- Specifics of File Recovery After a Quick Format
- Data Recovery After Partition Manager Crash
- File Recovery vs. File Repair
- Data Recovery from Virtual Machines
- How to Recover Files from a Remote Computer Using R-Studio Standalone License and Its Network Capabilities in Demo Mode
- How to Connect Disks to a Computer
- Emergency Data Recovery over Network
- Data Recovery over the Internet
- Creating a Custom Known File Type for R-Studio
- Finding RAID parameters
- Recovering Partitions on a Damaged Disk
- NAT and Firewall Traversal for Remote Data Recovery
- Data Recovery from an External Disk with a Damaged File System
- File Recovery Basics
- Default Parameters of Software Stripe Sets (RAID 0) in Mac OS X
- Data Recovery from Virtual Hard Disk (VHD/VHDX) Files
- Data Recovery from Various File Container Formats and Encrypted Disks
- Automatic RAID Parameter Detection
- IntelligentScan Data Recovery Technology
- Multi-pass imaging in R-Studio
- Runtime Imaging in R-Studio
- Linear Imaging vs Runtime Imaging vs Multi-Pass Imaging
- USB Stabilizer Tech for unstable USB devices
- Joint work of R-Studio and PC-3000 UDMA hardware
- Joint work of R-Studio and HDDSuperClone
- R-Studio T80+ - A Professional Data Recovery and Forensic Solution for Small Business and Individuals Just for 1 USD/day
- Backup Articles
- R-Drive Image Standalone and Corporate license transferring
- Fixing Windows update error 0x80070643 with R-Drive Image
- Backup with Confidence
- R-Drive Image as a free powerful partition manager
- Computer Recovery and System Restore
- Disk Cloning and Mass System Deployment
- Accessing Individual Files or Folders on a Backed Up Disk Image
- R-Drive Image startup / bootable version
- File Backup for Personal Computers and Laptops of Home and Self-Employed Users
- Creating a Data Consistent, Space Efficient Data Backup Plan for a Small Business Server
- How to Move the Already Installed Windows from an Old HDD to a New SSD Device and Create a Hybrid Data Storage System
- How to Move an Installed Windows to a Larger Disk
- How to Move a BitLocker-Encrypted System Disk to a New Storage Device
- How to backup and restore disks on Linux and Mac computers using R-Drive Image
- R-Drive Image and Virtual Machines
- Undelete Articles
- Get Deleted Files Back
- Free Recovery from SD and Memory cards
- R-Undelete: Video Recovery
- Recovery from an External Device with a Damaged File System
- File recovery from a non-functional computer
- Free File Recovery from an Android Phone Memory Card
- Free Photo and Video File Recovery Tutorial
- Easy file recovery in three steps
Rating: 4.8 / 5
R-TT may not be the easiest or most user-friendly solution, but the algorithm used for the renaming saved me THOUSAND of hours of opening ...