- PRODUCTSFREEWAREFOR COMMERCIAL USEFOR PERSONAL AND BUSINESS USEBackup and System Restore:PC Privacy and Security:
- BUY ONLINE
- DISTRIBUTION
-
R-Studio Technician: Data Recovery over the Internet


Note: Data recovery over the Internet is available in the R-Studio Technician package only.
For data recovery technicians and technical support teams, time is money. Unfortunately, that doesn't just include the time you spend working on a customer's machine - it also includes the time you spend traveling back and forth to the company's office, which can be a huge inconvenience, especially if they are located on the other side of town (let alone the other side of the globe). Phone support doesn't usually work for complex tasks that take hours to complete, and shipping hard drives and computers via courier or post can be costly and risky in terms of data security.
For situations like disaster recovery of lost files, where hands-on access to the client's hard drive is a necessity for getting the job done right, the best way to deliver uncompromising, yet affordable data recovery services is via remote data recovery over the Internet. The R-Studio Technician package allows you to do this in a quick, economical and secure fashion.
The R-Studio Technician package allows you to connect directly to your client's machine and get full access to their hard drives, disks and partitions, including external media. On your end, you can easily perform the data recovery tasks that you would perform if you were physically sitting in front of their machine. On the customer's end, they have relatively little to do - all they need to do is run R-Studio Agent (which can be downloaded for free from the R-TT site and configure some basic network/firewall settings
Previously, remote assistance via the Internet was simply incompatible for data recovery operations due to the massive amount of data that needed to be analyzed and copied to a stable hard drive. Given the price of data transfers and the limitations of broadband Internet connections, disk copy for a 500 GB hard drive for file recovery could easily send you over budget on your ISP bill and bottleneck your Internet speeds for hours. But with R-Studio, all of the heavy processing is done locally on the customer's computer via R-Studio Agent. This innovation allows you to stay connected for hours, or even days, and recover data loss from very large hard drives without incurring exorbitant data costs.
In this article, we'll show you how data recovery over the Internet with R-Studio Technician works and prove to you that it can be done using a reasonable amount of bandwidth and transferring a minimal amount of data.
Before we startThe general concept of data recovery over network is described in our article R-Studio: Data Recovery over Network.
ConnectivityBecause of the way that routers, firewalls and NAT devices are set up on corporate networks, many of the computers in your office will not have public IP addresses. This is true for both the client computer (computer where data is being recovered) running R-Studio Agent and the host machine running R-Studio Agent. If either computer is behind a NAT device which assigns it a private IP address, the computers will not be able to "see" each other directly. You may read more about the background of these issues on our article: NAT and Firewall Traversing for Remote Data Recovery.
There are two ways for a computer to achieve unrestricted access to/from the Internet: (1) by temporarily forgoing a router/NAT device or firewall and connecting directly to the Internet with a public IP address or (2) by setting up port forwarding on your NAT device that opens the appropriate ports required by R-Studio.
There are four basic scenarios regarding public/private IP addresses, all but three of which have workarounds that allow you to connect via R-Studio and/or R-Studio Agent:
- Both the computers have unrestricted access to the Internet. If both the host and client computers are assigned public IP addresses or have the appropriate ports opened, then you can make a direct connection between R-Studio Technician and R-Studio Agent.

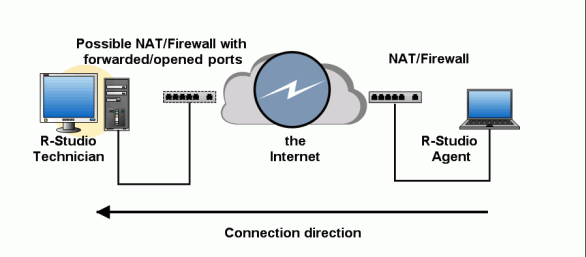
- R-Studio Technician has unrestricted access to the Internet, but R-Studio Agent is on a private network behind a NAT device. A connection can be made if it is initiated by R-Studio Agent. (See below for instructions on how to do this.)
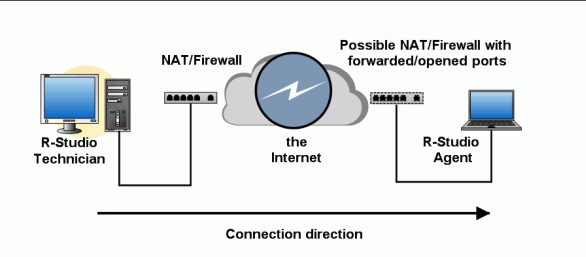
- R-Studio Technician is on a private network behind a NAT device, whereas R-Studio Agent has unrestricted access to/from the Internet. In this case, the connection can be made if it is initiated by R-Studio Technician.
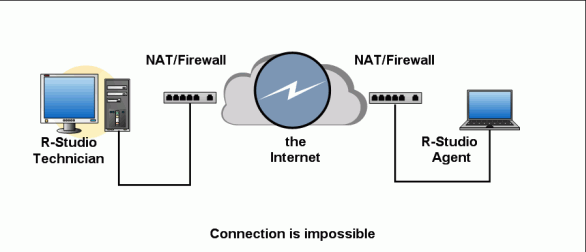
- Both R-Studio and R-Studio Agent are on private networks behind NAT/firewalls. In this case, no connection is possible. One of the computers must have unrestricted access to the Internet or enable port forwarding on their router/NAT device.
So, the general rule of thumb is that at least one of the computers must have unrestricted access to the Internet, either via a public IP or a port forwarded router, in order to establish a connection with R-Studio. If only one computer has such access, then the computer that has restricted connection must initiate the connection.
Bandwidth and Data TransferBecause data recovery typically consists of analysis, processing and copying of vast quantities of data (for example, a single hard drive can be up to 1 TB or more), it isn't economical nor efficient to actually transmit the contents of your disks via the Internet or a network. Not only will this extend the length of the process from hours to days, but it may also slow down your network and incur extra bandwidth charges from your Internet Service Provider. To avoid this issue, R-Studio handles remote data recovery in a way that minimizes the amount of data that is transferred over the Internet in two key ways:
- The actual data analysis is performed locally by R-Studio Agent. Only the pertinent results and metadata is actually sent back to the R-Studio Technician via the Internet or network. This represents the bulk of the processing demands.
- Recovered files can be saved to the storage devices (including external ones) that are on the computer where data is being recovered. Once again, there is no need to transfer the data to the R-Studio Technician's machine and then back to the customer.
In essence, R-Studio Agent/R-Studio Technician work in conjunction so that it is more like the technician was sitting in front of the machine where data was being recovered, rather than having the data copied to the host machine prior to processing.
Remote Data Recovery via the Internet - R-Studio Technician/R-Studio Agent Field TestTo give you a feel for how data recovery over the Internet using R-Studio works, we'll walk you through a data recovery scenario that we recently performed using the software. In this field test, we'll be using R-Studio to recover files from an existing logical disk and a deleted partition. We'll be opening the requisite ports on both machines and initiating the connection from the customer's computer using R-Studio Agent. Using R-Studio Technician, we'll be viewing data on the customer's computer without transferring inordinate amounts of data over the Internet. To prove this, we'll be tallying up an estimate of how much data is actually transferred throughout this process and keeping track of how long R-Studio and R-Studio Agent can stay connected.
This same procedure could be useful, say, if a data recovery company in San Francisco were offering remote assistance to a company that was located in Toronto. Let's say the Toronto-based customer has little to no experience in data recovery and network configuration and would rather not spend hours on the phone getting a crash course on hard disk recovery while following arduous step-by-step instructions dictated blindly by the technician in San Francisco. With R-Studio, the customer needs only install R-Studio Agent and add it as a Trusted Application. Thereafter, the R-Studio Technician user can recover data via the Internet without hopping a plane.
Field Test Network Configuration
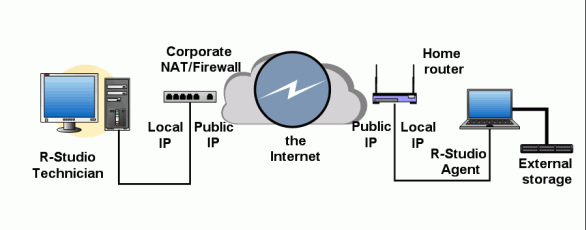
For our field test, we're using a typical network setup for both the technician and customer's computer. The technician's computer is on the company's corporate network, which is behind a firewall and a NAT device. The customer's machine is behind a home router. So, in this case, both computers have private IP addresses (recall from above that a direct connection is not possible in this scenario).
The computers are connected to the Internet through different ISPs. The R-Studio Technician machine is on an ADSL connection with a bandwidth of 7 Mbps down/700Kbps up. The R-Studio Agent (customer) computer is connected to the Internet via a cable modem with 3Mb/sec down and 1.5Mb/sec up. R-Studio Agent runs on a computer with 2.5MHz Celeron, 1GB of RAM, and 2 disks: 40GB and 1TB. The recovered files are to be saved to an external storage device which is a 2GB flash card.
Remember: the CPU/RAM processing power of the technician's computer is not important, since we'll be doing all the data analysis on the customer's computer.
(For security reasons, we'll conceal the actual IP addresses and DNS names of the R-Studio and R-Studio Agent computers used in this example.)
Settings on the corporate sideCorporate firewall
We need to open and forward ports on the corporate firewall and NAT device. The default port for incoming R-Studio connections is TCP 8080. If necessary, it can be changed on the Connect to remote dialog box when Wait connection from remote computer is selected.
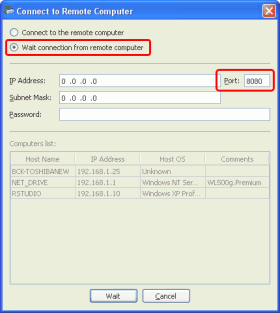
Click image to enlarge
This TCP port should be opened and forwarded to IP address 192.168.1.10 (the computer where R-Studio is running).
We can do that on the corporate firewall and NAT device:
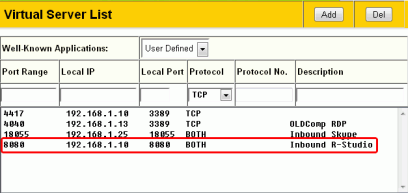
Click image to enlarge
If there is a personal firewall installed on the computer where R-Studio runs, it should be configured to allow the program to receive incoming connections. The easiest way to do that is to set R-Studio as a trusted application. We'll show how to do that for two firewalls as examples:
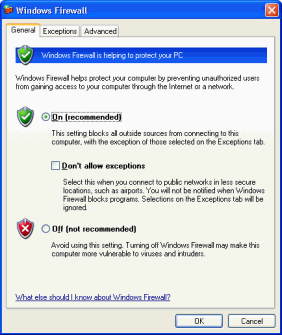
Built-in Windows firewall:
The Don't allow exceptions check box should be clear on its General tab to allow R-Studio be set as a trusted application.
Click image to enlarge
Click the Wait button on the Connect to remote dialog box when Wait connection from remote computer is selected, and the Windows Security Alert will appear.
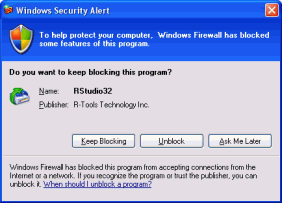
Click image to enlarge
Click the Unblock button, and Windows firewall will allow R-Studio to make incoming and outgoing connections.
Note: For the 64-bit version, the program name will be RStudio64.
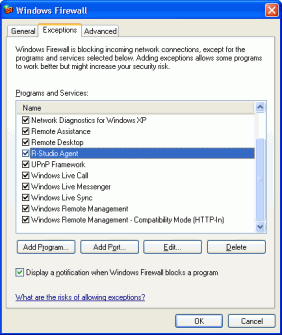
We can verify that Windows firewall allows R-Studio to make connections on its Exceptions tab.
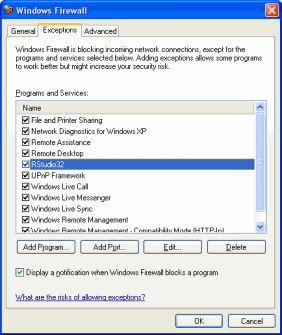
Click image to enlarge
Now R-Studio can accept incoming connections.
COMODO firewall
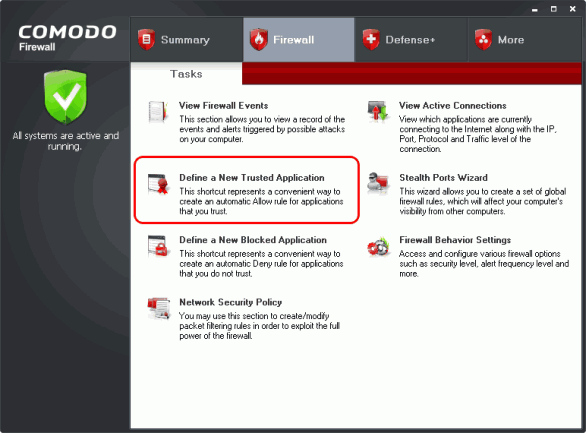
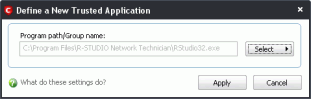
Check that R-Studio is running and start COMODO Control panel. Then go to the Firewall tab and click Define a New Trusted Application.
Click image to enlarge
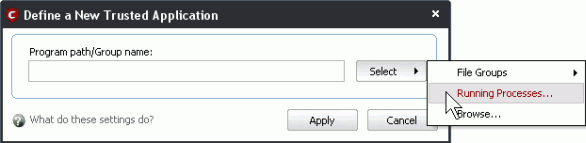
Click the Select button on the Define a New Trusted Application dialog box and select Running Processes...
Click image to enlarge
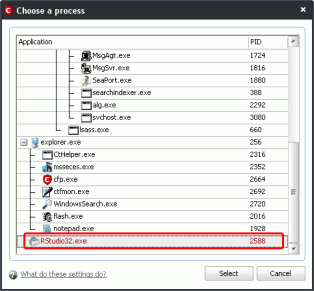
Select RStudio32.exe on the Choose a process dialog box and click the Select button.
Click image to enlarge
Note: For the 64-bit version, the program name will be RStudio64.
Then click Apply on the Define a New Trusted Application dialog box
Check that R-Studio is added to the trusted applications on the Application Rules tab of Network Security Policy.
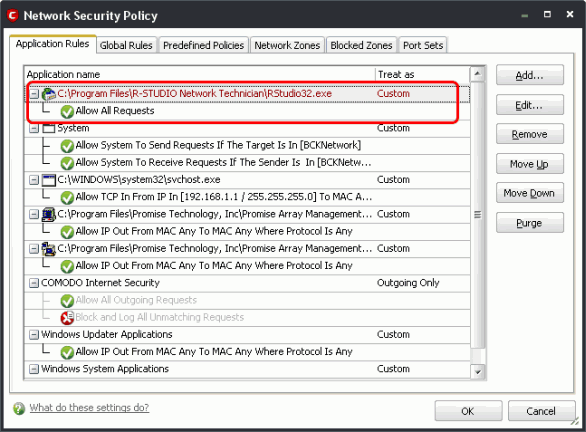
Click image to enlarge
Now R-Studio can accept incoming connections.
If someone has any security concerns about making R-Studio a trusted application, a personal firewall can be configured to allow R-Studio to make incoming connections to port TCP 8080 (or any other port specified).
Settings on the customer side.Although we try to minimize any customer activity, still there are some actions required from that part.
Home routerThere is no need to make any setting adjustment on the customer's home router.
R-Studio Agent PortableThe customer should be supplied with this program, either from the R-TT site (preferable), or directly from the company.
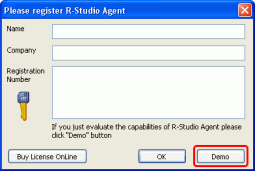
When R-Studio Agent starts for the first time, it displays a license agreement and requires registration. Click the Demo button. When R-Studio Agent connects to R-Studio, it will be automatically registered.
Click image to enlarge
If the Please configure R-Studio Agent dialog box appears, click the Cancel button.

Click image to enlarge
The best way for the customer is to temporally disable the firewall and all other anti-virus and other computer security software to allow R-Studio Agent to access disks freely. But if there are some security concerns from the customer, the personal firewall can be left running if it is properly configured.
The easiest way to allow R-Studio Agent to connect to R-Studio is to set it as a trusted application which can make any incoming and outgoing connections to any host. Later, when data recovery is over, those settings may be reverted.
Let's see how to do that on two personal firewalls as examples.
The built-in Windows firewallThe Don't allow exceptions check box should be clear on its General tab to allow R-Studio Agent be set as a trusted application.
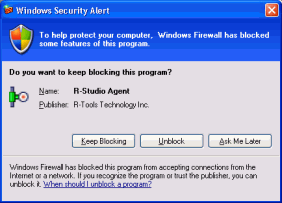
When R-Studio Agent starts, Windows firewall shows a security alert asking if you want to keep blocking it.
Click image to enlarge
Click the Unblock button, and Windows firewall will add R-Studio Agent to its list of applications that may connect to other hosts. It is possible to check that on the Exceptions tab of the Windows firewall settings.
Click image to enlarge
After those actions R-Studio Agent can connect to R-Studio.
When data recovery is over, the customer may remove R-Studio Agent from the Exceptions list.
The COMODO firewall
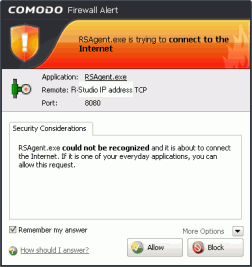
When we try to establish a connection to R-Studio, a COMODO alert appears.
Click image to enlarge
Select Remember my answer and click the Allow button. Now R-Studio Agent can establish a connection to R-Studio.
When data recovery is over, these settings may be removed on the Application Rules tab of Network Security Policy.
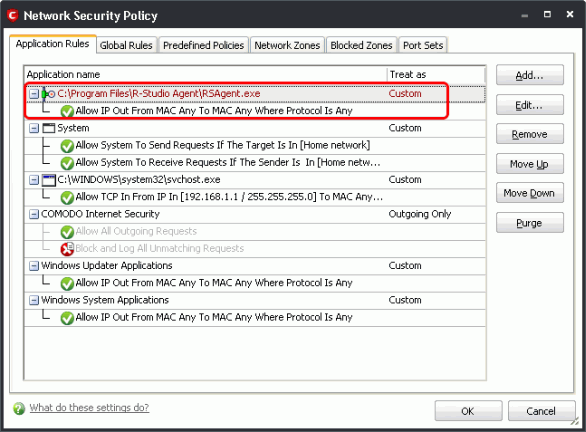
Click image to enlarge
Also, other programs that may affect R-Studio Agent performance should be stopped.
Initiating a Connection from R-Studio Agent
R-Studio should be waiting for an incoming connection.
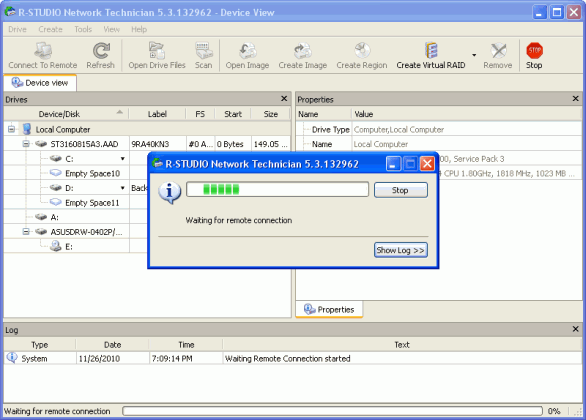
Click image to enlarge
(For an emergency data recovery, you need to start R-Studio Agent Emergency. Read our article Emergency Data Recovery over Network for details)
1. From the customer's computer, right-click the R-Studio Agent icon from the system tray.
Click image to enlarge
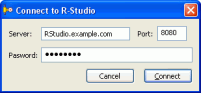
2. Type in the IP address or DNS name of the R-Studio computer. Be sure to include the same port specified on the R-Studio computer.
3. Type in the password (make sure it matches that entered above) and click Connect.
When the connection is successfully established, the disks of the customer's computer will show up in the R-Studio Drives panel on the R-Studio computer.
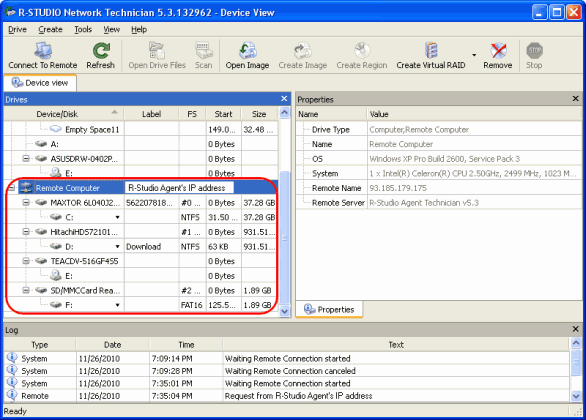
Click image to enlarge
Once the connection is established, we can perform the recovery tasks remotely.
Recovering Data from an Existing PartitionFirst, we'll recover deleted files from an existing logical disk.
1. Double click the disk where the deleted files resided. In this field test, we're using C:
Click image to enlarge
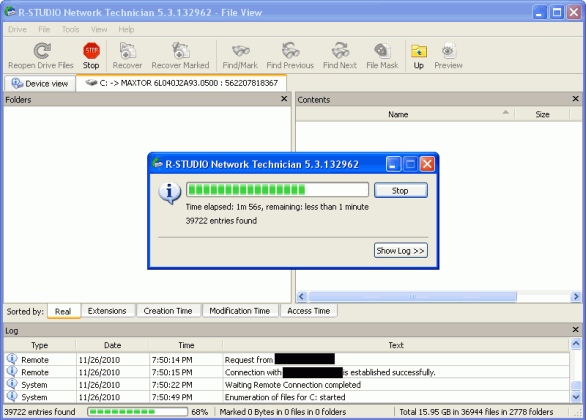
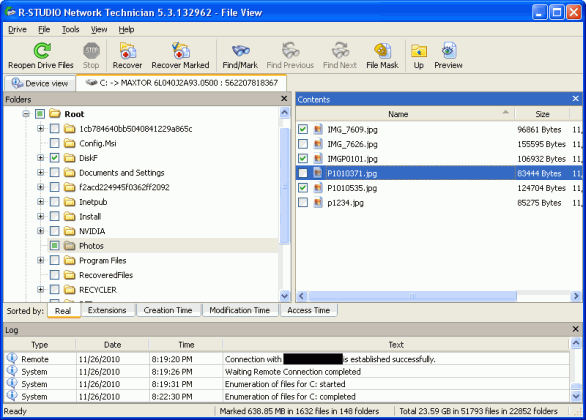
2. Wait for R-Studio to finish enumerating files. When it's finished, it'll show the folder/file structure of the selected disk (C:).
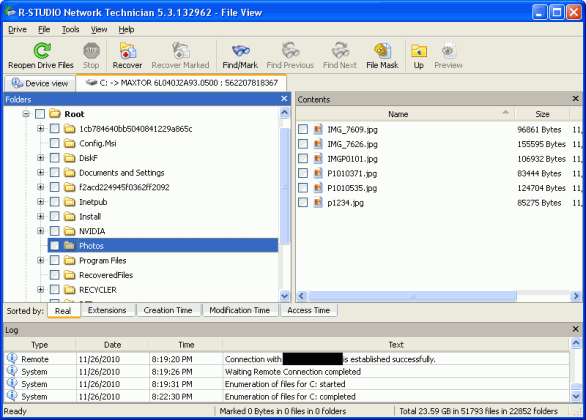
Click image to enlarge
3. Double-click a file to preview it. This will also let you estimate the chances for successful data recovery.
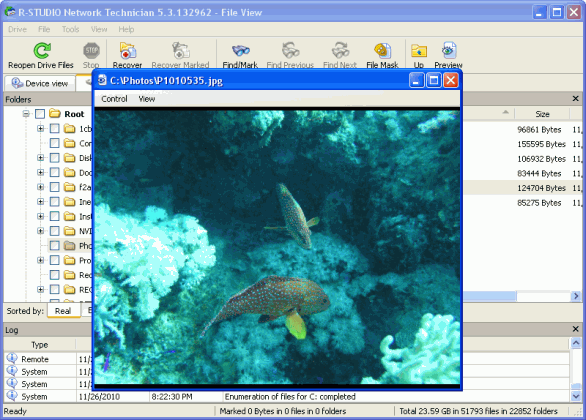
Click image to enlarge
4. Check the files that you'd like to attempt to recover and click Recover Marked.
Click image to enlarge
5. In the Recover dialog, choose the target where you'd like to save the recovered files. Remember: for bandwidth and data transfer reasons, it's much better to save the file on the remote computer (customer's computer). Choose Remote Computer to do so.
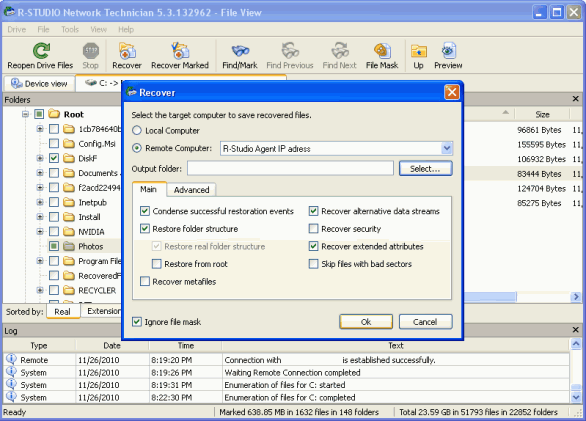
6. Click Select... to choose the output folder.
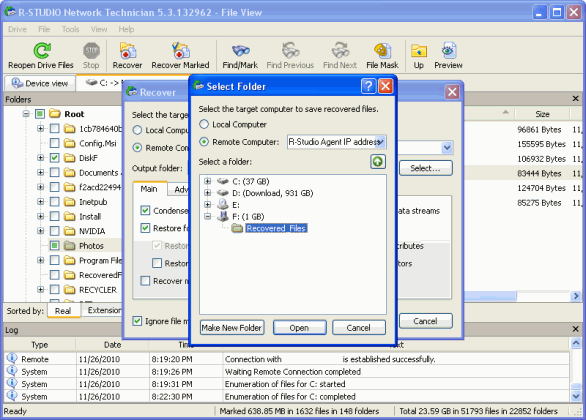
Click image to enlarge
7. Browse to the folder or disk you'd like to save the recovered files and click Open.
8. Choose whichever other parameters you'd like below and click OK.
Click image to enlarge
9. Wait for R-Studio to recover files.
Click image to enlarge
10. When data recovery is over, R-Studio will report the results in the log.
Click image to enlarge
Now, your recovered files are saved to the external storage.
Recovering Data from a Deleted PartitionIf the lost data you wish to recover is on a deleted partition, you may still be able to recover it by scanning the entire hard drive. In this field test, we'll be recovering lost images from a partition that was deleted from the first hard disk drive on the remote computer (MAXTOR, 37.2GB).
1. Right-click the hard drive where the deleted partition previously existed, and choose Scan.
Click image to enlarge
2. Choose the parameters for your hard disk scan and click Scan.
3. After the scan is complete, it will display the recognized partitions on the left. (In our test, this took 43 minutes to scan 40 GB hard drive.) Select the partition you'd like to recover (Recognized3 in our case). R-Studio will begin enumerating the files.

Click image to enlarge
4. Click Extensions to sort files according to file type. Because we are looking for image files, we'll select PNG Image and JPEG Image.
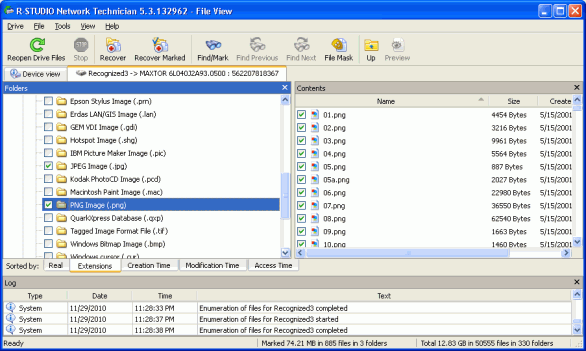
Click image to enlarge
5. Again, we can double-click a file to preview what it will look like when we recover it. In this preview, it looks like the image is intact, so we're good to go.
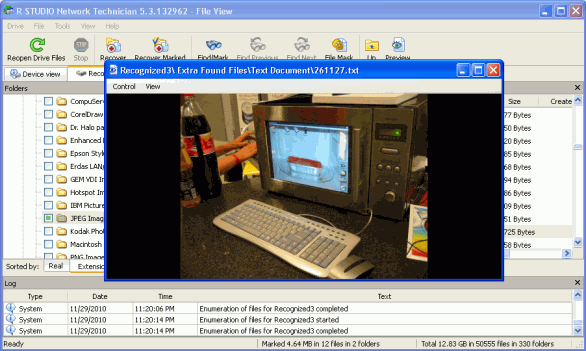
Click image to enlarge
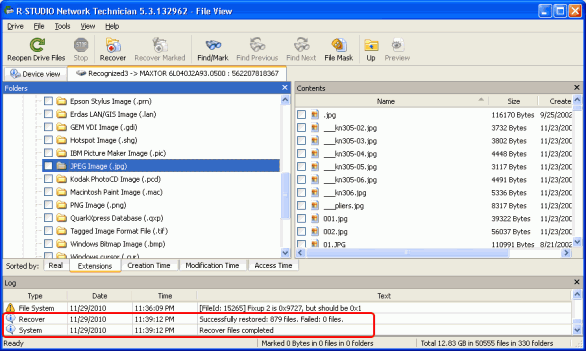
6. Click Recover Marked. Again, you'll be asked to specify recovery parameters and the output folder. Click Start to begin.
7. When the recovery is complete, R-Studio shows the results in the log.
Click image to enlarge
Recovered files are saved to the external storage.
Using the Hexadecimal Editor
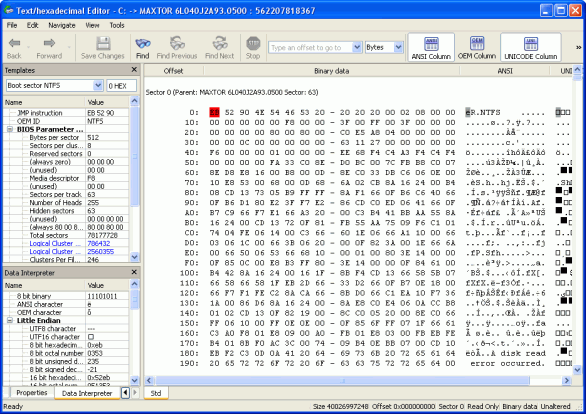
In addition to the graphical preview that you can use for images, R-Studio also has a hexadecimal editor which lets you edit and view objects on the remote computer. This helps you get a detailed look at what might be wrong with a disk so you can get an accurate estimate of your chances for a successful data recovery. In this example, we're looking at the first volume - C: (Maxtor HDD). Select the partition you'd like to examine and click View/Edit on the shortcut menu.
Click image to enlarge
The disk C: appears on the editor. You can edit the sectors directly here (for partition rebuild, for example). For our test, we'll refrain from doing so in order to avoid needlessly damaging this partition and following system restore.
Performance TestsData Transfer for Analyzing Large Disks
As mentioned above, the 40 GB hard drive took only 43 minutes to scan. But now, let's test the robustness of the connection and the performance of the program by scanning the second hard drive, which, recall is 1 TB. Here, it's shown as Hitachi, 931.5GB.
In the log, you can see that R-Studio successfully performed this task for 8.5 hours. That's a lot longer than the 40 GB hard drive, but remember that this second hard drive is 25 times the size of the previous one.
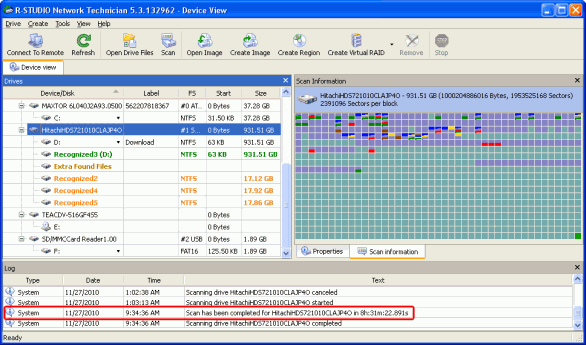
Click image to enlarge
More importantly, note that the overall data transfer for this process (that is, the amount of data that was actually sent over the Internet) was about 0.5 GB, or 500 MB, which amounts to just 0.05% of the amount of data that we actually analyzed. According to estimates by AT&T, 500 MB is about the same amount of data transfer as you'd get while watching a three and a half minute long YouTube video in standard definition. That's an incredibly low amount of data transfer, considering how much data was analyzed, and it will likely cost you next to nothing from your ISP. Given that this process was spread out over 8.5 hours, it'll likely have negligible impact on your Internet speeds for other computers on your network as well.
Click image to enlarge
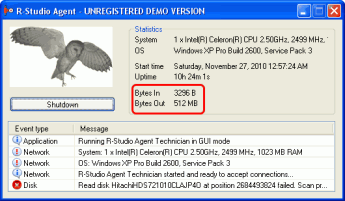
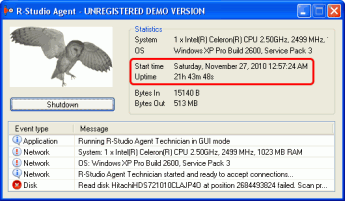
In order to verify the robustness of the connection, we also tested how long we could stay connected, since it's critical for data recovery procedures to unfold uninterrupted. We left the connection open for 21 hours (including the above processes and test as well as idle time overnight and during lunch breaks). The connection stayed strong throughout the entirety of this period.
Click image to enlarge
As you can see, R-Studio allows you to perform very demanding data recovery operations over the Internet without bogging down your bandwidth or exceeding your data usage limits. Because the processor-heavy operations are performed locally, these operations can be even be performed using a relatively modest hardware setup. This obviates the need for your customers to ship you their computers or pay for you to travel to their office to perform data recovery on-site. Overall, R-Studio's data recovery over the Internet will help you serve your customers more efficiently and more cost-effectively.
- R-Studio Technician: activation using a USB stick
- Data Recovery Guide
- Why R-Studio?
- R-Studio for Forensic and Data Recovery Business
- R-STUDIO Review on TopTenReviews
- File Recovery Specifics for SSD devices
- How to recover data from NVMe devices
- Predicting Success of Common Data Recovery Cases
- Recovery of Overwritten Data
- Emergency File Recovery Using R-Studio Emergency
- RAID Recovery Presentation
- R-Studio: Data recovery from a non-functional computer
- File Recovery from a Computer that Won't Boot
- Clone Disks Before File Recovery
- HD Video Recovery from SD cards
- File Recovery from an Unbootable Mac Computer
- The best way to recover files from a Mac system disk
- Data Recovery from an Encrypted Linux Disk after a System Crash
- Data Recovery from Apple Disk Images (.DMG files)
- File Recovery after Re-installing Windows
- R-Studio: Data Recovery over Network
- How To Use R-Studio Corporate Package
- Data Recovery from a Re-Formatted NTFS Disk
- Data Recovery from an ReFS disk
- Data Recovery from a Re-Formatted exFAT/FAT Disk
- Data Recovery from an Erased HFS Disk
- Data Recovery from an Erased APFS Disk
- Data Recovery from a Re-Formatted Ext2/3/4FS Disk
- Data Recovery from an XFS Disk
- Data Recovery from a Simple NAS
- How to connect virtual RAID and LVM/LDM volumes to the operating system
- Specifics of File Recovery After a Quick Format
- Data Recovery After Partition Manager Crash
- File Recovery vs. File Repair
- Data Recovery from Virtual Machines
- How to Recover Files from a Remote Computer Using R-Studio Standalone License and Its Network Capabilities in Demo Mode
- How to Connect Disks to a Computer
- Emergency Data Recovery over Network
- Data Recovery over the Internet
- Creating a Custom Known File Type for R-Studio
- Finding RAID parameters
- Recovering Partitions on a Damaged Disk
- NAT and Firewall Traversal for Remote Data Recovery
- Data Recovery from an External Disk with a Damaged File System
- File Recovery Basics
- Default Parameters of Software Stripe Sets (RAID 0) in Mac OS X
- Data Recovery from Virtual Hard Disk (VHD/VHDX) Files
- Data Recovery from Various File Container Formats and Encrypted Disks
- Automatic RAID Parameter Detection
- IntelligentScan Data Recovery Technology
- Multi-pass imaging in R-Studio
- Runtime Imaging in R-Studio
- Linear Imaging vs Runtime Imaging vs Multi-Pass Imaging
- USB Stabilizer Tech for unstable USB devices
- Joint work of R-Studio and PC-3000 UDMA hardware
- Joint work of R-Studio and HDDSuperClone
- R-Studio T80+ - A Professional Data Recovery and Forensic Solution for Small Business and Individuals Just for 1 USD/day
- Backup Articles
- R-Drive Image Standalone and Corporate license transferring
- Fixing Windows update error 0x80070643 with R-Drive Image
- Backup with Confidence
- R-Drive Image as a free powerful partition manager
- Computer Recovery and System Restore
- Disk Cloning and Mass System Deployment
- Accessing Individual Files or Folders on a Backed Up Disk Image
- R-Drive Image startup / bootable version
- File Backup for Personal Computers and Laptops of Home and Self-Employed Users
- Creating a Data Consistent, Space Efficient Data Backup Plan for a Small Business Server
- How to Move the Already Installed Windows from an Old HDD to a New SSD Device and Create a Hybrid Data Storage System
- How to Move an Installed Windows to a Larger Disk
- How to Move a BitLocker-Encrypted System Disk to a New Storage Device
- How to backup and restore disks on Linux and Mac computers using R-Drive Image
- R-Drive Image and Virtual Machines
- Undelete Articles
- Get Deleted Files Back
- Free Recovery from SD and Memory cards
- R-Undelete: Video Recovery
- Recovery from an External Device with a Damaged File System
- File recovery from a non-functional computer
- Free File Recovery from an Android Phone Memory Card
- Free Photo and Video File Recovery Tutorial
- Easy file recovery in three steps
Rating: 4.8 / 5
R-TT may not be the easiest or most user-friendly solution, but the algorithm used for the renaming saved me THOUSAND of hours of opening ...