- PRODUCTSFREEWAREFOR COMMERCIAL USEFOR PERSONAL AND BUSINESS USEBackup and System Restore:PC Privacy and Security:
- BUY ONLINE
- DISTRIBUTION


-
Creating a Custom Known File Type for R-Studio


Scanning for known file types, also known as raw file search, is one of R-Studio's most powerful data recovery techniques. By specifying known file types in R-Studio, you can recover certain types of files from a disk even when its data structure has been partially or completely damaged.
Under normal circumstances, the partition table is used to locate files on a disk. In a way, a partition table is a bit like an index in a book. R-Studio scans for known file types in lieu of this partition table by searching for identifiable file signatures. This is possible because almost every file type has a recognizable data pattern (i.e. file signature or magic number) that acts like a fingerprint for the file type. File signatures occur at the beginning of the file at a certain offset, and in many cases, at the end of the file as well. By scanning for these file signatures, R-Studio can identify and recover files and data, as long as it's a known file type.
Using scan for known file types, R-Studio can recover data from disks and drives that have been formatted or have had their partition tables overwritten. In fact, in cases where the partition has been overwritten, damaged or deleted, a scan for known file types is the only viable method of file recovery.
Sure, everything has its own drawback, and scan for known file types is not an exception. It can recover only un-fragmented files, but once again, for many data recovery cases, this is the last working remedy.
Out of the box, R-Studio comes with the most popular file types already predefined. (To see the full list of known file types, read the Disk Scan page in the R-Studio Online Help.)
You can add known file types to your R-Studio installation in order to meet your specific needs. For example, if you are searching for a proprietary file type developed in-house or a file type that was created after the latest release of R-Studio, you can expand R-Studio's list of known file types by creating a custom known file type. Read on to learn how to create custom known file types.
User-defined Known File Types
Custom known file types are stored in an XML file, which can be loaded in the Settings dialog box. Adding a user-defined known file type involves two steps:
- Identifying the file signature that appears at the beginning of the file, and, if possible, the file signature at the end.
- Specifying the user-defined file in the built-in graphic editor or creating an XML file that contains the file signature and other information about the known file type.
Both of these tasks can be completed with R-Studio. You don't need to be particularly well versed in XML or hex editing - this tutorial will walk you through the process step-by-step and is appropriate even for beginner skill levels.
Example: Defining a Known File Type for MP4 (XDCam-EX Codec)
To illustrate both of these steps, we'll be creating a known file type description for an .MP4 file created using a Sony XDCAM-EX. This could be useful, for instance, if your SD card became corrupted and you wanted to
recover videos that you hadn't yet imported to your computer.
Part One: Finding the File Signature
To find a file signature for a known file type, start with intact files of the same type that you'll be attempting to recover.
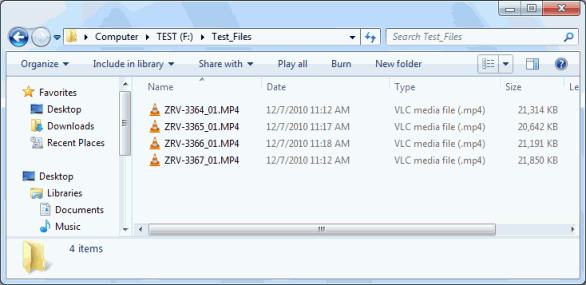
For this example, we'll be looking at four of video files from a Sony XDCAM-EX:
ZRV-3364_01.MP4
ZRV-3365_01.MP4
ZRV-3366_01.MP4
ZRV-3367_01.MP4
Note that these files are very short, for the sake of clarity in this tutorial. The actual files you deal with may be larger, and thus harder to navigate in them in hex form.
Click image to enlarge
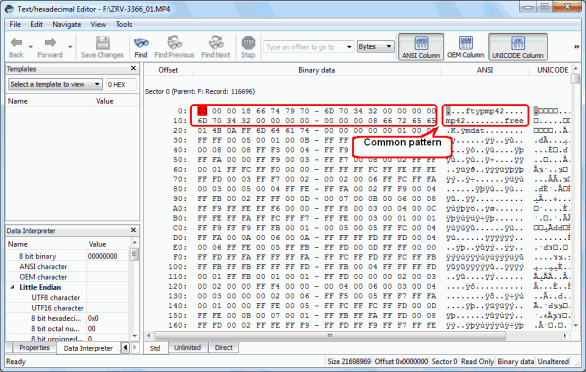
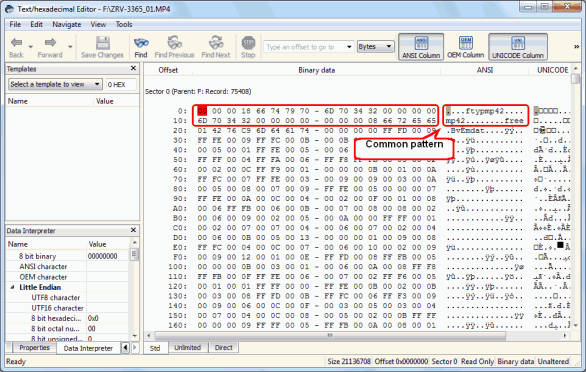
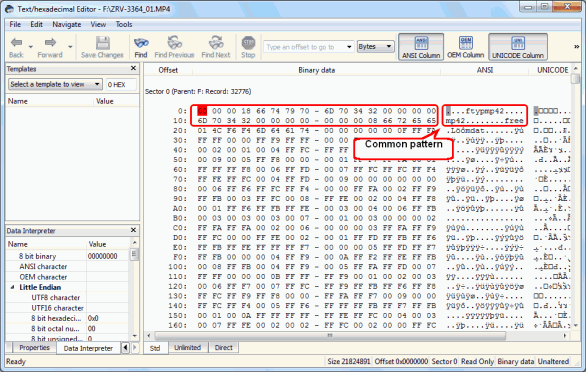
1. Open the files in the hexadecimal editor built into R-Studio. To do so, right-click the files and choose View/Edit in the shortcut menu.
2. Compare each of the files for similarities. You're looking for a pattern that is exactly the same across all four files. This is the file signature. File signatures usually appear at the beginning of the file, but sometimes they also appear at the end.
3. Locate the file signature at the beginning of the file. In this example, the file signature occurs at the very beginning of the file. Note that this is not always the case — occasionally, the file signature will be early in the file, but not on the first line (this is called an offset).
As you can see in these screenshots, the bulk of the file contents are different, yet each begins with the same file signature.
Click image to enlarge

Click image to enlarge
Click image to enlarge
Click image to enlarge
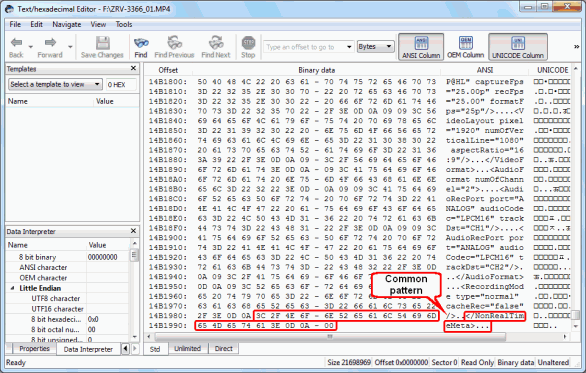
The highlighted areas in the above screenshot are the file signatures for this known file type. This is represented in text as well as hex.
In text, the file signature is:
The dots (".") in the text string denote characters that can't be printed in a readable format. For this reason, it's necessary to also take note of the hex version of the file signature:
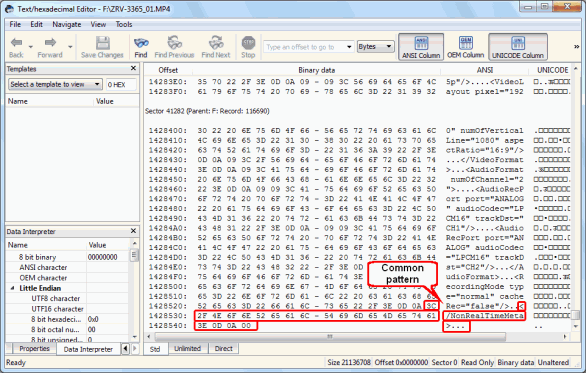
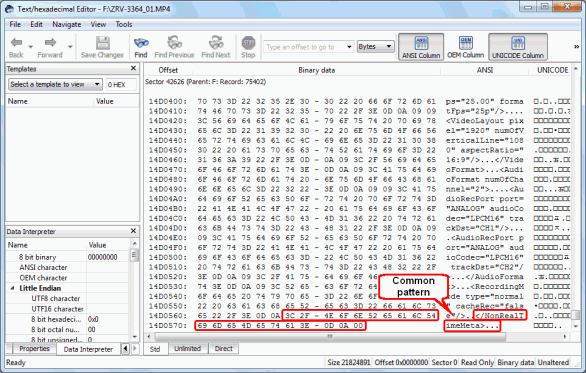
4. Locate the file signature at the end of the file. This is the same as the previous step, except we'll be looking at the very end of the file for another file signature. This may not necessarily be the same file signature or the same length as the file signature at the beginning.
The ending file signature is highlighted in the screenshots below:

Click image to enlarge
Click image to enlarge
Click image to enlarge
Click image to enlarge
If you read before the highlighted area that we are calling the file signature, you'll notice that the data is similar across all four files. This is because each of the files was shot by the same camera with the same settings. This technical information is not part of the file signature. Usually, you can spot the difference between coincidentally similar patterns and the actual file signature. In this example, you can see that the previous line reads 'RecordingMode type="normal"' which clearly denotes it as a parameter of some sort. To avoid erroneously including such technical information in your file signature, try to focus on the very last line.
In this case, the file signature in text is:
Recall that the dots are non-printable characters.
In HEX, the file signature is:
Note: there won't always be a file signature at the end of the file.
Part 2: Writing a Known File Type Description File
Now that we have the file signatures in hand, we can create an XML file to tell R-Studio to include it in its known file types database. There're two ways to do this:
2.1 Using the built-in graphic editor:
(See the R-Studio on-line help Customizing File Types for more information.)
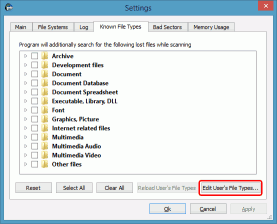
Select Settings on the Tools menu to open the Settings panel. Go to the Known Files Types tab and click the Edit User’s File Types button.
Click image to enlarge
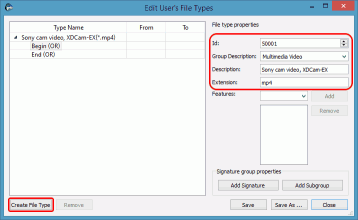
Click the Create File Type button on the Edit User's File Types dialog box.
Specify the following parameters:
- Id - A unique integer. R-Studio will automatically assign an arbitrary number, the only requirement is that it isn't shared by any other custom known file type.
- Group Description - A file group used to display results in R-Studio. You can create a custom own or use a predefined group. For this example, we'll use "Multimedia Video".
- Description - A description of the file type. For our example, we can use "Sony cam video, XDCam-EX".
- Extension - the file extension for our known file type. In our case, it is mp4.
Features is an optional parameter, we don't need to use it for our case.
Click image to enlarge
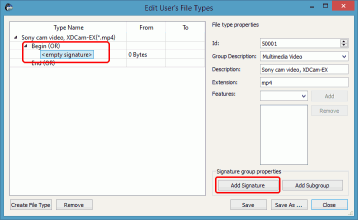
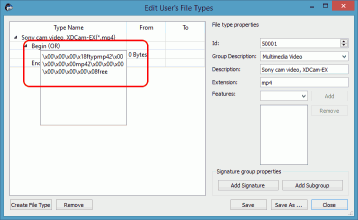
Then we need to enter file signature for the beginning and end of the file. To do so, select Begin and click the Add Signature button.
Click image to enlarge
Then click <empty signature> and enter the signature's text.
Click image to enlarge
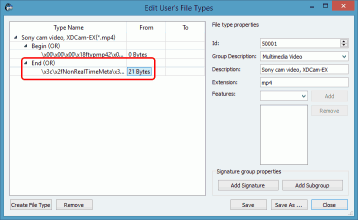
Then create the signature for the file's end. Don't forget to enter 21 into the From filed.
Click image to enlarge
You've successfully created a new user's known file types.
Now we need to save it. There's two options: you may either save it to the default file specified on the Main tab of the Settings panel by clicking the Save button to do this. Or click the Save As.. button to save it to some other file.
2.2 Writing the Known File Type Description File manually:
(See the R-Studio on-line help Customizing File Types-I for more information.)
To write this file, we'll be using XML version 1.0 and UTF-8 encoding. Don't worry if you're not sure what this means - just open a plain text editor (such as Notepad.exe) and enter the following text on the first line:
<FileTypeList>
Next, we'll create an XML tag that defines the FileType. Using the above attributes, the full XML tag will look like this:
Insert this right after <FileTypeList>
Next, we'll define the file signature using the <Signature> tag. The beginning file signature is simply wrapped in a <Signature> tag with no attributes or elements. Use the text version of the file signature, but sub out the hexadecimals for non-printable characters. Place "\x" before each hexadecimal. So, the <Signature> portion will look like this:
If one exists, define the file signature from the end, too. Do this the same way as the beginning file signature, except include a "from" element with the attribute "end".
It will look like this:
Recall that there were no non-printable characters in the ending file signature, but there were slashes and triangle brackets. To avoid confusion, we included the hexadecimal values instead of the "/" and "<" and ">" characters, so that these characters don't get mistaken for XML syntax.
Once you've added your file signatures, close the FileType and FileTypeList tags with these lines:
</FileTypeList>
So, the complete file should look like this:
<FileType id="50001" group="Multimedia Video" description="Sony cam video, XDCam-EX" extension="mp4">
<Signature>\x00\x00\x00\x18ftypmp42\x00\x00\x00\x00mp42\x00\x00\x00\x00\x00\x00\x00\x08free</Signature>
<Signature from="end" offset="21">\x3C\x2FNonRealTimeMeta\x3E\x0D\x0A\x00</Signature>
</FileType>
</FileTypeList>
Remember: XML is case sensitive. So, <filetype> will not be valid, while <FileType> is.
Save the file in plain text format with an .xml extension. For example: SonyCam.xml.
You've successfully created a custom known file type. This is sufficient for basic user-defined known file types. For more advanced users, you can use XML version 2.0. For full details on the proper XML version 2.0 syntax, refer to the R-Studio online help: Customizing File Types-II.
Part 3: Validating and Adding Known File Type Description Files
The next step is to add your XML file to R-Studio. R-Studio will validate the XML file before adding it.
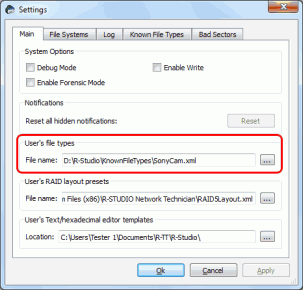
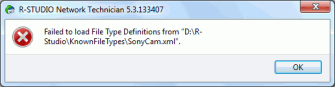
Load the XML file that you created in the previous section into R-Studio. Do this by clicking Tools -> Settings. In the section that reads User's file types, browse to your XML file (in our example, it's SonyCam.xml). Click Apply.
Click image to enlarge
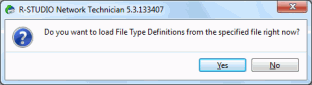
2. When prompted on whether you want to load the File Type Definition, click Yes.
Click image to enlarge
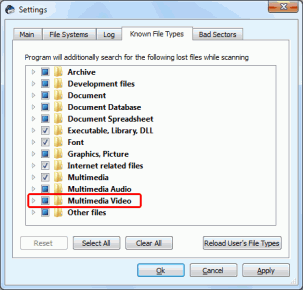
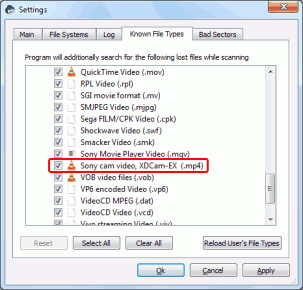
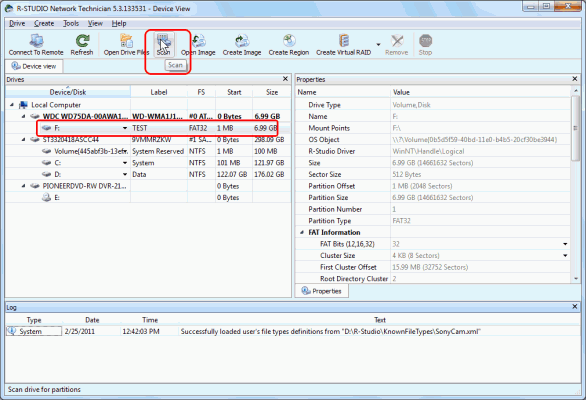
3. Ensure that the file type was loaded successfully by clicking on the Known File Types tab in the Settings dialog. Recall that we placed ours in the Multimedia Video group. Expand this folder and you should see it listed with the description we gave it in Part 2: Sony cam video, XDCam-EX (.mp4).
Click image to enlarge
Click image to enlarge
If there were syntax errors, the following message would've appeared:
Click image to enlarge
If you see this, go back and check your XML for syntax errors. Remember: XML is case sensitive and all tags must be closed.
Part 4: Testing Your Custom known file type Description
To test to see if our user-defined known file type works, we can try finding our .mp4 files on a removable USB flash drive.
1. Under Windows Vista/7/8/8.1/10/11, perform a full format on a disk (not a quick format), or use a disk wipe utility like R-Wipe & Clean, to wipe all previous data from it. A USB drive is fine for this test. Make sure that it's formatted as a FAT32 volume (provided that the test files are less than 2 GB).
2. Copy your test files to the disk and restart your computer. This will ensure that the cache is properly written to the disk. You can also disconnect the external disk and re-connect it again.
3. Mount the disk with the test files. For our example, we mounted it as the F:\ drive.
4. Launch R-Studio. Select disk with the test files and click the Scan button.
Click image to enlarge
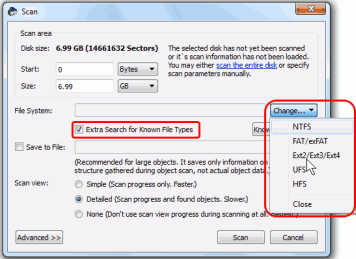
5. In the Scan dialog box, clear all the text that appears in the field "File System". This will prevent R-Studio from using the partition table to locate files using the existing file system.
Click image to enlarge
6. Check the box next to Extra Search for Known File Types. This enables the scan for known file types.
7. Click Scan to begin the search.
8. Wait as R-Studio performs the scan. The Scan Information tab shows the progress of the overall process.
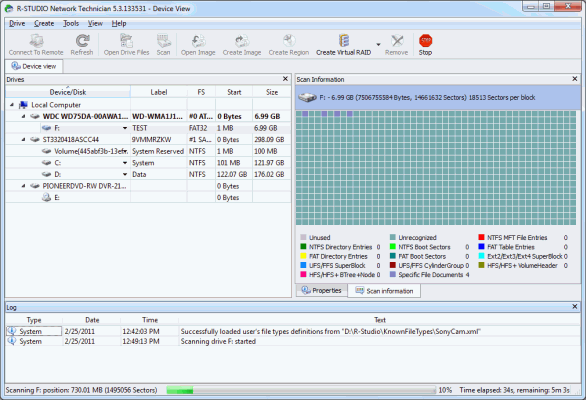
Click image to enlarge
9. Look for an item that reads Extra Found Files once R-Studio finishes the scan. Double-click it.
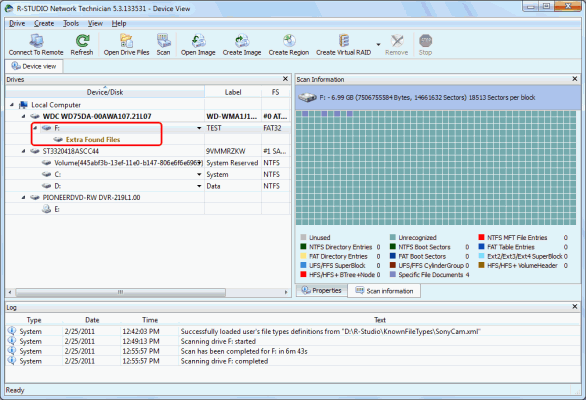
Click image to enlarge
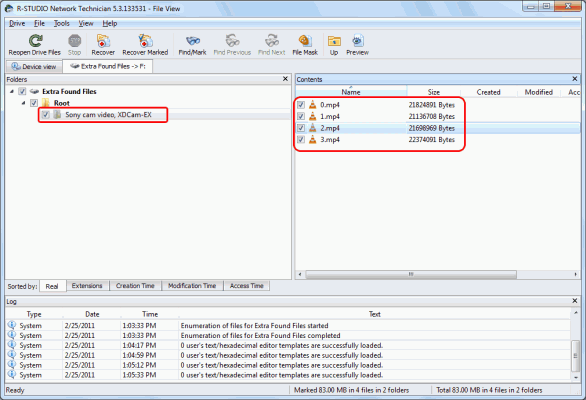
10. Our test files will be located in the Sony cam video, XDCam-EX folder (or whatever description you gave your file type in Part 2).
Click image to enlarge
As you can see, the names, dates and folder tree for the files were not recovered, since this information is held in the file system. As such, R-Studio automatically assigns each file a new filename.
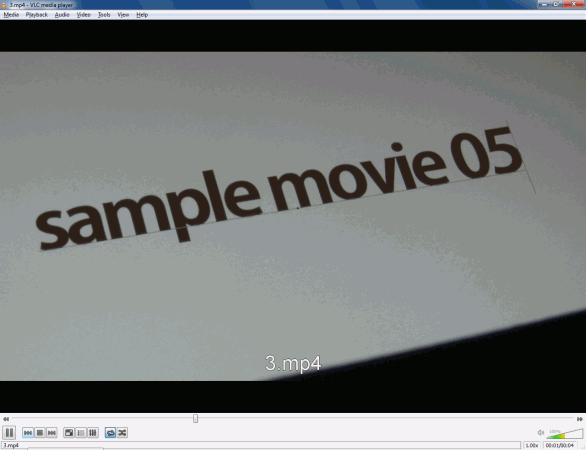
However, as you'll see, the contents of the files are completely intact. To test them, view them with a compatible program, such as VLC media player.
Click image to enlarge
Conclusion
R-Studio's scan for known file types enables you to recover files even from disk with severely damaged or overwritten file systems or partition tables. The known file types feature allows you to efficiently locate files based on their file signature, which is particularly useful when you know what kind of files you are trying to recover, as we did in this example. R-Studio's support for user-defined known file types expands this feature to include any file type that has an identifiable file signature.
- R-Studio Technician: activation using a USB stick
- Data Recovery Guide
- Why R-Studio?
- R-Studio for Forensic and Data Recovery Business
- R-STUDIO Review on TopTenReviews
- File Recovery Specifics for SSD devices
- How to recover data from NVMe devices
- Predicting Success of Common Data Recovery Cases
- Recovery of Overwritten Data
- Emergency File Recovery Using R-Studio Emergency
- RAID Recovery Presentation
- R-Studio: Data recovery from a non-functional computer
- File Recovery from a Computer that Won't Boot
- Clone Disks Before File Recovery
- HD Video Recovery from SD cards
- File Recovery from an Unbootable Mac Computer
- The best way to recover files from a Mac system disk
- Data Recovery from an Encrypted Linux Disk after a System Crash
- Data Recovery from Apple Disk Images (.DMG files)
- File Recovery after Re-installing Windows
- R-Studio: Data Recovery over Network
- How To Use R-Studio Corporate Package
- Data Recovery from a Re-Formatted NTFS Disk
- Data Recovery from an ReFS disk
- Data Recovery from a Re-Formatted exFAT/FAT Disk
- Data Recovery from an Erased HFS Disk
- Data Recovery from an Erased APFS Disk
- Data Recovery from a Re-Formatted Ext2/3/4FS Disk
- Data Recovery from an XFS Disk
- Data Recovery from a Simple NAS
- How to connect virtual RAID and LVM/LDM volumes to the operating system
- Specifics of File Recovery After a Quick Format
- Data Recovery After Partition Manager Crash
- File Recovery vs. File Repair
- Data Recovery from Virtual Machines
- How to Recover Files from a Remote Computer Using R-Studio Standalone License and Its Network Capabilities in Demo Mode
- How to Connect Disks to a Computer
- Emergency Data Recovery over Network
- Data Recovery over the Internet
- Creating a Custom Known File Type for R-Studio
- Finding RAID parameters
- Recovering Partitions on a Damaged Disk
- NAT and Firewall Traversal for Remote Data Recovery
- Data Recovery from an External Disk with a Damaged File System
- File Recovery Basics
- Default Parameters of Software Stripe Sets (RAID 0) in Mac OS X
- Data Recovery from Virtual Hard Disk (VHD/VHDX) Files
- Data Recovery from Various File Container Formats and Encrypted Disks
- Automatic RAID Parameter Detection
- IntelligentScan Data Recovery Technology
- Multi-pass imaging in R-Studio
- Runtime Imaging in R-Studio
- Linear Imaging vs Runtime Imaging vs Multi-Pass Imaging
- USB Stabilizer Tech for unstable USB devices
- Joint work of R-Studio and PC-3000 UDMA hardware
- Joint work of R-Studio and HDDSuperClone
- R-Studio T80+ - A Professional Data Recovery and Forensic Solution for Small Business and Individuals Just for 1 USD/day
- Backup Articles
- R-Drive Image Standalone and Corporate license transferring
- Fixing Windows update error 0x80070643 with R-Drive Image
- Backup with Confidence
- R-Drive Image as a free powerful partition manager
- Computer Recovery and System Restore
- Disk Cloning and Mass System Deployment
- Accessing Individual Files or Folders on a Backed Up Disk Image
- R-Drive Image startup / bootable version
- File Backup for Personal Computers and Laptops of Home and Self-Employed Users
- Creating a Data Consistent, Space Efficient Data Backup Plan for a Small Business Server
- How to Move the Already Installed Windows from an Old HDD to a New SSD Device and Create a Hybrid Data Storage System
- How to Move an Installed Windows to a Larger Disk
- How to Move a BitLocker-Encrypted System Disk to a New Storage Device
- How to backup and restore disks on Linux and Mac computers using R-Drive Image
- R-Drive Image and Virtual Machines
- Undelete Articles
- Get Deleted Files Back
- Free Recovery from SD and Memory cards
- R-Undelete: Video Recovery
- Recovery from an External Device with a Damaged File System
- File recovery from a non-functional computer
- Free File Recovery from an Android Phone Memory Card
- Free Photo and Video File Recovery Tutorial
- Easy file recovery in three steps
Rating: 4.8 / 5
R-TT may not be the easiest or most user-friendly solution, but the algorithm used for the renaming saved me THOUSAND of hours of opening ...