-
Data Recovery from Virtual Hard Disk (VHD/VHDX) Files
VHD (Virtual Hard Disk) and its successor VHDX are file formats used by Microsoft Virtual PC to represent a virtual hard disk drive (HDD). A VHD/VHDX file will have the same contents of a formatted physical hard drive, including a boot record, disk partitions, file systems, files, and folders. A VHD/VHDX file is typically used as a logical disk in a virtual machine, but it can also be attached directly to the Windows system (7 or later).
Just like physical hard drives, VHD/VHDX files are at risk for corruption, accidental deletion of their files, virus attacks, and other causes of data loss. As such, the ability to recover data from a VHD/VHDX image can be very valuable.
This article will show you how to use R-Studio for this task. All versions of R-Studio 9.3 and later can load VHD/VHDX files whereas R-Studio Technician/T80+ can create such files.
We'll start with the R-Studio version that can directly load VHD/VHDX files. The last part of this article will show how to work with R-Studio versions that cannot load such files.
Data recovery case: There's a VHDX file that earlier contained two partitions.
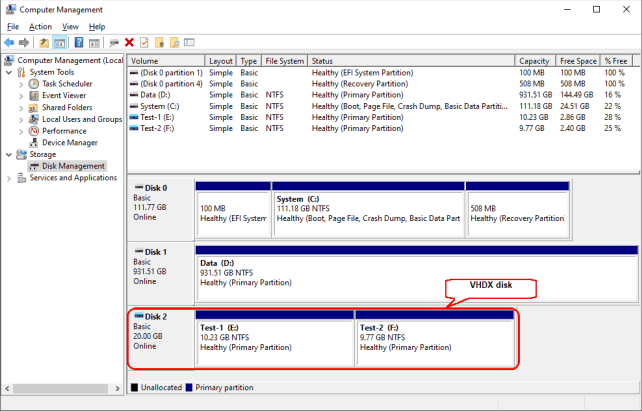
Click image to enlarge
Then the second partition (Disk F:, Test-2) was deleted and the first partition (Disk E:, Test-1) was extended to the whole disk.
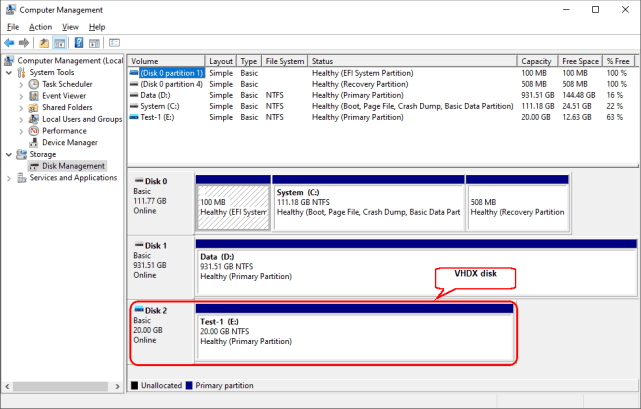
Click image to enlarge
The task: Data recovery from the second partition of the VHDX disk.
Case 1: Data recovery from a healthy VHDX file (it can be attached to the system).
1. Open the VHDX file as an image.
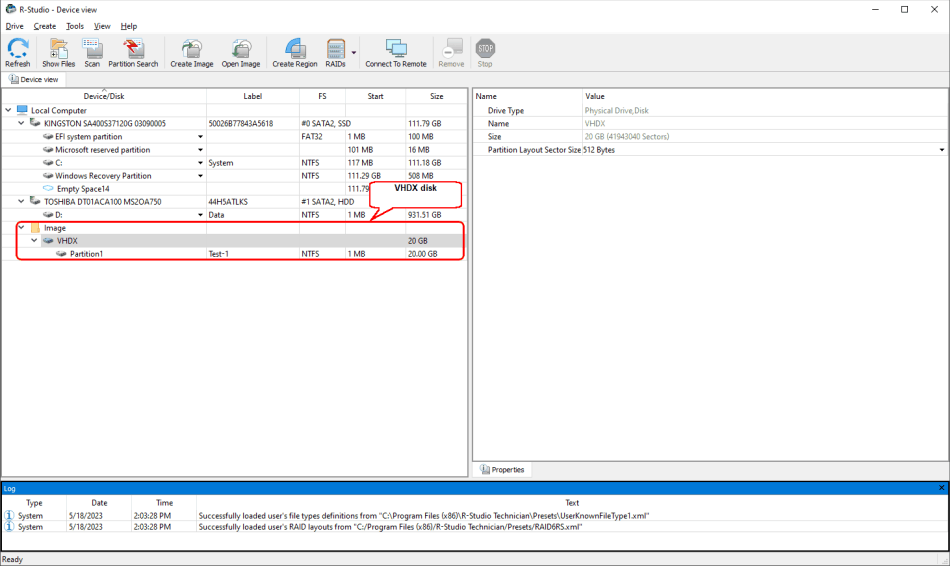
Click image to enlarge
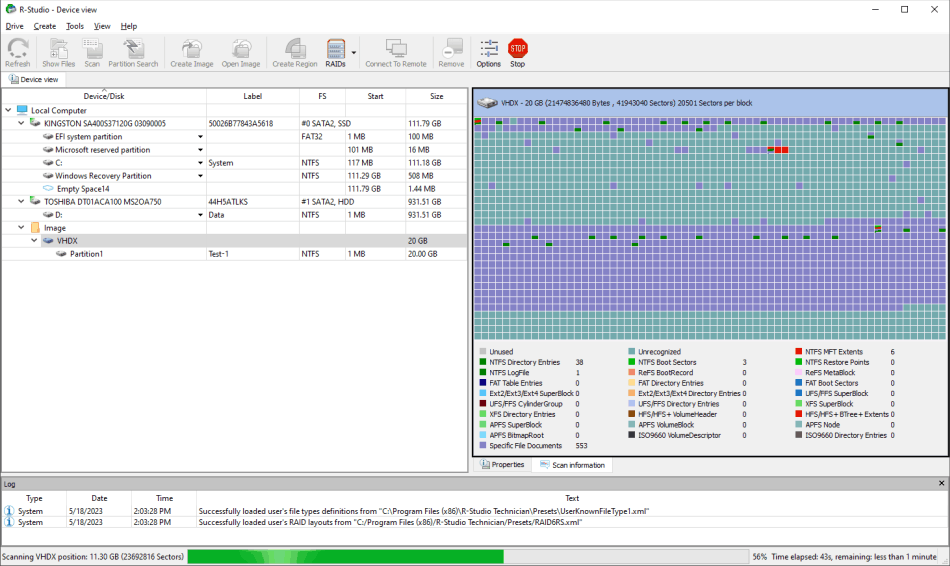
2. Scan the opened VHDX disk.
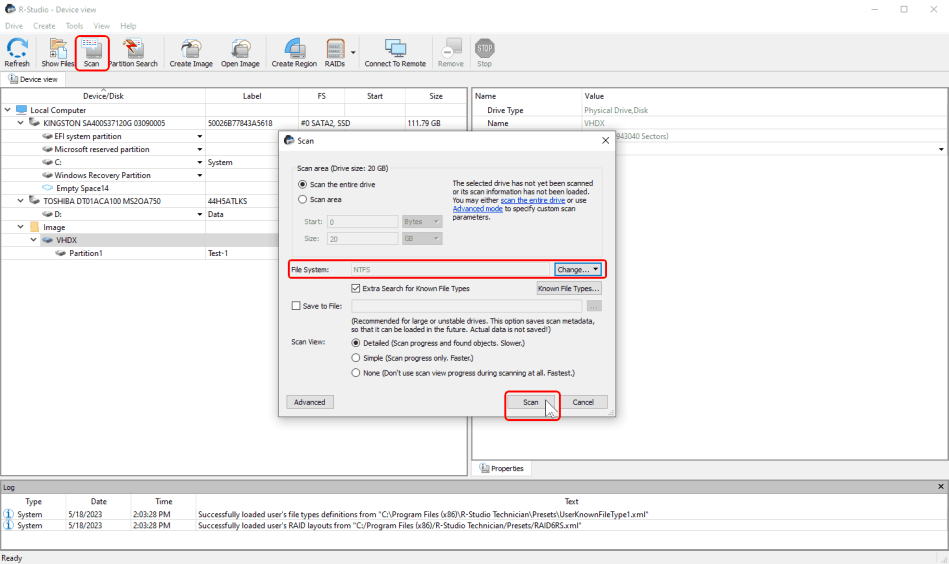
Click image to enlarge
Click the Scan button, then click the Change… button, leave only NTFS selected, and click the Scan button. You may read more about scan parameters in the on-line help: Drive Scan.
> R-Studio will start scanning the VHDX disk showing its progress.
Click image to enlarge
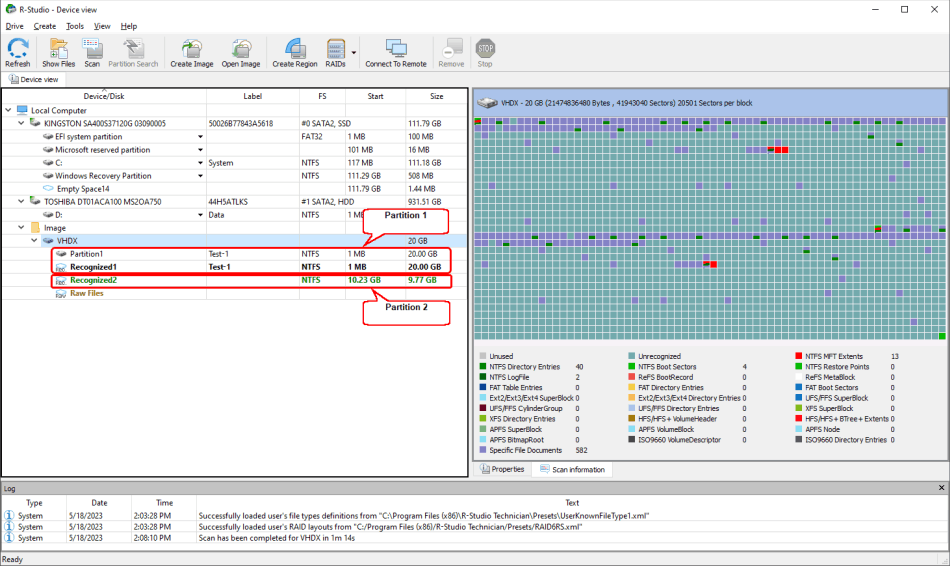
3. Inspect the scan result and locate the second partition.
Click image to enlarge
You can do that looking on the partition offset and size.
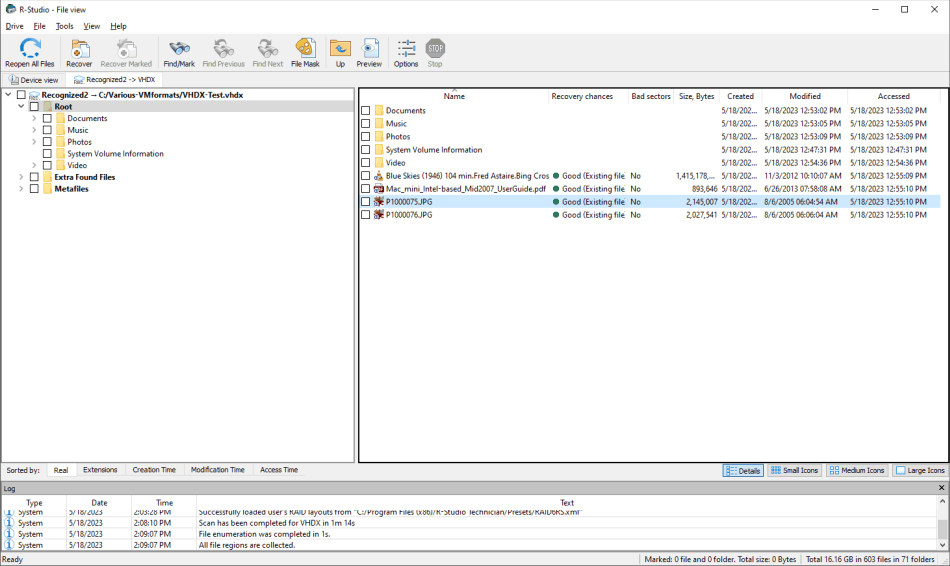
4. Enumerate files on the second partition (Recognized 2) by double-clicking it.
Click image to enlarge
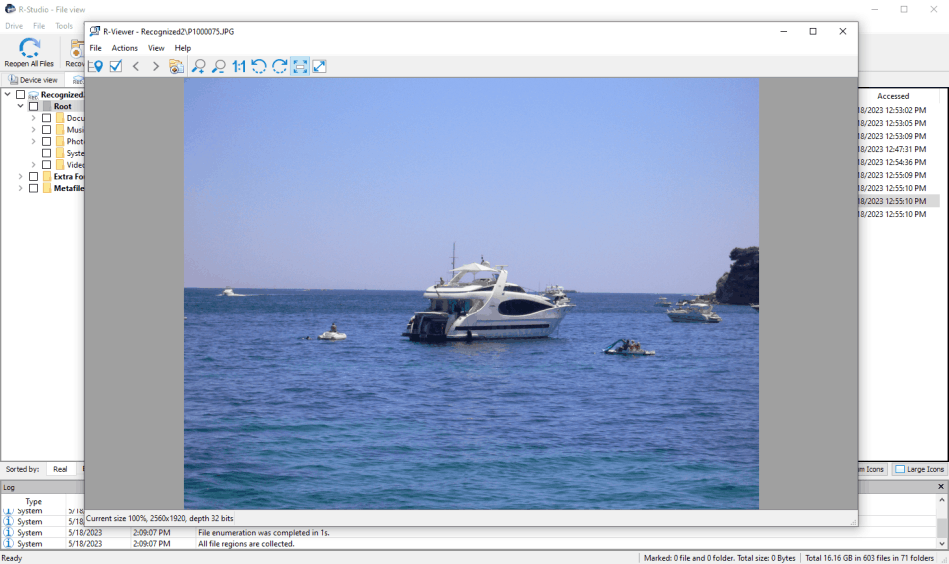
You can perform all data recovery actions as if this is a real hard drive. For example, preview a file.
Click image to enlarge
Then you can mark all necessary file for recovery and recover them as if it was a real logical disk.
Case 2: Data recovery from a damaged VHDX file (it cannot be attached to the system)
This method can be used for all R-Studio versions, even those that cannot directly load VHD/VHDX disks.
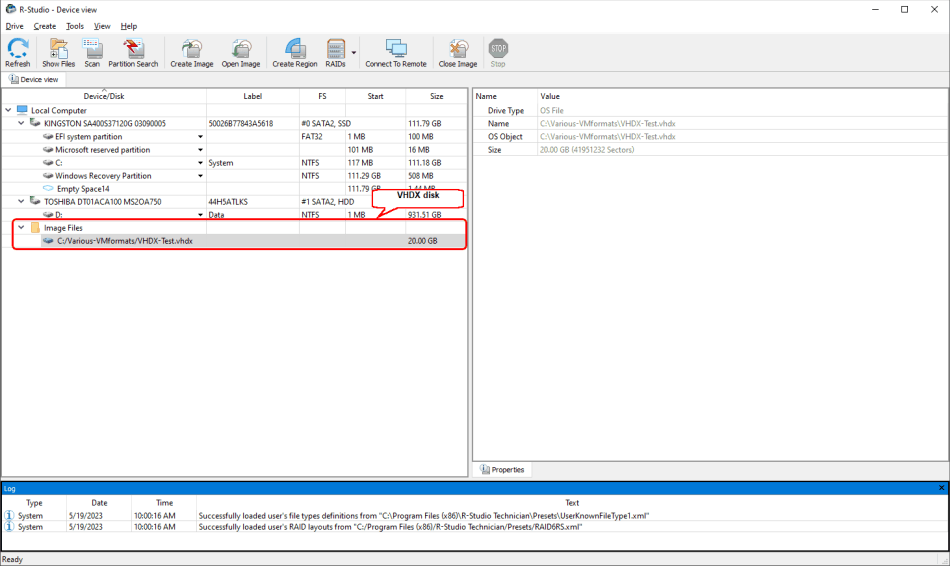
1. Open the VHDX file as a byte-by-byte image.
Click image to enlarge
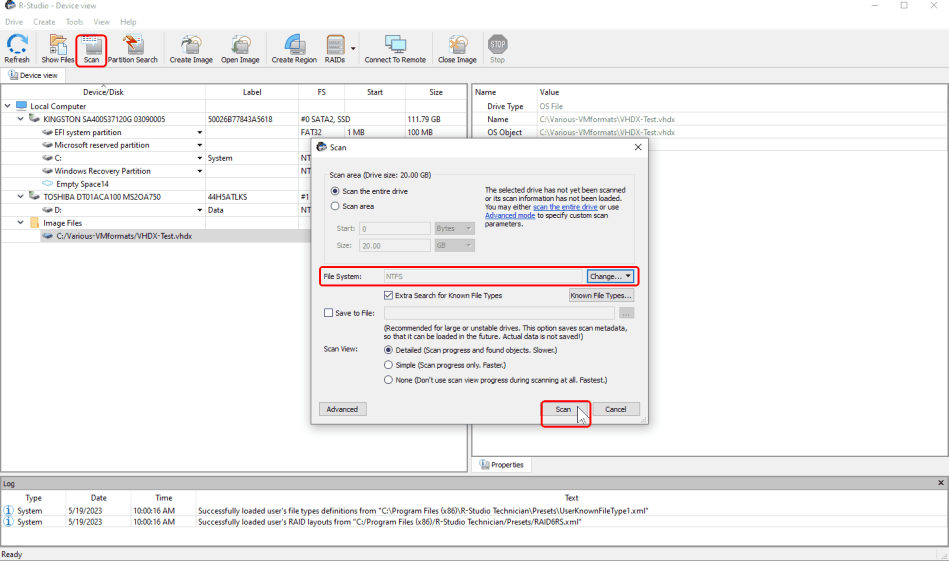
2. Scan the opened VHDX disk.
Click image to enlarge
Click the Scan button, then click the Change… button, leave only NTFS selected, and click the Scan button. You may read more about scan parameters in the on-line help.
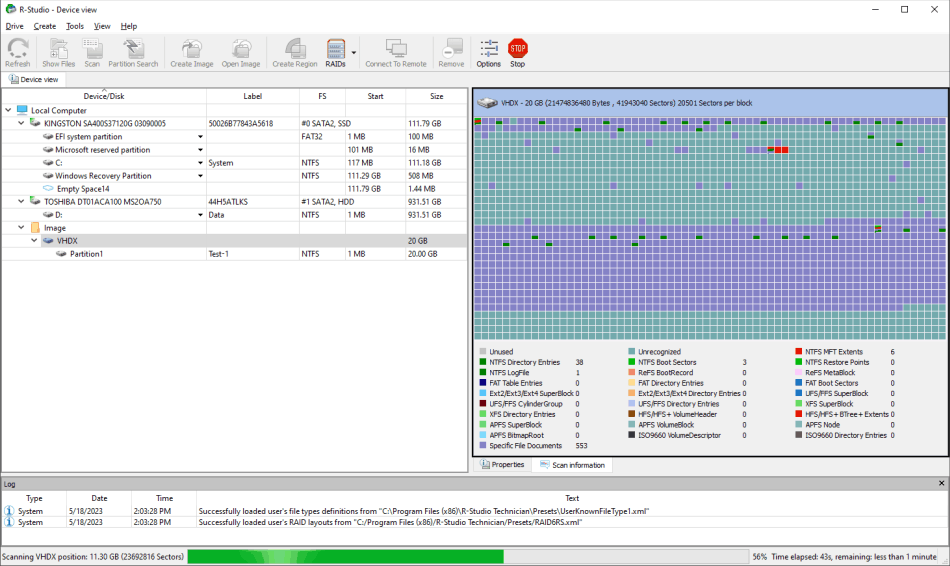
> R-Studio will start scanning the VHDX disk showing its progress.
Click image to enlarge
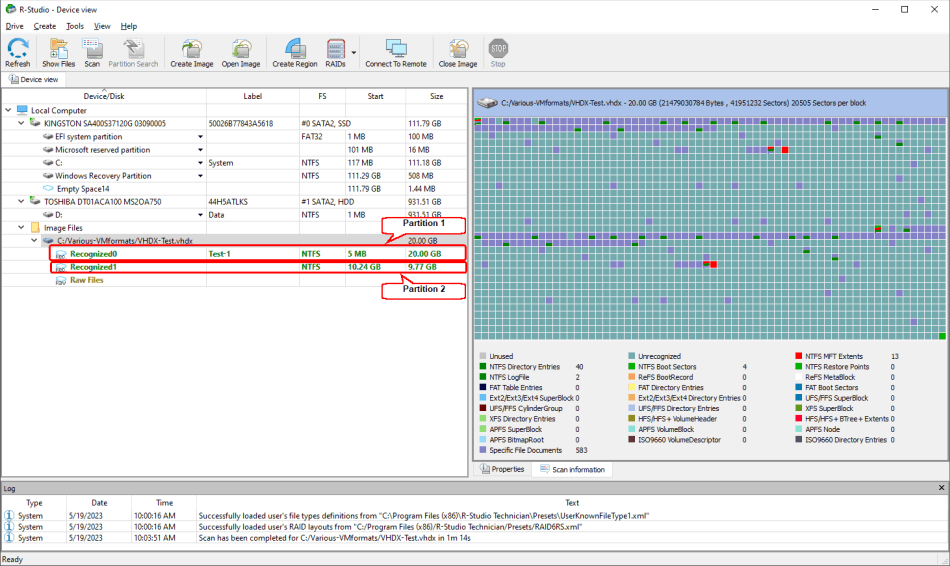
3. Inspect the scan result and locate the second partition.
Click image to enlarge
You can do that by looking at the partition offset and size.
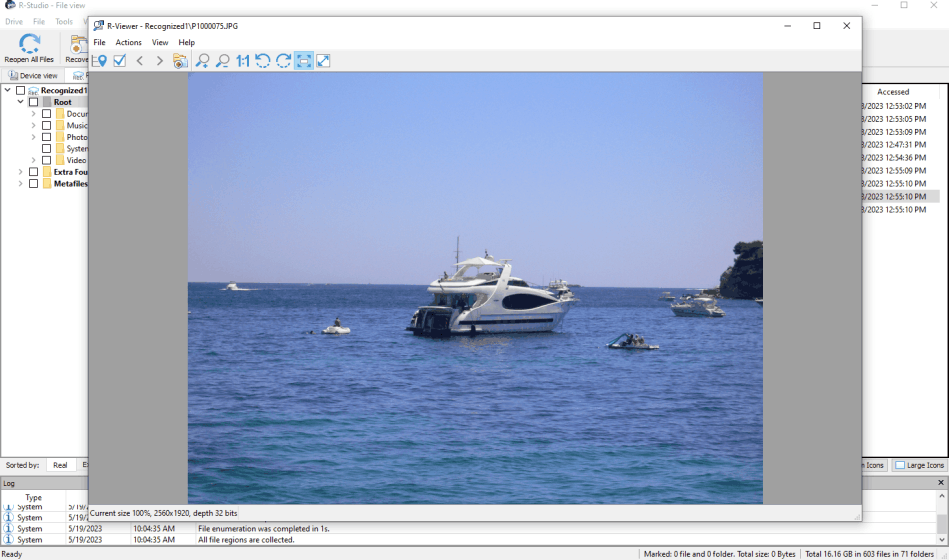
4. Enumerate files on the second partition (Recognized 2) by double-clicking it. You can perform all data recovery actions as if this is a real hard drive. For example, preview a file.
Click image to enlarge
Then you can mark all necessary file for recovery and recover them as it was a real logical disk.
Case 3: Data recovery from a healthy VHDX file by an R-Studio version that cannot load VHD/VHDX files
Virtual Hard Disks are healthy and can be attached in Windows.
Attaching a VHD file directly in a host operating system requires Windows 7 or later.
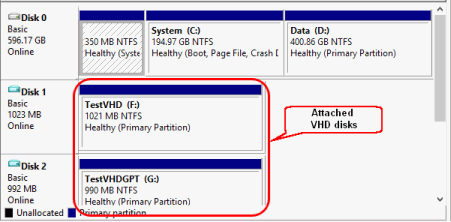
1. Attach the VHD image to the system from the Windows Disk Management utility.
Click image to enlarge
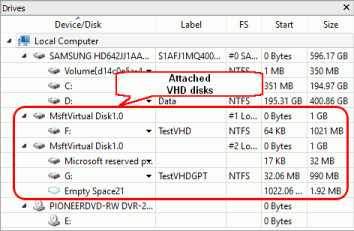
If successfully mounted, the partitions will be assigned drive letters. They will also appear as normal disks in R-Studio.
2. Process the attached VHD disks in R-Studio as regular disks.
Click image to enlarge
Conclusion
All versions of R-Studio have the capability to find lost partitions, recover data, and copy data from VHD/VHDX files.
If the R-Studio version you're using can load VHD/VHDX files (9.3 and higher), R-Studio can open a healthy VHD/VHDX file as a conventional disk image and process it in the same way you would process a normal hard drive.
For previous versions of R-Studio that cannot load such files, another technique should be used: the VHD/VHDX file can be attached to the system (Windows 7 and higher) and then R-Studio can process it as a real hard drive.
For a corrupted VHD/VHDX file, more advanced methods can be employed to locate and recover lost data. This file should be loaded as a byte-by-byte image and scanned for partitions, file systems, and individual files.
- R-Studio Technician: activation using a USB stick
- Data Recovery Guide
- Why R-Studio?
- R-Studio for Forensic and Data Recovery Business
- R-STUDIO Review on TopTenReviews
- File Recovery Specifics for SSD devices
- How to recover data from NVMe devices
- Predicting Success of Common Data Recovery Cases
- Recovery of Overwritten Data
- Emergency File Recovery Using R-Studio Emergency
- RAID Recovery Presentation
- R-Studio: Data recovery from a non-functional computer
- File Recovery from a Computer that Won't Boot
- Clone Disks Before File Recovery
- HD Video Recovery from SD cards
- File Recovery from an Unbootable Mac Computer
- The best way to recover files from a Mac system disk
- Data Recovery from an Encrypted Linux Disk after a System Crash
- Data Recovery from Apple Disk Images (.DMG files)
- File Recovery after Re-installing Windows
- R-Studio: Data Recovery over Network
- How To Use R-Studio Corporate Package
- Data Recovery from a Re-Formatted NTFS Disk
- Data Recovery from an ReFS disk
- Data Recovery from a Re-Formatted exFAT/FAT Disk
- Data Recovery from an Erased HFS Disk
- Data Recovery from an Erased APFS Disk
- Data Recovery from a Re-Formatted Ext2/3/4FS Disk
- Data Recovery from an XFS Disk
- Data Recovery from a Simple NAS
- How to connect virtual RAID and LVM/LDM volumes to the operating system
- Specifics of File Recovery After a Quick Format
- Data Recovery After Partition Manager Crash
- File Recovery vs. File Repair
- Data Recovery from Virtual Machines
- How to Recover Files from a Remote Computer Using R-Studio Standalone License and Its Network Capabilities in Demo Mode
- How to Connect Disks to a Computer
- Emergency Data Recovery over Network
- Data Recovery over the Internet
- Creating a Custom Known File Type for R-Studio
- Finding RAID parameters
- Recovering Partitions on a Damaged Disk
- NAT and Firewall Traversal for Remote Data Recovery
- Data Recovery from an External Disk with a Damaged File System
- File Recovery Basics
- Default Parameters of Software Stripe Sets (RAID 0) in Mac OS X
- Data Recovery from Virtual Hard Disk (VHD/VHDX) Files
- Data Recovery from Various File Container Formats and Encrypted Disks
- Automatic RAID Parameter Detection
- IntelligentScan Data Recovery Technology
- Multi-pass imaging in R-Studio
- Runtime Imaging in R-Studio
- Linear Imaging vs Runtime Imaging vs Multi-Pass Imaging
- USB Stabilizer Tech for unstable USB devices
- Joint work of R-Studio and PC-3000 UDMA hardware
- Joint work of R-Studio and HDDSuperClone
- R-Studio T80+ - A Professional Data Recovery and Forensic Solution for Small Business and Individuals Just for 1 USD/day
- Backup Articles
- R-Drive Image Standalone and Corporate license transferring
- Fixing Windows update error 0x80070643 with R-Drive Image
- Backup with Confidence
- R-Drive Image as a free powerful partition manager
- Computer Recovery and System Restore
- Disk Cloning and Mass System Deployment
- Accessing Individual Files or Folders on a Backed Up Disk Image
- R-Drive Image startup / bootable version
- File Backup for Personal Computers and Laptops of Home and Self-Employed Users
- Creating a Data Consistent, Space Efficient Data Backup Plan for a Small Business Server
- How to Move the Already Installed Windows from an Old HDD to a New SSD Device and Create a Hybrid Data Storage System
- How to Move an Installed Windows to a Larger Disk
- How to Move a BitLocker-Encrypted System Disk to a New Storage Device
- How to backup and restore disks on Linux and Mac computers using R-Drive Image
- R-Drive Image and Virtual Machines
- Undelete Articles
- Get Deleted Files Back
- Free Recovery from SD and Memory cards
- R-Undelete: Video Recovery
- Recovery from an External Device with a Damaged File System
- File recovery from a non-functional computer
- Free File Recovery from an Android Phone Memory Card
- Free Photo and Video File Recovery Tutorial
- Easy file recovery in three steps
Rating: 4.8 / 5
R-TT may not be the easiest or most user-friendly solution, but the algorithm used for the renaming saved me THOUSAND of hours of opening ...


