- PRODUCTSFREEWAREFOR COMMERCIAL USEFOR PERSONAL AND BUSINESS USEBackup and System Restore:PC Privacy and Security:
- BUY ONLINE
- DISTRIBUTION
-
HD Video Recovery from SD cards


On the consumer market, the days of the analog tape camcorder are long gone. Today, videotape-based camcorder formats such as VHS, Betamax, and Video8 have been superseded by digital formats. The most common digital camcorder format is the AVCHD format. AVCHD, which stands for Advanced Video Coding High Definition, allows digital camcorders to use conventional computer storage devices, like hard disk drives, CDs, DVDs, and Blu-ray discs. Instead of a miniature cassette tape, video is stored on the camcorder using a flash memory card - Secure Digital (SD) or Compact Flash (CF)-or an internal hard drive. The digital video is then transferred to your normal PC, where it can be edited, burned to a DVD, uploaded to the web, or streamed to a smart TV set or set-top box.
While there are many advantages to digital video formats, there are a number of drawbacks as well. The mode of capturing and archiving videos has shifted from storing videos on physical media to importing and storing data just like you would other digital data on your computer. This leaves your digital videos vulnerable to all the typical data loss risks: hard drive failure, virus attacks, accidental deletion, unsafe removal of memory cards, improper data migration, etc. But on the other hand, if you do experience data loss, video recovery from hard drives and flash cards is much easier than from damaged VHS tapes or DVDs. Because video files are just like the rest of the data on your computer, you can use the same powerful data recovery techniques that are effective for recovering or undeleting other files.
In this article, we'll illustrate a few different video recovery scenarios using four typical cases. In each scenario, we'll recover lost video clips and in some cases, restore the data so it can be used on the camcorder again.
Note that this article will primarily focus on recovering video from the AVCHD storage media used in camcorders and BlueRay disks. For recovering other video formats and photos, see our Photo and Video File Recovery Tutorial 2020 article.
Before We Begin: Data Recovery Basics and AVCHD File Structure
Although not required for completing the steps in this walkthrough, some basic background knowledge about data recovery will help contextualize some of the concepts covered here. Before reading on, you may want to read through our article File Recovery Basics: How Data Recovery Works.
For a successful video recovery it's also useful to understand how AVCHD data is stored on your camcorder's memory card and how R-Studio scans disks. Before we begin, we'll cover both of these topics in this article.
File Structure of an AVCHD Flash Card
Whether you use a CF card, an SD card, or an internal drive, AVCHD videos use a standard file structure when stored on your camcorder. For this example, we'll use an SD card from a Sony HDR-CX250E camcorder.
Like most memory cards used in consumer camcorders, the Sony HDR-CX250E video camera uses the FAT32 file system. The advantage of FAT32-formatted memory cards is that they can be read by Mac OS X, Windows, and Linux-based computers. The drawback of the FAT32 file system is that files stored on the card must be less than 2 GB each. As such, recorded videos will be divided into many files called video clips. This is in contrast to video tapes, which consist of one continuous video recording on a single tape. With digital videos, there are also a number of other files that contain important information about video clips, such as clip descriptions, playlists, service information, and other metadata.
Because of the number and complexity of the files on a digital camcorder memory card, it can often be difficult to tell which files on the card are essential to the video content and which are additional meta information. A typical example of an SD card with digital video content is shown in Fig. 1.
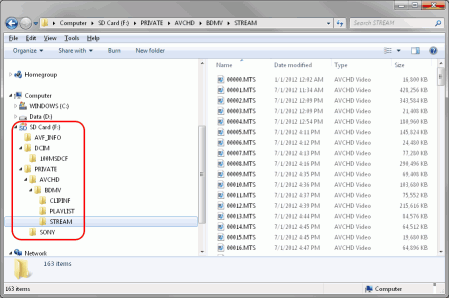
Fig.1. File structure of an AVCHD memory card
Click image to enlarge
In Fig.1, you'll notice a number of folders stored on the card. Table 1 provides an overview of the contents and purpose of each folder.
| FOLDER | FILE CONTENTS | DESCRIPTION |
| AVF_INFO | AVIN0001.BNP; AVIN0001.INP; AVIN0001.INT; PRV00001.BIN | This is a Sony-specific folder which contains information to support indexing and playback of files directly on the camcorder. When importing videos to a computer, this folder isn't usually necessary and oftentimes, it will be hidden. If deleted from the memory card, a Sony camcorder can attempt to regenerate the data, but some information may be lost. Other brands may have similar folders that have different names but serve the same purpose. |
| DCIMA | *.jpeg; *.jpg | This folder contains still images captured by your camcorder. The format is usually jpeg, but other cameras may support other still photo formats. |
| BMDV | INDEX.BDM; MOVIEOBJ.BDM | INDEX.BDM is a clip index file and MOVIEOBJ.BDM is a clip description file. These files are not the video content themselves, but they contain information about the video clips. If deleted, a Sony camcorder will regenerate the files, but it may move the previously associated video clip files into a backup folder called AVCHD_BK. |
| PLAYLIST | *.mpl | *.mpl files are playlists that are also essential for video playback on the camcorder. |
| STREAM | *.mts | Unlike the above files, *.mts files contain the actual video content of the recorded videos. These are the largest files and are the most important when recovering video data. |
Table 1. AVCHD Memory Card File and Folder Structure
Note for Mac Users: Mac OS X shows this file structure as a single object. Control-click the object and select Show Package Contents on the contextual menu to see this structure.
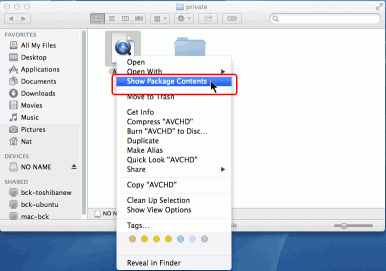
Fig.2. File structure of an AVCHD card shown by a Mac computer.
Click image to enlarge
Recovering AVCHD Video Content and File Structure
Although .mts files are the actual video content of the files, it's important to recover the entire folder structure when working with a memory card from a camcorder, if possible. Most players, smart TVs, and computers require the entire structure to play videos-they cannot play .mts files alone.
As mentioned above, some camcorders will automatically repair and recover the file information and folder structure when a damaged card is inserted into the camera. However, depending on what caused the damage or data loss, this may not always be successful.
For a complete video recovery, the card should be restored to its original state, including the entire file and folder structure. This allows the data to be restored to another card so it can be used in a camcorder again. This is what we will attempt to do in our four scenarios below.
That being said, if the file structure is lost and cannot be recovered, video content can be salvaged from the .mts files. If you find yourself with only .mts files, there are a few options:
- Convert .mts files into a more common standalone format, such as .m4p or .avi.
- Playback the .mts file using a third-party player such as VLC from VideoLan
- Use video authoring software (such as AVCHDCoder or multiAVCHD) to recreate the file structure
The software titles mentioned above are free for personal use and may be useful to have in addition to R-Studio. Note, however, that the memory card should remain untouched until data recovery has been performed-do not attempt to open or convert files directly on the card until you are completely satisfied with your data recovery results. Overwriting data on a card before it is recovered can be avoided by creating an image of the card before proceeding (see below).
If you only need to recover video clips and stills, you may use our free software R-Photo, although you won't be able to recover the entire folder/file structure using this software.
Create a Disk Image and Scan of an AVCHD Memory Card
One of the most important guideline for data recovery is to use disk images rather than the original disks whenever possible. In practice, this can be hard to follow for 2-3 TB hard drives, but SD cards are relatively small (most are about 32 to 64 GB). Therefore, imaging an SD card is not prohibitively time consuming and can improve your data recovery results. By working with a disk image, you also preserve the original card, so that it can be turned over to a professional data recovery service if your attempts are unsuccessful.
R-Studio can create an image of the card while performing a read-only scan of the disk's data. This is a deep scan that provides a thorough analysis of the card's data. This analysis will be necessary to recover the videos. As such, each video recovery scenario begins with an R-Studio disk image creation and scan.
To create an image of the card and scan its data, perform the following steps:
1. Select the memory card from the Drives panel and click the Create Image button.
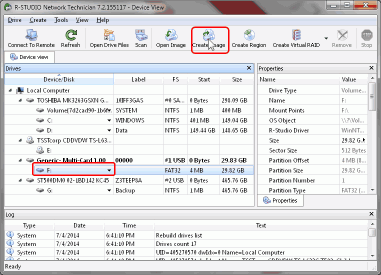
Fig.3. Select a Memory Card and Create a Disk Image (Step 1)
Click image to enlarge
2. In the Create image dialog box, select Compressed Image (R-Drive Image Compatible) and move the slider under Compression ratio all the way to the right toward Smaller size.
Specify the path and filename for storing the image file at the top of the dialog. Use the .rdr extension.
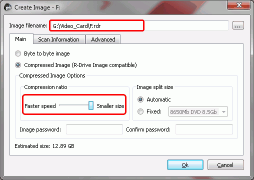
Fig.4. Create Image - Main (Step 2)
Click image to enlarge
Select the Create scan information file option. Make sure that FAT/exFAT is selected for File System. If not, choose FAT/exFAT from the Change... drop-down list.
Select the Extra Search for Known File Types option and click the Known File Types Button.
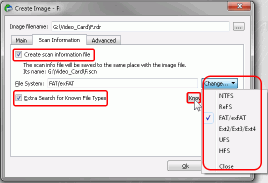
Fig.5. Create Image - Scan Information (Step 3)
Click image to enlarge
4. From the Known File Types dialog, click the Clear All button. Select the Multimedia, Multimedia Audio, and Multimedia Video items on the Known File Types list. Then, click the OK button.
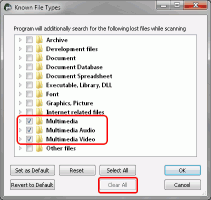
Fig.6. Create Image - Scan Information / Extra Search for Known File Types (Step 4)
Click image to enlarge
5. From the Create Image dialog, click OK.
R-Studio will start creating the image and scanning the data. The progress will be shown.
6. After the image and scan info are created, the AVCHD memory card can be ejected. For the remaining steps, use the card image and scan info that were created in the steps above.
7. To load the image and can info in R-Studio, click the Open Image button and browse to the image file from the path specified in Step 2. When the image is loaded, right-click the disk in the image and select Open Scan Information from the contextual menu.
The Scan Information panel will appear to the right of the Drives panel.
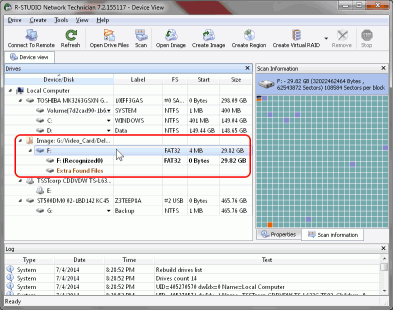
Fig.7. R-Studio Scan Information and Results (Step 7)
Click image to enlarge
Video Recovery: Data Recovery from Four Common Video Loss Scenarios
For digital video, data loss occurs most commonly in four different scenarios:
- Video clip accidentally deleted from the camcorder
- Memory card accidentally formatted by the camcorder
- Memory card accidentally formatted by a computer
- Memory card data corrupted (e.g. from improper ejection)
The chances for successful recovery from the above scenarios rely on a number of factors. Before proceeding with the examples, we'll take a look at those factors so you can get an idea of how likely a successful video recovery will be.
Scenario 1: Video Clip Accidentally Deleted from the Camcorder
When you delete a video clip directly from your camcorder, it not only removes the video content (the .mts file), it also removes the information various other files and indexes. When you recover a video file that was deleted in this way, it will usually be recovered without this additional information.
Because of this, simply writing the deleted video clip files back to their place on the folder structure will not be enough to restore the video content in a way that is readable by the camcorder. In order for the clip to be playable again, you will also need to restore the information and service files that were removed when the clip was deleted by the camcorder.
There are two solutions to this problem. You can either use AVCHD authoring software to recreate the files and information required to incorporate the video clip file into the AVCHD structure. Or, you can convert the video clip (.mts) file into a more common video format that does not require the additional AVCHD information.
In this scenario, chances for recovering the lost video are very high, provided that no videos were recorded after accidentally deleting the clip. If a clip was deleted (for example, to free up storage), and then more videos were recorded onto the card, prospects are grim for a successful video recovery; it is likely that the old files were overwritten by the newer files.
As mentioned above, the meta information from the AVCHD file structure is likely lost. Our main goal in this scenario is to recover the deleted .mts files from the STREAM folder. To do so, perform the following steps:
1. Scan and create an image of the memory card and load the image into R-Studio. See the Create a Disk Image and Scan of an AVCHD Memory Card section above for specific steps.
2. Open the disk in the card image (F: (Recognized0) in our case) on the R-Studio Device view panel, and go to the STREAM folder. You may need to expand some of the folders to find the STREAM folder. For the Sony card used in this example, STREAM is located in F:\Private\AVCHD\BDMV\.
3. Locate the deleted video clip files in the Contents pane, mark them for recovery, and click the Recover Marked button.
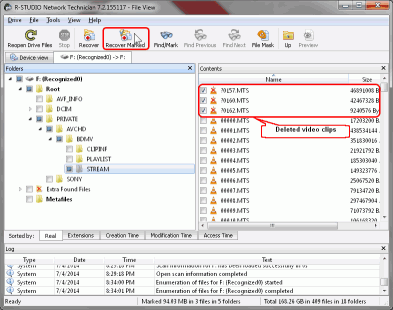
Fig.8. Video Recovery: Deleted Video Clips Marked for Recovery (Step 3)
Click image to enlarge
4. In the Recover dialog, specify the output folder for recovered files.
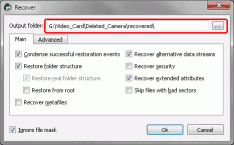
Fig.9. Video Recovery Parameters: Recover - Main (Step 4)
Click image to enlarge
Leave the other parameters at their default values. (For more information on these parameters, see the R-Studio On-line Help documentation).
5. From the Advanced tab, in the Broken File Name section, select Rename and change all Invalid symbols to: and specify a value for the first character (0 for our case). Click the OK button.
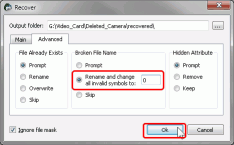
Fig.10. Video Recovery Parameters: Recover - Advanced (Step 5)
Click image to enlarge
R-Studio will start recovering files, showing its progress.
6. When the recovery is complete, browse to the output folder selected in Step 4.
Fig.12 show three files: one unsuccessfully recovered video clip and two successfully recovered video clips. In our case, the unsuccessfully recovered file most likely was overwritten by a new video clip.
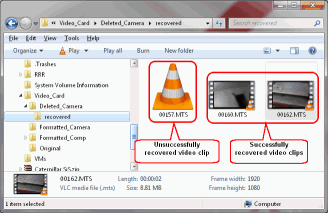
Fig.11. Video Recovery: Recovered Video Clips
Click image to enlarge
Because VLC media player is installed, the .mts files can be played from Windows. You can also use a video converter to convert the .mts files to another format.
Scenario 2: Memory Card Accidentally Formatted by the Camcorder
When a memory card is formatted by a camera, the chances for video recovery are much worse than when individual video clips are deleted. This is because when the camcorder formats the card, the camera will not only erase the video content and the metadata, it will also recreate a new, empty AVCHD folder structure. The new structure will overwrite the deleted data, significantly decreasing your chances for a successful video recovery.
Nevertheless, depending on the capacity of the card and how much free space was on the card prior to formatting, it may be possible to recover some or all of the deleted .mts video clip files. This can be done using the scan for known file types operation in R-Studio. Once the .mts clips are recovered, they can be converted, imported into AVCHD authoring software to recreate their folder structure, or played by a third-party video player such as VLC.
To recover the video clips, perform the following steps:
1. Scan and create an image of the memory card and load the image into R-Studio. See the Create a Disk Image and Scan of an AVCHD Memory Card section above for specific steps.
2. Open the disk in the card image (F: (Recognized0) in our case) on the R-Studio Device view panel, and go to the Extra Found Files. Then, select the MPEG Transport Stream Video folder.
3. Locate the deleted video clip files, mark them for recovery, and click the Recover Marked button.
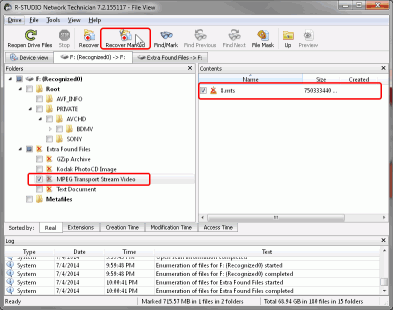
Fig.12. Video Recovery: Found Video Clips Marked for Recovery (Step 3)
Click image to enlarge
4. In the Recover dialog, specify the output folder for recovered files.
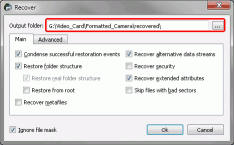
Fig.13. Video Recovery Parameters: Recover - Main (Step 4)
Click image to enlarge
Leave the other parameters at their default values. (For more information on these parameters, see the R-Studio On-line Help documentation).
5. Click the OK button. R-Studio will start recovering files, showing its progress.
6. When the recovery is complete, browse to the output folder selected in Step 4.
Fig.14 shows a recovered video clip.

Fig.14. Video Recovery: Recovered Video Clip
Click image to enlarge
Scenario 3: Memory card accidentally formatted by a computer
There are two types of format a computer can perform: quick (default) and full. The quick format cleans only the file table of the disk, leaving many file traces and the contents of the files untouched. This makes your chances for a successful video recovery very good. On the other hand, the full format overwrites the data, erases the file table and overwrites the data on the card with zeroes, making video recovery practically impossible.
Fortunately, most accidental formats involve a quick format. This often occurs when a card is inserted into a computer and the file system is not recognized. The operating system may prompt to format the card, which in most cases entails a quick format.
With a quick format, a disk scan usually reveals the entire folder structure with the uncorrupted files, so long as nothing has been written to the card after the format was performed. Moreover, it may be possible to restore the file structure on the card and use it further in the camera as if the format never occurred.
Our goal in this case will be to recover the entire folder and file structure of the card. To do so, perform the following steps:
1. Scan and create an image of the memory card and load the image into R-Studio. See the Create a Disk Image and Scan of an AVCHD Memory Card section above for specific steps.
2. Open the disk in the card image (F: (Recognized0) in our case) on the R-Studio Device view panel, and browse through its file system to locate the AVCHD folder structure.
3. Mark the found folders and click the Recover Marked button.
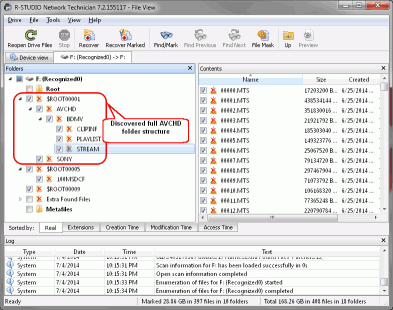
Fig.15. Video Recovery: Found AVCHD Folders and Files Marked For Recovery (Step 3)
Click image to enlarge
4. In the Recover dialog, specify the output folder for recovered files.
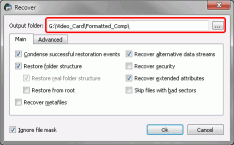
Fig.16. Video Recovery Parameters: Recover - Main (Step 4)
Click image to enlarge
Leave the other parameters at their default values. (For more information on these parameters, see the R-Studio On-line Help documentation).
5. Click the OK button. R-Studio will start recovering files, showing its progress.
6. When the recovery is complete, browse to the output folder selected in Step 4.
The figures below show the recovered video clips and file structure. To restore the card, you can copy the file and folder structure from your recovery folder back to the card (after ensuring that all the files were recovered successfully).
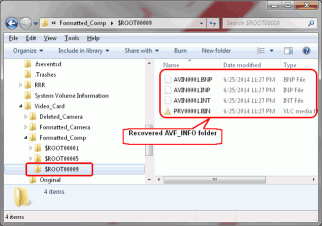
Fig.17. Video Recovery: Recovered AVCHD Folders and Files
Click image to enlarge
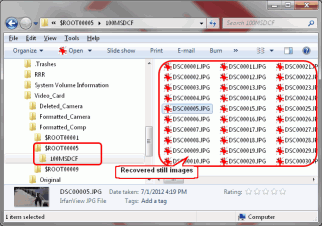
Fig.18. Video Recovery: Recovered AVF_INFO Folder and Files
Click image to enlarge
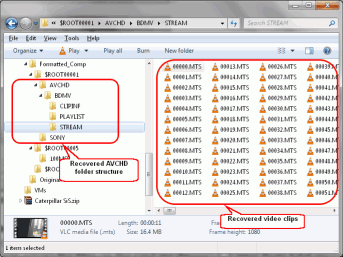
Fig.19. Video Recovery: Recovered Still Images
Click image to enlarge
Scenario 4: Memory Card Data Corrupted
Memory card corruption can occur due to a number of reasons, including improper ejection, a failed format operation, or exposure to physical damage. Because of the causes and severity of the file system and file damage can vary widely, so too do your chances for a successful file recovery. In some cases, you can recover all of your video files (for example, if the file table is corrupted but the contents are intact) and in others, you may not be able to recover any video content.
For this scenario, we'll work with a card that was ejected from a camcorder while recording video.
When opened on a computer, the card contains only an empty folder with video clips.
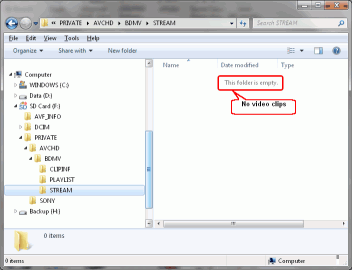
Fig.20. Video recovery: Empty video clip folder
Click image to enlarge
In a case like this, it's expect that we'll be able to recover the video clip files only (.mts) which can be later converted into more common video formats or imported into AVCHD authoring software to recreate the folder structure.
To recover the video clips, perform the following steps:
1. Scan and create an image of the memory card and load the image into R-Studio. See the Create a Disk Image and Scan of an AVCHD Memory Card section above for specific steps.
2. Open the disk in the card image (F: (Recognized0) in our case) on the R-Studio Device view panel, and go to the STREAM folder. You may need to expand some of the folders to find the STREAM folder. For the Sony card used in this example, STREAM is located in F:\Private\AVCHD\BDMV\.
3. Mark the found folders and click the Recover Marked button.
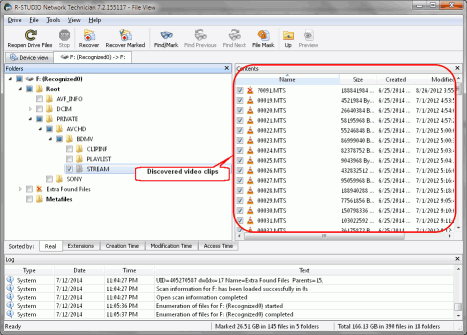
Fig.21. Video recovery: Found full AVCHD folders and files marked for recovery (Step 3)
Click image to enlarge
4. In the Recover dialog, specify the output folder for recovered files.
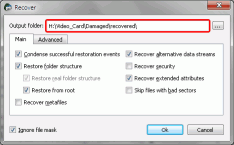
Fig.22. Video Recovery Parameters: Recover - Main (Step 4)
Click image to enlarge
Leave the other parameters at their default values. (For more information on these parameters, see the R-Studio On-line Help documentation).
5. Click OK. R-Studio will start recovering files, showing its progress.
6. When the recovery is complete, browse to the output folder selected in Step 4.
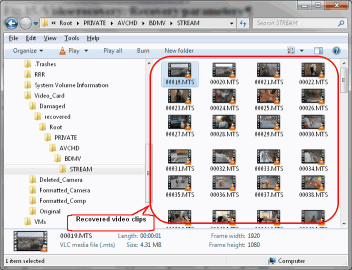
Fig.23. Video recovery: Recovered Video Clips
Click image to enlarge
Conclusion
Compared to analog video tapes, restoring accidentally deleted videos from a digital camcorder is much more feasible. You can use the same data recovery methods on a camcorder memory card as you would for accidentally deleted files or formatted drives on a computer. The principle challenge of recovering video is understanding the AVCHD file structure and identifying which files need to be restored in order to undelete or recover your video files. With some basic file recovery knowledge and the steps illustrated above, you can successfully recover lost video data with relatively high success using R-Studio.
- R-Studio Technician: activation using a USB stick
- Data Recovery Guide
- Why R-Studio?
- R-Studio for Forensic and Data Recovery Business
- R-STUDIO Review on TopTenReviews
- File Recovery Specifics for SSD devices
- How to recover data from NVMe devices
- Predicting Success of Common Data Recovery Cases
- Recovery of Overwritten Data
- Emergency File Recovery Using R-Studio Emergency
- RAID Recovery Presentation
- R-Studio: Data recovery from a non-functional computer
- File Recovery from a Computer that Won't Boot
- Clone Disks Before File Recovery
- HD Video Recovery from SD cards
- File Recovery from an Unbootable Mac Computer
- The best way to recover files from a Mac system disk
- Data Recovery from an Encrypted Linux Disk after a System Crash
- Data Recovery from Apple Disk Images (.DMG files)
- File Recovery after Re-installing Windows
- R-Studio: Data Recovery over Network
- How To Use R-Studio Corporate Package
- Data Recovery from a Re-Formatted NTFS Disk
- Data Recovery from an ReFS disk
- Data Recovery from a Re-Formatted exFAT/FAT Disk
- Data Recovery from an Erased HFS Disk
- Data Recovery from an Erased APFS Disk
- Data Recovery from a Re-Formatted Ext2/3/4FS Disk
- Data Recovery from an XFS Disk
- Data Recovery from a Simple NAS
- How to connect virtual RAID and LVM/LDM volumes to the operating system
- Specifics of File Recovery After a Quick Format
- Data Recovery After Partition Manager Crash
- File Recovery vs. File Repair
- Data Recovery from Virtual Machines
- How to Recover Files from a Remote Computer Using R-Studio Standalone License and Its Network Capabilities in Demo Mode
- How to Connect Disks to a Computer
- Emergency Data Recovery over Network
- Data Recovery over the Internet
- Creating a Custom Known File Type for R-Studio
- Finding RAID parameters
- Recovering Partitions on a Damaged Disk
- NAT and Firewall Traversal for Remote Data Recovery
- Data Recovery from an External Disk with a Damaged File System
- File Recovery Basics
- Default Parameters of Software Stripe Sets (RAID 0) in Mac OS X
- Data Recovery from Virtual Hard Disk (VHD/VHDX) Files
- Data Recovery from Various File Container Formats and Encrypted Disks
- Automatic RAID Parameter Detection
- IntelligentScan Data Recovery Technology
- Multi-pass imaging in R-Studio
- Runtime Imaging in R-Studio
- Linear Imaging vs Runtime Imaging vs Multi-Pass Imaging
- USB Stabilizer Tech for unstable USB devices
- Joint work of R-Studio and PC-3000 UDMA hardware
- Joint work of R-Studio and HDDSuperClone
- R-Studio T80+ - A Professional Data Recovery and Forensic Solution for Small Business and Individuals Just for 1 USD/day
- Backup Articles
- R-Drive Image Standalone and Corporate license transferring
- Fixing Windows update error 0x80070643 with R-Drive Image
- Backup with Confidence
- R-Drive Image as a free powerful partition manager
- Computer Recovery and System Restore
- Disk Cloning and Mass System Deployment
- Accessing Individual Files or Folders on a Backed Up Disk Image
- R-Drive Image startup / bootable version
- File Backup for Personal Computers and Laptops of Home and Self-Employed Users
- Creating a Data Consistent, Space Efficient Data Backup Plan for a Small Business Server
- How to Move the Already Installed Windows from an Old HDD to a New SSD Device and Create a Hybrid Data Storage System
- How to Move an Installed Windows to a Larger Disk
- How to Move a BitLocker-Encrypted System Disk to a New Storage Device
- How to backup and restore disks on Linux and Mac computers using R-Drive Image
- R-Drive Image and Virtual Machines
- Undelete Articles
- Get Deleted Files Back
- Free Recovery from SD and Memory cards
- R-Undelete: Video Recovery
- Recovery from an External Device with a Damaged File System
- File recovery from a non-functional computer
- Free File Recovery from an Android Phone Memory Card
- Free Photo and Video File Recovery Tutorial
- Easy file recovery in three steps
Rating: 4.8 / 5
R-TT may not be the easiest or most user-friendly solution, but the algorithm used for the renaming saved me THOUSAND of hours of opening ...