- PRODUCTSFREEWAREFOR COMMERCIAL USEFOR PERSONAL AND BUSINESS USEBackup and System Restore:PC Privacy and Security:
- BUY ONLINE
- DISTRIBUTION
-
Data Recovery from a Simple NAS


NAS (Network Attached Storage) devices are becoming more and more popular both in home and small to medium size business environments. Compared to PC-based file servers, they are inexpensive, consume less electricity, and are easy to maintain even for a not so experienced person.
Most NAS devices use RAIDs of various types for disk fault tolerance and data consistency. Many NAS vendors offer their customers their proprietary RAID management systems that are able to combine different hard drives into quite complex RAID systems without much knowledge of RAID technology. Those systems allow home or small business users to efficiently utilize their spare hard drives, but they also come with one drawback: when it comes to data recovery, it's not clear how handle such RAID systems.
This article will show you how to use our data recovery program R-Studio to recover files from typical simple NAS configurations.
General notes on data recovery from NAS devices
Most commercial NAS devices differ from regular PCs: quite often they use Intel-incompatible CPUs (usually PowerPC processors), they have no video output ports, and it's impossible to connect a keyboard and mouse to them. Therefore none of the available data recovery tools, R-Studio or R-Studio Agent included, can run directly on such devices. That's why disks should be taken out from such devices and connected to a computer where R-Studio is installed.
Most NAS devices runs on a customized version of the Linux OS. All various proprietary RAID management systems are based on two Linux RAID technologies: mdadm and LVM2. Those systems create more user-friendly interfaces for disk management, whereas the underlying technology remains pure native Linux. R-Studio supports both of these technologies and can assemble such RAIDs automatically in most cases.
We also recommend you to save images of the disks, as data recovery professionals always do, and perform all file recovery from such images. Our article Clone Disks before File Recovery explains why. The drawback of this approach is that such images may be quite large, and if disk space to store those images is a problem, you may recover data directly from the disks, provided that you're absolutely sure that the disks in the NAS device are healthy. You may check this using disks S.M.A.R.T. attributes, which we'll explain later.
You'll also need a free disk space large enough to store recovered files. It may be an internal or external disk, or other storage device visible to the host computer, including connected network disks.
In this article we'll use free OpenMediaVault as our test NAS because it can use the RAID and LVM2 technologies in the most transparent way.
If the NAS volumes were reformatted, you can also use this article to re-create the RAIDs and then follow the instructions in our article Data Recovery from a Re-formatted ext4FS disk.
A mdadm RAID-based NAS
NAS configuration:
We used three 500 GB disks in this configuration. The most efficient way to utilize them is to create a RAID5. This is a good trade-off between storage space and reliability.
Fig. 1 shows the components of such a RAID5 created using the mdadm technology.
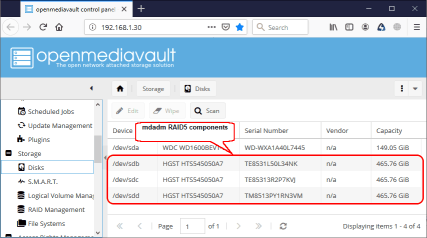
Fig.1. mdadm RAID5 components.
Click image to enlarge
An ext4fs volume based on this RAID5 was created and made accessible on a local network as the //NAS-TEST/NAS-test/ share. Then some files were written to that share. Fig. 2 shows the file system stored on this NAS device.
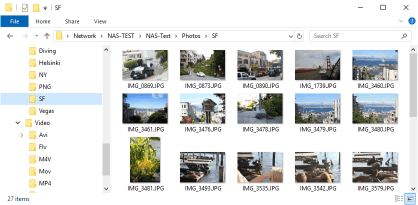
Fig.2. File system on the NAS device.
Click image to enlarge
Then the SF folder containing jpg files was deleted.
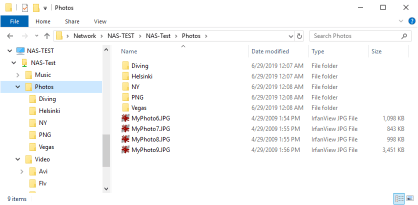
Fig.3. File system on the NAS device with the deleted SF folder.
Click image to enlarge
To make the situation much worse, one disk in the RAID5 failed. Its S.M.A.R.T. status went red (a failure) and soon the disk stopped working at all.

Fig.4. A failed disk in the RAID5.
Click image to enlarge
Due to this hardware failure the NAS share became inaccessible on the local network.
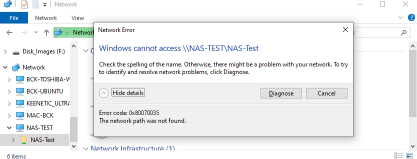
Fig.5. Inaccessible NAS share.
Click image to enlarge
Data Recovery:
As it was said before in this article, the disks should be taken out of the NAS device and connected to a computer with installed R-Studio and data recovery should take place on that computer.
1. Start R-Studio and locate the NAS mdadm RAID5 and its components:
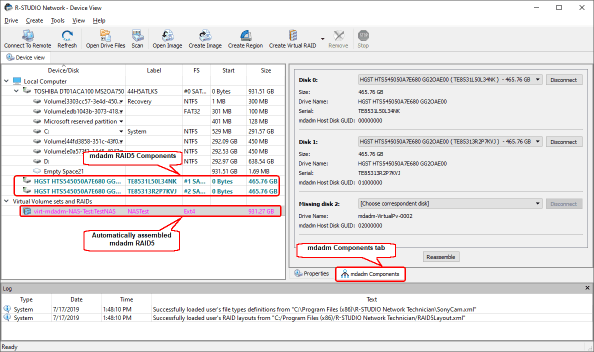
Fig.6. mdadm RAID5 in R-Studio.
Click image to enlarge
You may also add RAID5 components manually, if R-Studio cannot automatically identify some of them. See R-Studio help for details: Linux mdadm RAIDs.
2. Then immediately check the S.M.A.R.T. status of the RAID5 components. Select the disk and its S.M.A.R.T. tab.
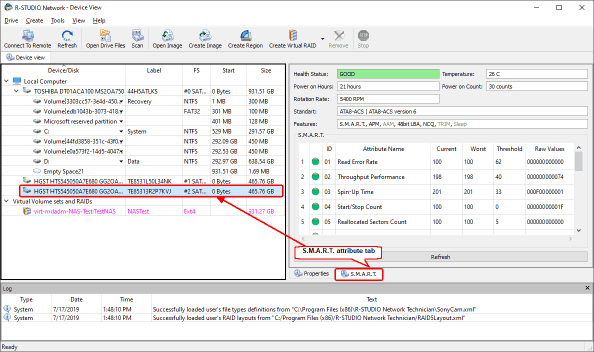
Fig.7. S.M.A.R.T. attributes of the RAID5 components.
Click image to enlarge
In our case, all components are healthy, and we can recover data directly from physical disks rather than their images.
3. Double-click the mdadm RAID5 and wait for R-Studio to enumerate files. Locate the deleted folder and go to it to browse its files.
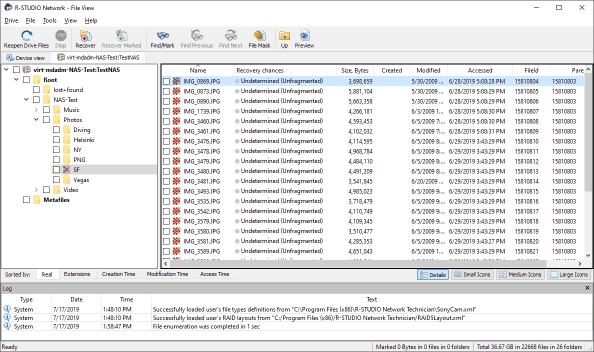
Fig.8. Deleted folder in R-Studio
Click image to enlarge
4. Check file recovery chances for the deleted files. Right-click a file and select Recheck Recovery Chances on the shortcut menu.
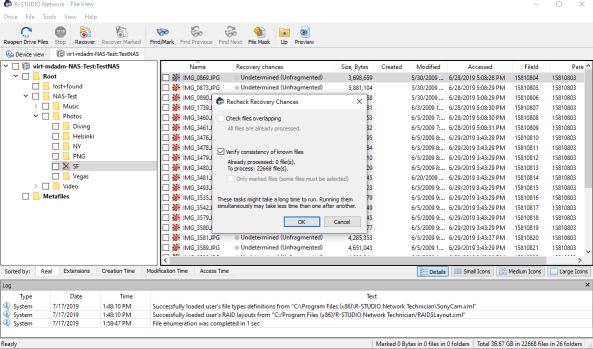
Fig.9. Rechecking recovery chances.
Click image to enlarge
Select Verify consistency of known files on the Recheck Recovery Chances dialog box to improve the accuracy of chance estimate.
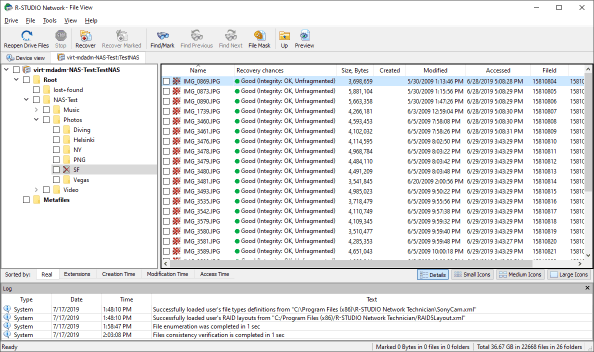
Fig.10. Recovery chances.
Click image to enlarge
5. You may search for specific files and preview them.
For graphic files, you may do it in two ways:
a) By viewing them as icons.
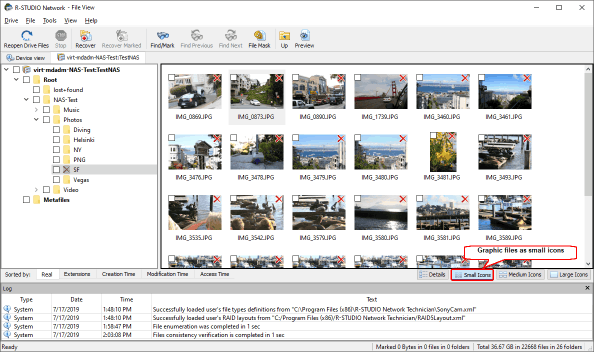
Fig.11. Graphic files as small icons.
Click image to enlarge
You may select Small Icons, Medium Icons, or Large Icons tab, whatever is convenient to you.
b) By viewing a particular file in a built-in File Previewer. Double-click the file to view it.
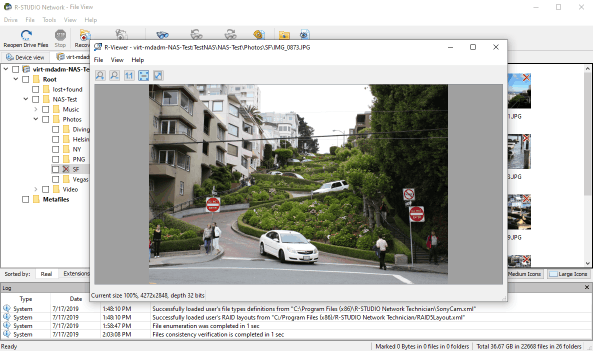
Fig.12. File previewer.
Click image to enlarge
The File Previewer in R-Studio supports many file formats, including almost all graphic, video, and audio files, and Microsoft Office, Open/Libre Office, and pdf documents. It plays/shows them even without their native applications installed.
You may also search for individual files and folders. See R-Studio help for details: Searching for a File.
6. Mark files for recovery
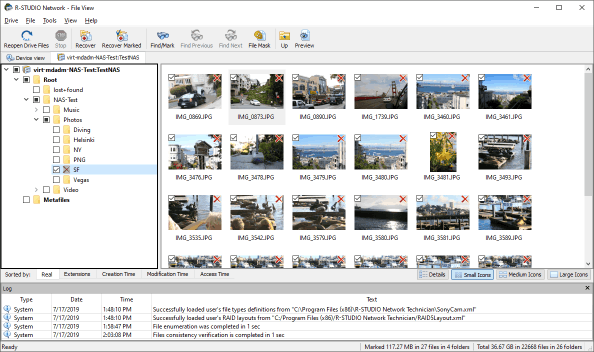
Fig.13. Files marked for recovery.
Click image to enlarge
When all necessary files are marked, click the Recover Marked button and specify place to store recovered files and other recovery parameters.
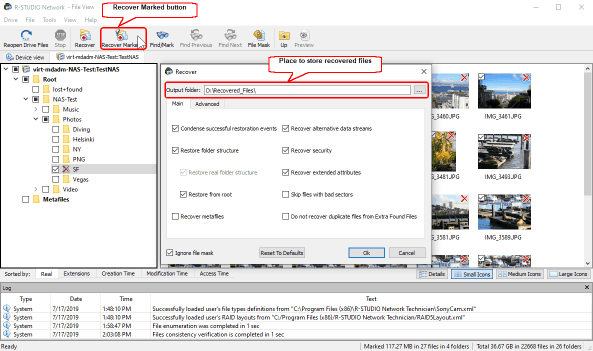
Fig.14. Recovery parameters.
Click image to enlarge
See R-Studio on-line help for details: Basic File Recovery.
When all parameters are specified, click the OK button, and R-Studio will start file recovery showing its progress.
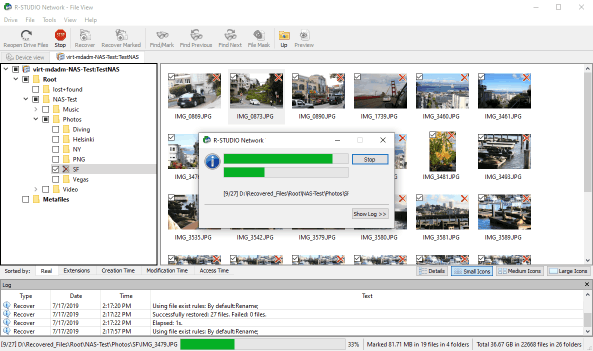
Fig.15. Recovery progress.
Click image to enlarge
When the recovery is completed, you may go to the folder the recovered files have been saved to and browse through them.

Fig.16. Recovered files.
Click image to enlarge
A mdadm RAID/LVM2-based NAS
NAS configuration:
In this configuration another set of storage devices will be used: one 1 TB and two 500 GB disks. Fig. 17 shows this disk set.
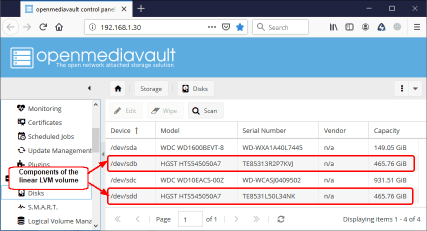
Fig.17. Disk set for the mdadm RAID/LVM2-based NAS.
Click image to enlarge
In this case the best trade-off between storage space and reliability is to create a liner (sequential) LVM2 volume of two 500 GB disks and then create a RAID1 (mirror) volume of the 1 TB disk and the linear LVM2 volume. Fig. 18 shows this configuration.
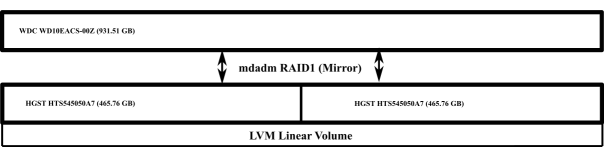
Fig.18. Volume configuration of the mdadm RAID/LVM2-based NAS.
Click image to enlarge
An ext4fs volume based on this RAID5 was created and made accessible on a local network as the //NAS-TEST/NASTest/ share. Then some files were written to that share. Fig. 19 shows the file system stored on the NAS device.
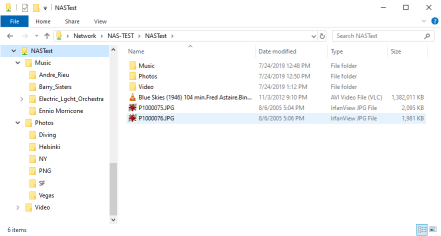
Fig.19. File system on the NAS device.
Click image to enlarge
Then the 1 TB disk failed and the share was inaccessible on the network.
A special data recovery procedure has to be performed to get all of the files back.
Data Recovery:
Again, the disks should be taken out of the NAS device and connected to a computer with installed R-Studio, and data recovery should take place on that computer.
1. Start R-Studio and locate the NAS disks and automatically created mdadm RAID1.
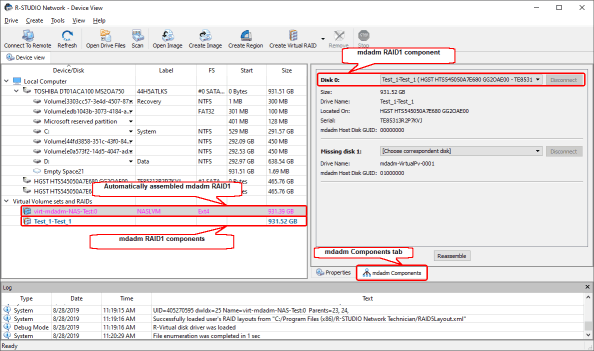
Fig.20. mdadm RAID1 and its components in R-Studio.
Click image to enlarge
R-Studio should create it detecting the RAID parameters automatically. You may also add mdadm RAID1 components manually, if R-Studio cannot automatically identify some of them, see R-Studio help for details: Linux mdadm RAIDs.
The component of this mdadm RAID1 is another complex disk object - an LVM volume Test_1-Test_1.
2. To check S.M.A.R.T. status of the hard drives from the NAS, we need to locate them in the Device View panel. Select the Test_1-Test_1 object and locate its hard drives.
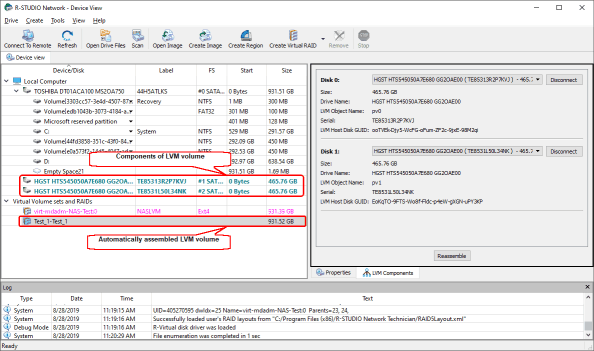
Fig.21. LVM2 volume and its components in R-Studio
Click image to enlarge
Check the S.M.A.R.T. status of those hard drives by selecting the drive in the Device View panel and its S.M.A.R.T. tab.
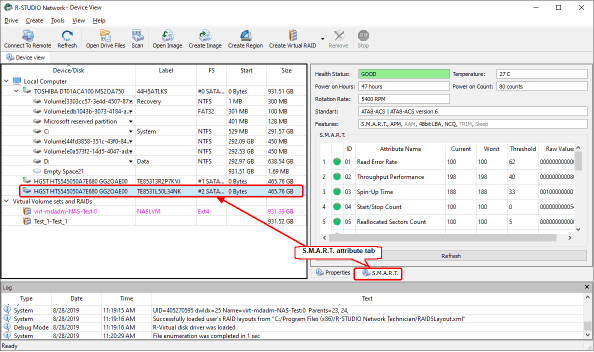
Fig.22. S.M.A.R.T. attributes of the LVM2 components.
Click image to enlarge
3. R-Studio has automatically found a valid file system on this mdadm RAID1 (the virt-mdadm-NAS-Test:0 object). Double-click this object and wait for R-Studio to enumerate the files.
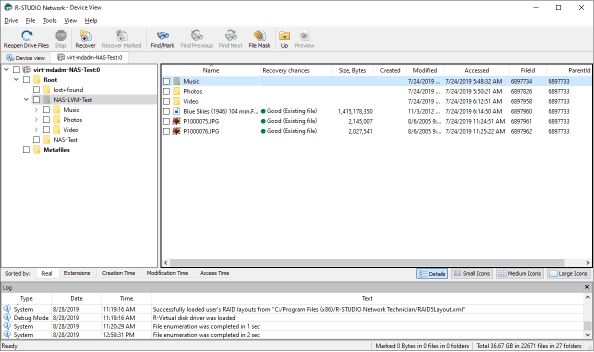
Fig.23. File system on the NAS device.
Click image to enlarge
No files were deleted from the NAS device, that is why R-Studio is able to immediately determine chances for successful recovery for the files. So, no need to recheck them again.
4. You may search for specific files and preview them.
For graphic files, you may make R-Studio show them as icons.
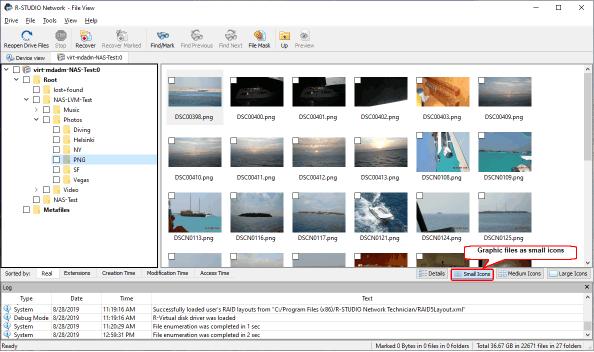
Fig.24. Graphic files shown as icons.
Click image to enlarge
Many other files can be displayed in a built-in File Previewer. Double-click the file to play it back.
The File Previewer in R-Studio supports many file formats, including almost all graphic, video, and audio files, and Microsoft Office, Open/Libre Office, and pdf documents. It plays/shows them even without their native applications installed.

Fig.25. Movie file played back in Previewer.
Click image to enlarge
You may also search for individual files and folders. See R-Studio help for details: Searching for a File.
5. Mark files for recovery.
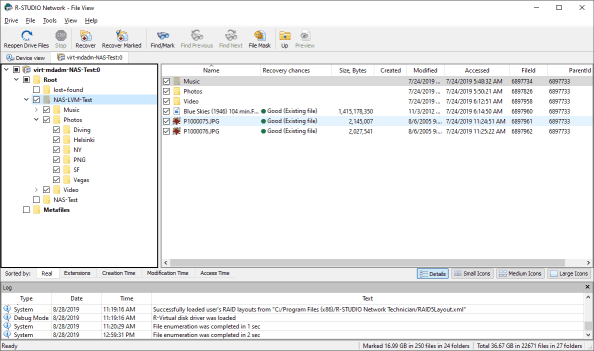
Fig.26. Files marked for recovery.
Click image to enlarge
When all necessary files are marked, click the Recover Marked button and specify a place to store recovered files and other recovery parameters.
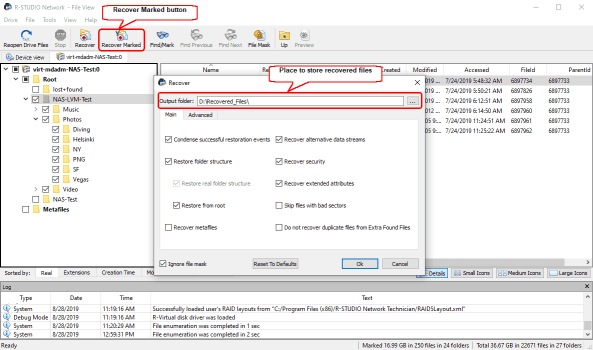
Fig.27. Recovery parameters.
Click image to enlarge.
In most cases, leave them with their default values. See R-Studio help for more details if necessary: Basic File Recovery.
When all parameters are specified, click the OK button, and R-Studio will start file recovery showing its progress.

Fig.28. Recovery progress.
Click image to enlarge
Once the recovery is completed, you may go to the folder the recovered files have been saved to and browse through them.
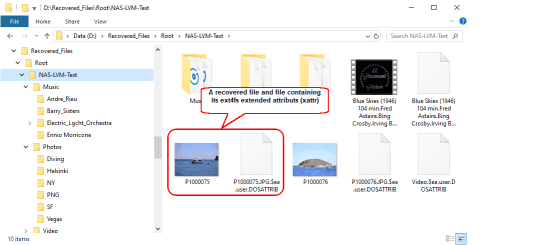
Fig.29. Recovered files.
Click image to enlarge
Conclusions
In our both NAS recovery cases R-Studio restored the RAID configuration automatically even for complex mdadm/LVM2 volumes, found deleted files and folders, and was able to recover all, even deleted, files.
- R-Studio Technician: activation using a USB stick
- Data Recovery Guide
- Why R-Studio?
- R-Studio for Forensic and Data Recovery Business
- R-STUDIO Review on TopTenReviews
- File Recovery Specifics for SSD devices
- How to recover data from NVMe devices
- Predicting Success of Common Data Recovery Cases
- Recovery of Overwritten Data
- Emergency File Recovery Using R-Studio Emergency
- RAID Recovery Presentation
- R-Studio: Data recovery from a non-functional computer
- File Recovery from a Computer that Won't Boot
- Clone Disks Before File Recovery
- HD Video Recovery from SD cards
- File Recovery from an Unbootable Mac Computer
- The best way to recover files from a Mac system disk
- Data Recovery from an Encrypted Linux Disk after a System Crash
- Data Recovery from Apple Disk Images (.DMG files)
- File Recovery after Re-installing Windows
- R-Studio: Data Recovery over Network
- How To Use R-Studio Corporate Package
- Data Recovery from a Re-Formatted NTFS Disk
- Data Recovery from an ReFS disk
- Data Recovery from a Re-Formatted exFAT/FAT Disk
- Data Recovery from an Erased HFS Disk
- Data Recovery from an Erased APFS Disk
- Data Recovery from a Re-Formatted Ext2/3/4FS Disk
- Data Recovery from an XFS Disk
- Data Recovery from a Simple NAS
- How to connect virtual RAID and LVM/LDM volumes to the operating system
- Specifics of File Recovery After a Quick Format
- Data Recovery After Partition Manager Crash
- File Recovery vs. File Repair
- Data Recovery from Virtual Machines
- How to Recover Files from a Remote Computer Using R-Studio Standalone License and Its Network Capabilities in Demo Mode
- How to Connect Disks to a Computer
- Emergency Data Recovery over Network
- Data Recovery over the Internet
- Creating a Custom Known File Type for R-Studio
- Finding RAID parameters
- Recovering Partitions on a Damaged Disk
- NAT and Firewall Traversal for Remote Data Recovery
- Data Recovery from an External Disk with a Damaged File System
- File Recovery Basics
- Default Parameters of Software Stripe Sets (RAID 0) in Mac OS X
- Data Recovery from Virtual Hard Disk (VHD/VHDX) Files
- Data Recovery from Various File Container Formats and Encrypted Disks
- Automatic RAID Parameter Detection
- IntelligentScan Data Recovery Technology
- Multi-pass imaging in R-Studio
- Runtime Imaging in R-Studio
- Linear Imaging vs Runtime Imaging vs Multi-Pass Imaging
- USB Stabilizer Tech for unstable USB devices
- Joint work of R-Studio and PC-3000 UDMA hardware
- Joint work of R-Studio and HDDSuperClone
- R-Studio T80+ - A Professional Data Recovery and Forensic Solution for Small Business and Individuals Just for 1 USD/day
- Backup Articles
- R-Drive Image Standalone and Corporate license transferring
- Fixing Windows update error 0x80070643 with R-Drive Image
- Backup with Confidence
- R-Drive Image as a free powerful partition manager
- Computer Recovery and System Restore
- Disk Cloning and Mass System Deployment
- Accessing Individual Files or Folders on a Backed Up Disk Image
- R-Drive Image startup / bootable version
- File Backup for Personal Computers and Laptops of Home and Self-Employed Users
- Creating a Data Consistent, Space Efficient Data Backup Plan for a Small Business Server
- How to Move the Already Installed Windows from an Old HDD to a New SSD Device and Create a Hybrid Data Storage System
- How to Move an Installed Windows to a Larger Disk
- How to Move a BitLocker-Encrypted System Disk to a New Storage Device
- How to backup and restore disks on Linux and Mac computers using R-Drive Image
- R-Drive Image and Virtual Machines
- Undelete Articles
- Get Deleted Files Back
- Free Recovery from SD and Memory cards
- R-Undelete: Video Recovery
- Recovery from an External Device with a Damaged File System
- File recovery from a non-functional computer
- Free File Recovery from an Android Phone Memory Card
- Free Photo and Video File Recovery Tutorial
- Easy file recovery in three steps
Rating: 4.9 / 5
Bought it and 100% recommend it for anyone with a similar issue.
Thank you very much for R-Studio for Linux.
Please pay attention to new Linux package manager `Snappy` => https://snapcraft.io/
Good luck!
Regrettably it`s not possible to simply restore the accidently zapped partitions ?
An installer wiped my boot drive without asking and erased LVM and other partitions.