- PRODUCTSFREEWAREFOR COMMERCIAL USEFOR PERSONAL AND BUSINESS USEBackup and System Restore:PC Privacy and Security:
- BUY ONLINE
- DISTRIBUTION
-
Data Recovery from an External Disk with a Damaged File System


Note: Data recovery from various formatted disks is described in the following articles:
- Data Recovery from a Reformatted NTFS Disk (Windows)
- Data Recovery from an Erased HFS or HFS+ Disk (macOS)
- Data Recovery from an Erased APFS Disk
- Data Recovery from a Re-Formatted exFAT/FAT Disk (Windows/macOSX/Linux)
- Data Recovery from a Reformatted Ext2/3/4FS Disk (Linux)
External USB disks are becoming larger, faster and more affordable every day. This makes them nearly ideal for use as mass storage devices for music, videos, photos or as backup storage for files and systems.
While USB disks are generally very reliable as file storage, they do introduce some unique risks when compared to internal disks and non-removable media. The most obvious risks are physical hazards, such as a disk being dropped on the ground, mishandled or exposed to harsh environments (extreme heat or cold, moisture or direct sunlight) for a prolonged time.
Logical errors caused by improper removal from a computer or sudden power loss are also a common risk for removable hard disk and flash drives. All major operating systems include an "eject" command, which prepares your disk to be physically removed from the computer or device. This ensures that no write operations are currently in progress when the disk is removed. If a disk is roughly disconnected while the operating system is accessing it, the disk's file system may be damaged, causing the disk (and the files on it) to become inaccessible. When attempting to mount the disk, the computer will be unable to recognize the file system or may see it as unallocated space (and therefore ask to format the disk). The screenshot below shows a damaged disk in Windows Disk Manager.
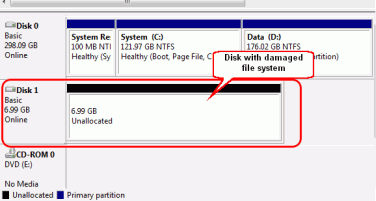
Click image to enlarge
Other operating systems show such disks much the same way
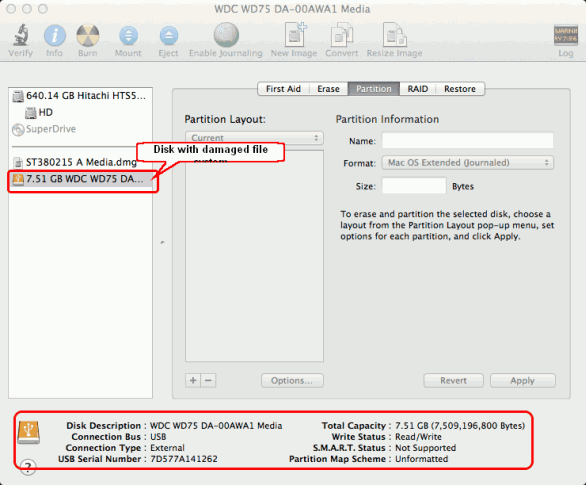
Click image to enlarge
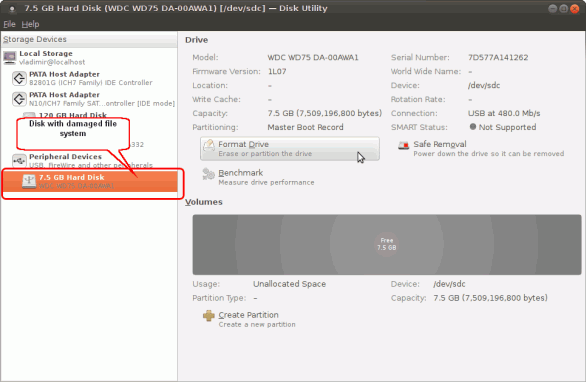
Click image to enlarge
Judging by the information given by these disk utilities, it may appear that the data on the disk has been completely wiped out or lost. However, in most cases, it hasn't been. Some or all of your data may still be on the disk, albeit invisible to the operating system.
R-Studio is a data recovery utility that lets you "see" that data in ways that the operating system can't. R-Studio can identify and analyze the contents of the damaged disk without relying on an intact file system. This allows you to recover your important data, even if the disk is damaged beyond readability. This article will show you how to do that, step by step.
Before We Begin
Important: This step-by-step data recovery tutorial presumes that your disk is in good physical shape and is damaged due to a logical error (e.g. improper disconnection or accidental reformat). If there appears to be a hardware problem with the disk or if the disk has suffered some sort of physical trauma, it's best to seek out the services of a professional data recovery specialist. Beyond checking that the cables are firmly connected, any "do it yourself" data recovery efforts may actually worsen your chances of recovering the data if your disk has a serious physical malfunction. Signs that a disk has a physical failure include:
- The system does not recognize the device at all, or it appears with an unusual or garbled name.
- A SMART (Self-Monitoring, Analysis and Reporting Technology) utility warns that a severe hardware failure event has occurred.
- The hard drive makes unusual noises, clicks, or takes a very long time to spin up and initialize.
- Bad blocks continually appear on the drive.
All these cases are best handled by qualified data recovery professionals only. They have special equipment, software, and, most important, the required skills to work with such drives. Neither R-Studio, nor other data recovery software will help you in such cases. Moreover, any further tampering with such a drive will surely inflict more damage to your data. Quite often, such damage will render the data completely irrecoverable.
There are a few other general tips before we begin. First, it's best to use the fastest interface available when performing data recovery. Many USB drives have additional eSATA interfaces, which are faster than even USB 3.0. Also, make sure you have enough space to restore recovered files. R-Studio can save files to any local or network drive visible to the host OS. Never save recovered files onto the same disk that they are being recovered from. Lastly, you don't have to buy R-Studio to start the data recovery process. You can perform most of these steps using the Demo mode. This will let you estimate your chances for a successful file recovery. If it appears that your files can be recovered, you can purchase an R-Studio license and enter the registration key on the fly without re-installing the software or restarting the process.
With all that being said, let's begin.
(Note: The screenshots in this tutorial are from R-Studio for Windows, but the procedure is the same for the Mac and Linux versions.)
To recover data from a formatted or damaged disk, perform the following steps:
Step 1
Start R-Studio and locate the damaged disk. Most likely, it'll be shown as a disk without a valid file system.
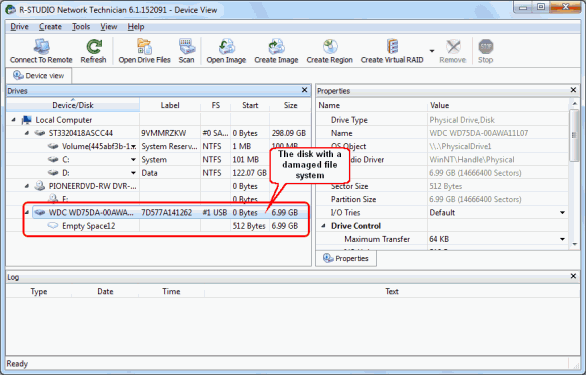
Click image to enlarge
Step 2
Scan the damaged disk. To do so, right-click the damaged disk and select Scan on the shortcut menu. This opens the Scan dialog box.
In the Scan dialog box, you'll be presented with a number of options.
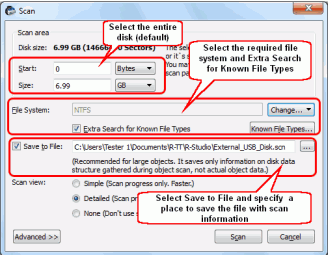
Click image to enlarge
Scan Area
For most file systems, the information about the file structure may be scattered over the entire disk, so it's best to scan the entire disk (default).
File System
If you know for sure which file system the disk used, select it here. If you aren't sure, use one of the default file systems:
- For Windows - NTFS
- For Mac - HFS/APFS
- For SD memory cards and USB memory sticks - FAT
- For Linux - Ext2/Ext3/Ext4
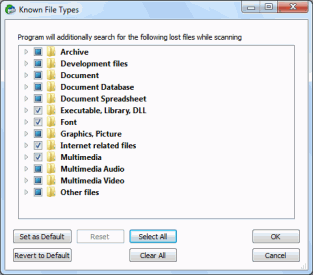
Extra Search for Known File Types
Check the box next to "Extra Search for Known File Types" to activate an additional data recovery algorithm, also known as search for file signatures or raw file recovery.
You can also select which specific file types you want to search for. To do so, click the Known File Types button. In the Known File Types dialog box, select each file type you want to include in the search and click OK.
Click image to enlarge
For more information on which file types R-Studio supports, refer to the on-line help documentation: List of known file types.
If a certain file type isn't natively supported, you can specify your own known file type. The article Creating a Custom Known File Type for R-Studio explains how.
If you are unsure or don't know which file signature you are looking for, leave the selection as it is.
Save to File
Although it is optional, we recommend checking the box next to "Save to File." This will save the scan info to a file so you don't have to re-scan the disk if the process is interrupted. Note that, depending on the complexity of the file and folder structure, the scan info (.scn) file may be as large as 10% of the size of the disk being scanned.
Scan View
Unless you are working on an older, slower machine, there's no need to change the default Scan view option. Selecting Simple or None may speed up the scan on older machines, but for most computers, it won't make enough of a difference to be beneficial.
When you're done with the options, click the Scan button. R-Studio will start scanning the disk and showing its progress.
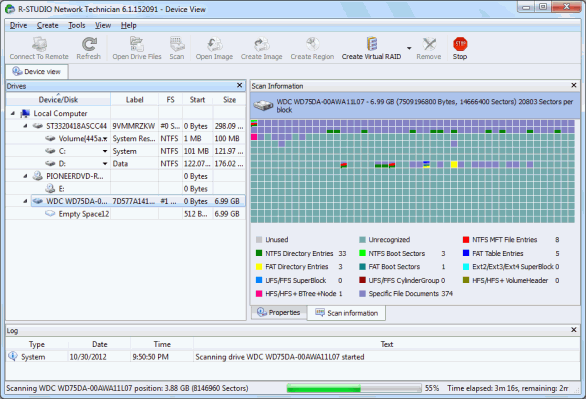
Click image to enlarge
Note: Scanning large disks, especially connected via relatively slow interfaces like USB 2.0, may take a long time, so be patient.
Step 3
View the search results. When R-Studio finishes the scan, it will show recognized partitions (disks that R-Studio believes existed on the disk).
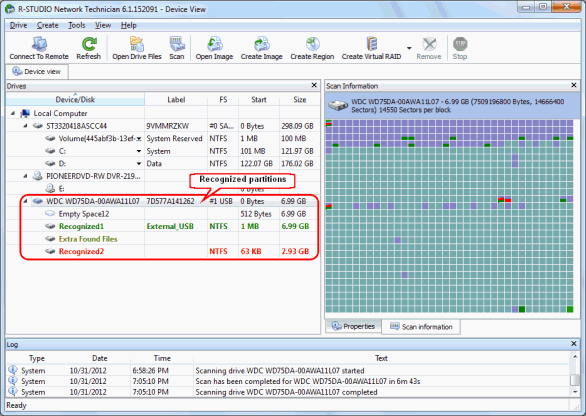
Click image to enlarge
R-Studio shows them in different colors, depending on which elements of the partition have been found.
|
| An existing logical disk or partition. |
|
| Both boot records and file entries are found for this partition. |
|
| Only file entries are found for this partition. |
|
| Only boot records are found for this partition. |
|
| Empty space on the object. |
|
| Files that have been found using scan for known file types. |
Although such recognized partitions are virtual objects, R-Studio allows you to search them for lost files and recover such files.
If R-Studio has found several recognized partitions, it's necessary to determine which one corresponds to the real logical disk on which the files resided. Generally, speaking, the following guidelines apply:
- If you are going to recover files from a disk with a damaged file system, the right recognized partition will most likely be a green one.
- If you are going to recover files from a previously deleted or re-formatted partition, the right recognized partition will most likely be a yellow one.
This, however, won't always be the case. Also always check the recognized partition's file system, start point, and size. They should be the same for the recognized partition and the lost logical disk. When in doubt, try to preview a couple of files from the recognized partition. If the files are displayed correctly, then chances are good that you've selected the right partition.
For our case, the recognized partition that corresponds to the lost logical disk is the green Recognized1.
Step 4
Double-click the partition to browse its contents. R-Studio will start enumerating files on it and show found files and folders.
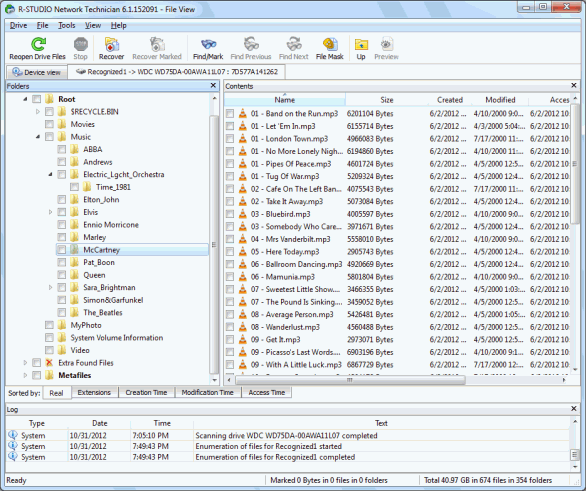
Click image to enlarge
Step 5
Mark the files and folders you want to recover. You can do so by clicking the checkbox next to the file from the panel on the right.
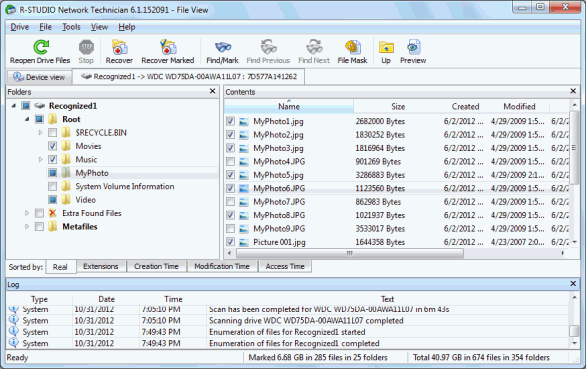
Click image to enlarge
If the drive is relatively small, this method works well enough. But for larger drives with many files, it becomes less feasible. Rather than sifting through each file one by one, R-Studio gives you a few ways to quickly find lost files.
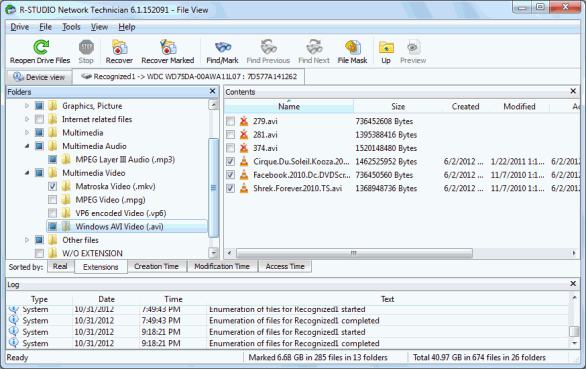
Sort Files
Above the Log panel is the Sorted by: bar. By default, the Real tab is selected. This displays the contents of the partition according to how they are configured on the disk. Using the other tabs on the Sorted by: bar, you can organize the files differently:
- Extensions - This sorts files by their file type (for example, .jpg, .tif, .docx).
- Creation Time - This sorts files according to the time the file was created on the original logical disk.
- Modification Time - This sorts files according to the time the file was last modified.
- Access Time - This sorts files according to the time they were last accessed.
Click image to enlarge
Find/Mark
The Find/Mark button along the top of the screen lets you search for files based on a number of parameters. Clicking the button opens the Find/Mark dialog box, where you can specify search parameters.
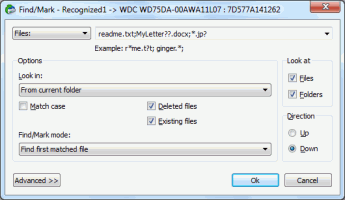
Click image to enlarge
By using wildcards, (such as * and ?) you can search for groups of files with similar filenames or extensions.
Read more about searching for files in R-Studio on-line help: Searching for a File.
Extra Found Files (Recognized Partition)
We also recommend you look at the Extra Found Files folder within the recognized partition. R-Studio puts in this folder those files which parent folders cannot be determined. If the file system is heavily damaged, many files may appear here.
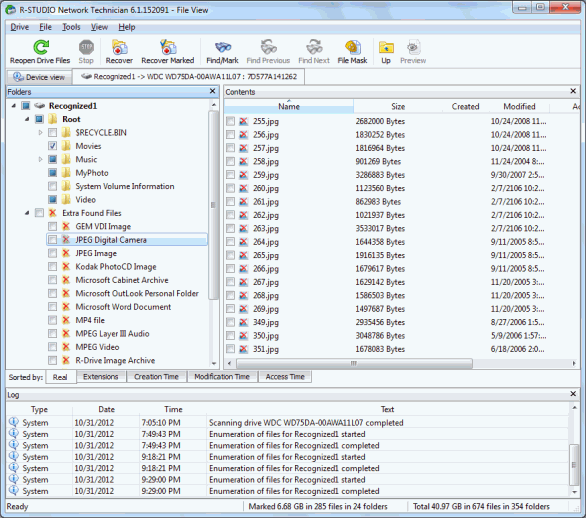
Click image to enlarge
Extra Found Files (Drives Pane)
If the file system on the disk is damaged too severely and you cannot find your files in any recognized partition, look for your files in the Extra Found Files on the Drives pane. (Not to be confused with the Extra Found Files folder in a recognized partition.) R-Studio puts files found using the Scan for Known File Types algorithm (or raw file search) in this place.
Such found files lose their file names, but their content may be good.
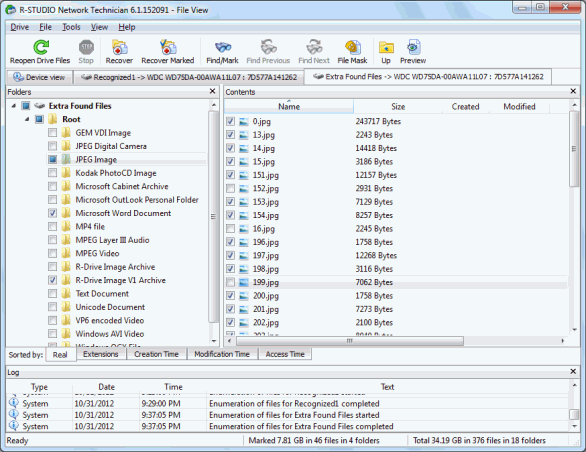
Click image to enlarge
Step 6
Preview the files by double-clicking them. This step is optional, but is very useful when assessing the chances of recovering the file. This is particularly handy if you are using R-Studio in Demo mode and want to make sure your files can be recovered before purchasing a license.
R-Studio has a very powerful built-in previewer that supports most audio, video, and graphic files as well as PDF files. It can also display Microsoft Office documents without having Office installed on your computer. For a list of supported file formats in R-Studio, refer to the R-Studio on-line help: List of supported file formats.
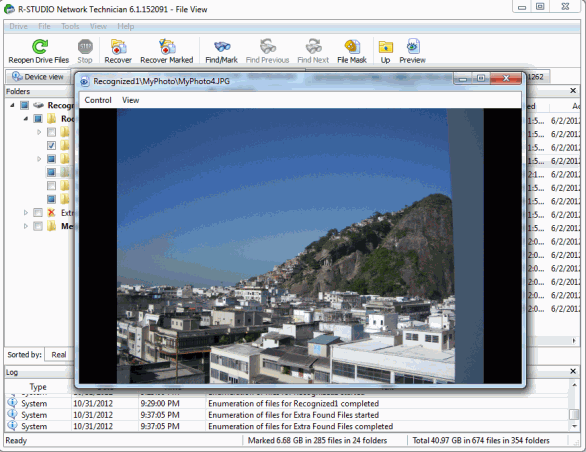
Click image to enlarge
If the file is damaged, a special warning will appear. If it seems that many or all of the files cannot be previewed, it's likely that the wrong partition was selected. If this is not the case, then the disk may be too severely damaged.
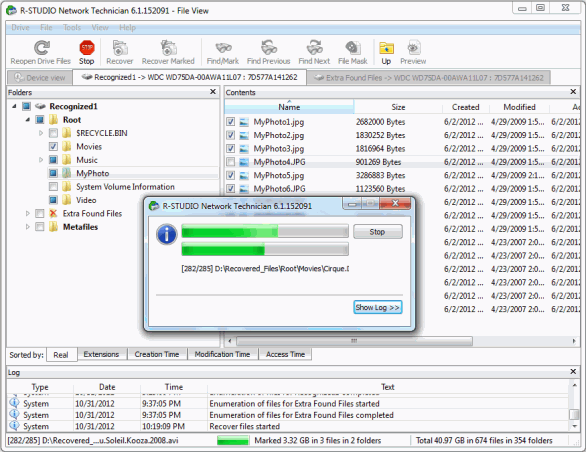
Step 7
Recover the marked files. This is the point where a registered version of R-Studio is required. With the Demo version, only files up to 64 KB can be recovered.
To begin the recovery, click the Recover Marked button. This opens the Recover dialog box. Select the output folder, which is the location where your recovered data will be saved. Important: Never attempt to save recovered files or folders to the same logical disk where they are being recovered from. This can cause conflicts and further damage to your drive, which may cause you to lose all of your data.
Next, choose your recovery options. If you are unsure, leave them as is. If necessary, read more about data recovery parameters on the R-Studio on-line help: Basic File recovery.
Click OK when you are ready to begin the recovery process.
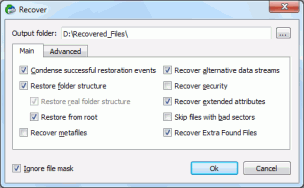
Recover dialog box
R-Studio will start file recovery, showing its progress.
Your recovered files can now be viewed in the output folder. If the recovery was successful, you can reformat or dispose of the damaged hard drive (although it's a good idea to image the drive or wait a few weeks before disposing of the damaged drive). If you saved the results of your scan in Step 2, you can go recover more files from the drive at a later time without rescanning the disk.
- R-Studio Technician: activation using a USB stick
- Data Recovery Guide
- Why R-Studio?
- R-Studio for Forensic and Data Recovery Business
- R-STUDIO Review on TopTenReviews
- File Recovery Specifics for SSD devices
- How to recover data from NVMe devices
- Predicting Success of Common Data Recovery Cases
- Recovery of Overwritten Data
- Emergency File Recovery Using R-Studio Emergency
- RAID Recovery Presentation
- R-Studio: Data recovery from a non-functional computer
- File Recovery from a Computer that Won't Boot
- Clone Disks Before File Recovery
- HD Video Recovery from SD cards
- File Recovery from an Unbootable Mac Computer
- The best way to recover files from a Mac system disk
- Data Recovery from an Encrypted Linux Disk after a System Crash
- Data Recovery from Apple Disk Images (.DMG files)
- File Recovery after Re-installing Windows
- R-Studio: Data Recovery over Network
- How To Use R-Studio Corporate Package
- Data Recovery from a Re-Formatted NTFS Disk
- Data Recovery from an ReFS disk
- Data Recovery from a Re-Formatted exFAT/FAT Disk
- Data Recovery from an Erased HFS Disk
- Data Recovery from an Erased APFS Disk
- Data Recovery from a Re-Formatted Ext2/3/4FS Disk
- Data Recovery from an XFS Disk
- Data Recovery from a Simple NAS
- How to connect virtual RAID and LVM/LDM volumes to the operating system
- Specifics of File Recovery After a Quick Format
- Data Recovery After Partition Manager Crash
- File Recovery vs. File Repair
- Data Recovery from Virtual Machines
- How to Recover Files from a Remote Computer Using R-Studio Standalone License and Its Network Capabilities in Demo Mode
- How to Connect Disks to a Computer
- Emergency Data Recovery over Network
- Data Recovery over the Internet
- Creating a Custom Known File Type for R-Studio
- Finding RAID parameters
- Recovering Partitions on a Damaged Disk
- NAT and Firewall Traversal for Remote Data Recovery
- Data Recovery from an External Disk with a Damaged File System
- File Recovery Basics
- Default Parameters of Software Stripe Sets (RAID 0) in Mac OS X
- Data Recovery from Virtual Hard Disk (VHD/VHDX) Files
- Data Recovery from Various File Container Formats and Encrypted Disks
- Automatic RAID Parameter Detection
- IntelligentScan Data Recovery Technology
- Multi-pass imaging in R-Studio
- Runtime Imaging in R-Studio
- Linear Imaging vs Runtime Imaging vs Multi-Pass Imaging
- USB Stabilizer Tech for unstable USB devices
- Joint work of R-Studio and PC-3000 UDMA hardware
- Joint work of R-Studio and HDDSuperClone
- R-Studio T80+ - A Professional Data Recovery and Forensic Solution for Small Business and Individuals Just for 1 USD/day
- Backup Articles
- R-Drive Image Standalone and Corporate license transferring
- Fixing Windows update error 0x80070643 with R-Drive Image
- Backup with Confidence
- R-Drive Image as a free powerful partition manager
- Computer Recovery and System Restore
- Disk Cloning and Mass System Deployment
- Accessing Individual Files or Folders on a Backed Up Disk Image
- R-Drive Image startup / bootable version
- File Backup for Personal Computers and Laptops of Home and Self-Employed Users
- Creating a Data Consistent, Space Efficient Data Backup Plan for a Small Business Server
- How to Move the Already Installed Windows from an Old HDD to a New SSD Device and Create a Hybrid Data Storage System
- How to Move an Installed Windows to a Larger Disk
- How to Move a BitLocker-Encrypted System Disk to a New Storage Device
- How to backup and restore disks on Linux and Mac computers using R-Drive Image
- R-Drive Image and Virtual Machines
- Undelete Articles
- Get Deleted Files Back
- Free Recovery from SD and Memory cards
- R-Undelete: Video Recovery
- Recovery from an External Device with a Damaged File System
- File recovery from a non-functional computer
- Free File Recovery from an Android Phone Memory Card
- Free Photo and Video File Recovery Tutorial
- Easy file recovery in three steps
Rating: 4.8 / 5
R-TT may not be the easiest or most user-friendly solution, but the algorithm used for the renaming saved me THOUSAND of hours of opening ...