- PRODUCTSFREEWAREFOR COMMERCIAL USEFOR PERSONAL AND BUSINESS USEBackup and System Restore:PC Privacy and Security:
- BUY ONLINE
- DISTRIBUTION
-
Data Recovery from a Reformatted NTFS Disk


NTFS, which stands for New Technology File System, was originally developed by Microsoft and is primarily used in Windows machines. Practically every computer using Windows will have an NTFS-formatted disk. NTFS disks can even be mounted as read-only disks by Mac OS X by default. With third-party software, Apple computers can even get read/write access NTFS disks. Likewise, many Linux systems support read and write operations for NTFS disks. For this reason, many external disks come pre-formatted as NTFS devices.
To meet the growing need for data recovery capabilities with the latest file systems, R-Studio comes fully equipped with the ability to recover data from an NTFS disk.
Before We Begin
If you are following along our procedure with your own data recovery scenario, it's important to make sure that your situation is similar enough to our test case. Make sure to check the following before proceeding:
The drive you are attempting to recover is a disk with a reformatted NTFS partition.
This article only applies to NTFS formatted devices. If you need to recover data from other disks, see our other articles:
- From an ReFS disk (Windows): Data Recovery from an ReFS disk
- From an exFAT/FAT disk (Windows/Mac OS X/Linux): Data Recovery from a Re-Formatted exFAT/FAT Disk
- From an HFS disk (Mac OS X): Data Recovery from an Erased HFS Disk
- From an APFS disk (macOS): Data Recovery from an Erased APFS Disk
- From an Ext2/3/4FS disk (Linux): Data Recovery from a Re-Formatted Ext2/3/4FS Disk
- From an XFS Disk (Linux): Data Recovery from an XFS Disk
Your disk is in good physical condition
We presume that your disk is in good physical shape. If not, it's best to seek out the services of a professional data recovery specialist. Beyond checking that the cables are firmly connected, any "do it yourself" data recovery efforts may actually worsen your chances of recovering the data if your disk has a serious physical malfunction. Signs that a disk has a physical failure include:
- The system does not recognize the device at all, or it appears with an unusual or garbled name.
- A S.M.A.R.T. (Self-Monitoring, Analysis and Reporting Technology) utility warns that a severe hardware failure event has occurred. R-Studio can check S.M.A.R.T. conditions of your disk, and we explain how to do that below.
- The hard drive makes unusual noises, clicks, or takes a very long time to spin up and initialize.
- Bad blocks continually appear on the drive.
All these cases are best handled by qualified data recovery professionals. They have special equipment, software, and, most importantly, the required skills to work with such drives. Neither R-Studio nor other data recovery software will help you in such cases. Moreover, any further tampering with such a drive will very likely inflict more damage to your data. Quite often, such damage will render the data completely irrecoverable, even by a data recovery professional.
And one last reminder...
Do not write anything on the disk from which you're going to recover data! The new data may overwrite your old files, and you may lose them for good.
Test Disk Setup: Initial Folder Structure and Files on the Drive
To show you the recovery process, we prepared a test disk with a typical set of user files that may be on an external NTFS disk, scattered over a certain folder structure:
Documents:
- Archives: .zip files created in WinZip
- PDFs: .pdf files created in Adobe Acrobat
- Microsoft Office: .doc and .docx files created in Word; .xls and .xlsx files created in Excel
- OpenOffice: .odt and .docx files created in Writer; .ods and .xlsx files created in Calc
Multimedia:
- Music: .mp3 files
- Pictures: .jpg and .png files
- Video: .avi, .flv, .m4v, .mov, .mp4, .mpeg, .mts, and .mkv files.
The root folder of the test disk is shown in Fig. 1.

Fig.1: Root folder of the test disk
Click image to enlarge
After setting up the files, we performed a disk reformat using the Disk Management tool in Windows. Upon doing this, the disk will initially appear completely blank.
Data recovery process
Preliminary preparation:
- Before you begin, prepare a storage place large enough to store all recovered files. It may be any disk visible by the operating system including an external or network drive. Do not try to save the files on the same disk from which the files are being recovered.
- If you haven't already, download and install R-Studio. Right now, it is not necessary to buy and register the program. R-Studio in its demo mode allows you to perform all the necessary data recovery operations, except saving the recovered files. This lets you see if it can successfully recover your files and therefore, if it's worth buying. You will not have to re-install or restart R-Studio to register it.
Note: We'll use the Windows version of R-Studio to show the data recovery process, but these directions are fully applicable to the Mac and Linux versions of R-Studio. The panels and dialog boxes will have a different look and feel, but the functionality is the same. - Connect the disk to the R-Studio computer. Use the fastest interface available: the SATA ports are the fastest, but USB 3.0 is sufficiently fast as well. USB 2.0 may be too slow for large disks. Note that many external USB drives have additional eSATA interfaces.
Start R-Studio and locate the reformatted disk and the disk where you want to store your recovered files.
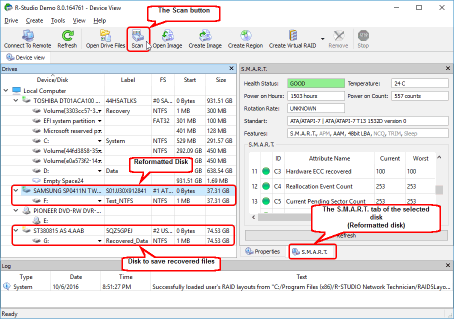
Fig.2. R-Studio main panel with the reformatted disk
Click image to enlarge
Before proceeding, check the S.M.A.R.T. attributes for the reformatted disk:
- If the health status is CAUTION, there may be minor problems with the disk, but it should be safe to use the disk for data recovery purposes. The problems are likely to worsen, so check the S.M.A.R.T. parameters periodically to ensure that the health status hasn't gone to BAD. Creating an image of the disk is recommended, but this will require additional storage space.
- If the health status is BAD, the disk conditions are critical and chances of hardware failure are high. The best recommendation for this case is to stop working with the disk and bring it to professional data recovery specialists. You may continue to work with the disk at your own risk, but disk imaging is very strongly recommended.
If the S.M.A.R.T. attributes of the disk are OK, we can start data recovery.
2. Select the re-formatted disk and click the Scan button. The Scan dialog box will appear.
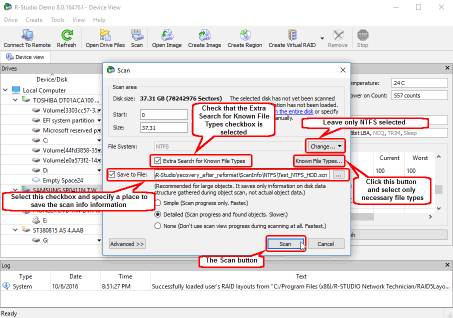
Fig.3: Disk scan dialog box
Click image to enlarge
3. Since we know the file system we are trying to recover from, we can improve R-Studio's results and performance by specifying the file system of the reformatted disk. Click the Change... button next to File Systems and leave only the NTFS file system selected.
Optional: Check the option to "Save to File" and specify a save location. This will save your disk scan information, so you can resume where you left off if your disk scan is interrupted, or if you want to recovery more files in another session.
4. Check that the Extra search for Known File Types option is selected and click the Known File Types... button.
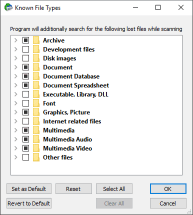
Fig.4: Known File Types dialog box
Click image to enlarge
Specify only those file types that you believe resided on the deleted disk. The best way to do that is to click the Clear button and then select the necessary types in the list. Then click the OK button and return to the Scan dialog box. Click the Scan button.
5. R-Studio will start scanning the disk showing the progress.
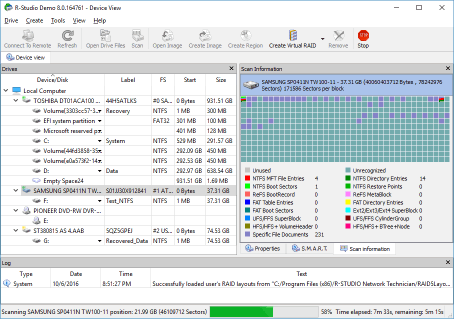
Fig.5: Disk scan in progress
Click image to enlarge
6. Inspect the scan results and find the recognized partition which corresponds to the deleted disk.
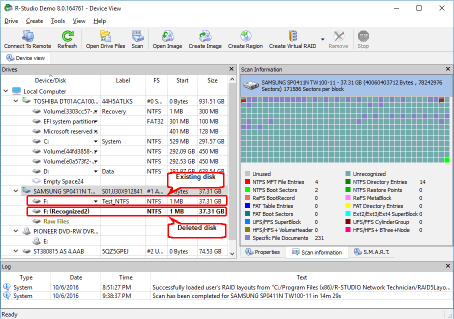
Fig.6: Scan results
Click image to enlarge
In our case, this is the Recognized2 partition.
If other partitions previously resided on the disk, R-Studio may find them. You will have to determine which of the recognized partitions is the one you are looking for. In most cases, the partition you are attempting to recover will be the same size as the existing logical disk. See R-Studio online help for more details: Data Recovery Using R-Studio.
7. Double-click the Recognized2 partition. R-Studio will enumerate files on it and show the folder tree.
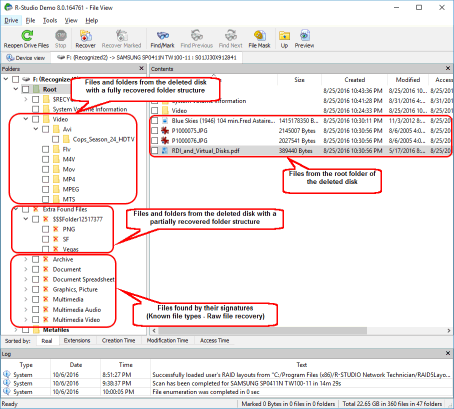
Fig.7: Files and folders found on the deleted disk
Click image to enlarge
First, let's take a look at the files recovered from the remnants of the previous file system.
Files with the fully recovered file structure:
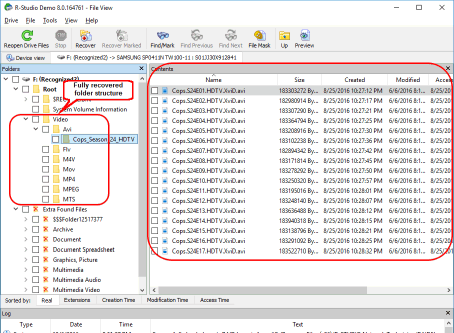
Fig.8: Files and folders from the deleted disk with fully recovered folder structure
Click image to enlarge
Files with the partially recovered folder structure:
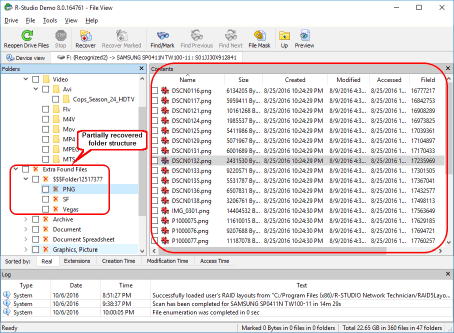
Fig.9: Files and folders from the deleted disk with partially recovered folder structure
Click image to enlarge
And then into files recovered by their signature (raw data recovery):
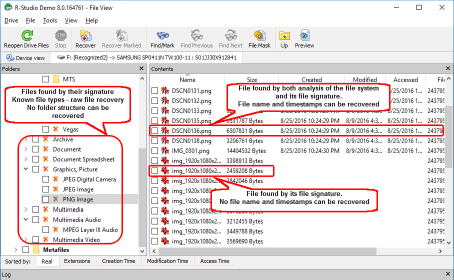
Fig.10: Files found by their signatures (raw file recovery - search Known File Types)
Click image to enlarge
Usually, files from these sections are given an automatically generated file name, such as 001.dat, 245.xml, etc. But if you see a file in this section with a correct filename and timestamp, that means that it's also been found in the remnants of the previous file system, and it's not necessary to recover it as part of the raw file recovery process. It will be recovered from the file system remnants with a proper filename, timestamps, and within its folder tree.
Some file types can contain document names, timestamps, and some other attributes within the files in their inner tags. R-Studio can read some tags and use them in an attempt to give meaningful file names and timestamps.
It is important to recognize which file attributes are from the remnants of the previous file systems and which from the file inner tags. Generally, it can be done by looking at file names and timestamps, etc.
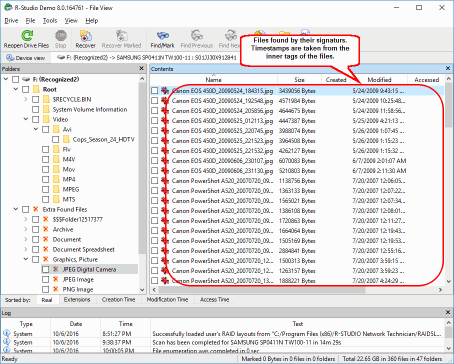
Fig.11: Files found by their file signatures. Timestamps are taken from file inner tags
Click image to enlarge
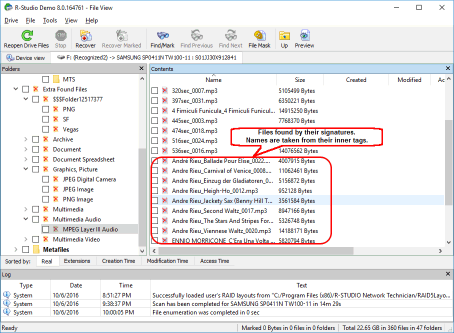
Fig.12: Files found by their file signatures. File names are taken from file inner tags
Click image to enlarge
If you are searching for a particular file or set of files, you can use the advanced find and mark capabilities of R-Studio. See R-Studio help for more details: Searching for a File.
9. Use the built-in Previewer to estimate chances for successful data recovery. This is particularly useful with large picture files. Double-click a file to preview it.
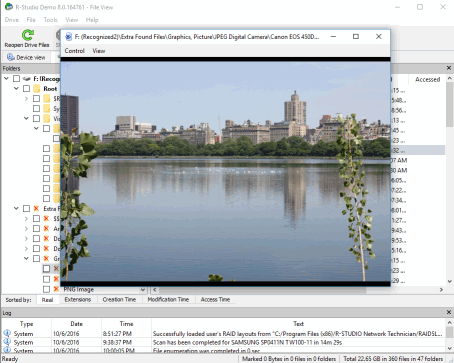
Fig.13: File preview
Click image to enlarge
If the file appears correctly, you can purchase a license and register R-Studio. Now you may start saving recovered files.
10. Select the files and folders you want to recover and specify a save location for your restored files.
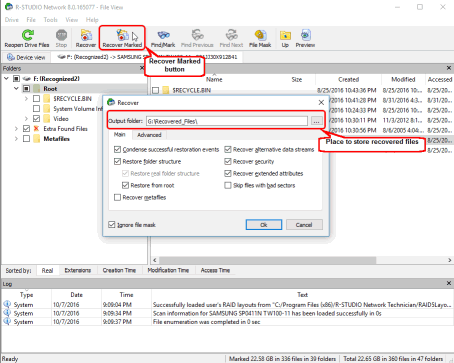
Fig.14. Files marked for recovery and recovery options
Click image to enlarge
If necessary, specify other recovery parameters. See R-Studio on-line help for details: Basic File Recovery. Then, click the Recover Marked button.
R-Studio will start recovering files showing its progress.
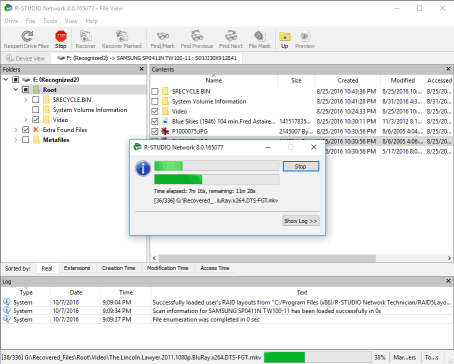
Fig.15: Data recovery process
Click image to enlarge
When the recovery finishes, R-Studio will show a final report with the recovery results.
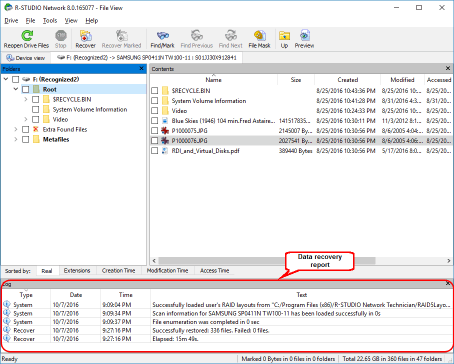
Fig.16: Data recovery results
Click image to enlarge
Data recovery results
To view the recovered files, browse to the folder where you saved the files from R-Studio's file recovery.
For our test scenario, you can see that many files and folders were correctly recovered with correct filenames and all other their attributes. But some first-level folders in the root folder lost their filenames.
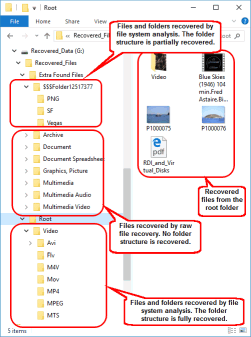
Fig.17: Data recovery results
Click image to enlarge
Conclusions
Our test case has proven that R-Studio is an effective tool for recovering data from NTFS disks after they have been reformatted. In our test scenario, we had a 100% success rate in terms of recovering the data from all the files that were on the deleted partition. This success is owed in part to the fact that no new data was written to the disk after the deletion occurred. Your mileage will vary depending on your specific data recovery scenario, but in most cases, a combination of R-Studio's analysis of the previous file system on the disk and a Search for Known File Types will recover most of the data on the disk. In the latter case, the files and folder names in the root folder may be lost, but the data will be intact.
If you have an NTFS disk that has been accidentally reformatted, try performing the steps above in the demo mode of R-Studio. If you can successfully find and preview the files you are looking for, go ahead and register the product to get your files back. As long as your drive is in good physical shape and you do not write any new data to the disk, attempting a data recovery with R-Studio in demo mode is risk-free and can tell you immediately if your data is recoverable.
- R-Studio Technician: activation using a USB stick
- Data Recovery Guide
- Why R-Studio?
- R-Studio for Forensic and Data Recovery Business
- R-STUDIO Review on TopTenReviews
- File Recovery Specifics for SSD devices
- How to recover data from NVMe devices
- Predicting Success of Common Data Recovery Cases
- Recovery of Overwritten Data
- Emergency File Recovery Using R-Studio Emergency
- RAID Recovery Presentation
- R-Studio: Data recovery from a non-functional computer
- File Recovery from a Computer that Won't Boot
- Clone Disks Before File Recovery
- HD Video Recovery from SD cards
- File Recovery from an Unbootable Mac Computer
- The best way to recover files from a Mac system disk
- Data Recovery from an Encrypted Linux Disk after a System Crash
- Data Recovery from Apple Disk Images (.DMG files)
- File Recovery after Re-installing Windows
- R-Studio: Data Recovery over Network
- How To Use R-Studio Corporate Package
- Data Recovery from a Re-Formatted NTFS Disk
- Data Recovery from an ReFS disk
- Data Recovery from a Re-Formatted exFAT/FAT Disk
- Data Recovery from an Erased HFS Disk
- Data Recovery from an Erased APFS Disk
- Data Recovery from a Re-Formatted Ext2/3/4FS Disk
- Data Recovery from an XFS Disk
- Data Recovery from a Simple NAS
- How to connect virtual RAID and LVM/LDM volumes to the operating system
- Specifics of File Recovery After a Quick Format
- Data Recovery After Partition Manager Crash
- File Recovery vs. File Repair
- Data Recovery from Virtual Machines
- How to Recover Files from a Remote Computer Using R-Studio Standalone License and Its Network Capabilities in Demo Mode
- How to Connect Disks to a Computer
- Emergency Data Recovery over Network
- Data Recovery over the Internet
- Creating a Custom Known File Type for R-Studio
- Finding RAID parameters
- Recovering Partitions on a Damaged Disk
- NAT and Firewall Traversal for Remote Data Recovery
- Data Recovery from an External Disk with a Damaged File System
- File Recovery Basics
- Default Parameters of Software Stripe Sets (RAID 0) in Mac OS X
- Data Recovery from Virtual Hard Disk (VHD/VHDX) Files
- Data Recovery from Various File Container Formats and Encrypted Disks
- Automatic RAID Parameter Detection
- IntelligentScan Data Recovery Technology
- Multi-pass imaging in R-Studio
- Runtime Imaging in R-Studio
- Linear Imaging vs Runtime Imaging vs Multi-Pass Imaging
- USB Stabilizer Tech for unstable USB devices
- Joint work of R-Studio and PC-3000 UDMA hardware
- Joint work of R-Studio and HDDSuperClone
- R-Studio T80+ - A Professional Data Recovery and Forensic Solution for Small Business and Individuals Just for 1 USD/day
- Backup Articles
- R-Drive Image Standalone and Corporate license transferring
- Fixing Windows update error 0x80070643 with R-Drive Image
- Backup with Confidence
- R-Drive Image as a free powerful partition manager
- Computer Recovery and System Restore
- Disk Cloning and Mass System Deployment
- Accessing Individual Files or Folders on a Backed Up Disk Image
- R-Drive Image startup / bootable version
- File Backup for Personal Computers and Laptops of Home and Self-Employed Users
- Creating a Data Consistent, Space Efficient Data Backup Plan for a Small Business Server
- How to Move the Already Installed Windows from an Old HDD to a New SSD Device and Create a Hybrid Data Storage System
- How to Move an Installed Windows to a Larger Disk
- How to Move a BitLocker-Encrypted System Disk to a New Storage Device
- How to backup and restore disks on Linux and Mac computers using R-Drive Image
- R-Drive Image and Virtual Machines
- Undelete Articles
- Get Deleted Files Back
- Free Recovery from SD and Memory cards
- R-Undelete: Video Recovery
- Recovery from an External Device with a Damaged File System
- File recovery from a non-functional computer
- Free File Recovery from an Android Phone Memory Card
- Free Photo and Video File Recovery Tutorial
- Easy file recovery in three steps
Rating: 4.8 / 5
R-TT may not be the easiest or most user-friendly solution, but the algorithm used for the renaming saved me THOUSAND of hours of opening ...