-
Joint work of R-Studio and HDDSuperClone
It's difficult to extract data from malfunctioning or dying hard drives using standard system routines. For example, every time the system runs into bad sectors on the hard drive, the read speed drastically drops - thus making disk imaging a very long process. There are some methods to get around this, like skipping some sectors in the hope that the next sectors will be readable, but they are not implemented into the standard disk drivers. Other times, faulty hard drives require specialized hardware and software to implement a solution.
Two examples come to mind: PC-3000 from ACELab and DeepSpar Disk Imager™ from DeepSpar. They've earned great standings in the data recovery community and are widely accepted in data recovery labs around the world, and they also work quite well with R-Studio, too. See R-Studio help page DeepSpar Disk Imager™ and our article "Joint work of R-Studio and PC-3000 UDMA hardware" for more details.
Hardware solutions have their own drawbacks, with the most important being their prices. Quite often cost considerations limit the number of such devices that many small data recovery companies can afford, or, at worst, prevent them from having even one piece of such hardware.
However, there are good substitutions for that data recovery hardware - pure software solutions. They use system disk I/O ports for hardware emulation, as well as their own drivers with extended controls that aren't available in standard system drivers. Such solutions do have some limitations compared with their hardware counterparts, but they can still solve most data extraction tasks. Taking into account their minimal cost, it's not surprising that those software solutions are widely used.
Usually those software solutions work under Linux, as this OS gives the most flexibility in disk operations among the major PC operating systems.
HDDSuperClone from SD Computing Service is a software solution for disk imaging, cloning, and data extraction tasks. It's specifically designed to work with unstable, faulty, or dying hard drives. It uses several advanced techniques to extract data from hard drives with bad sectors and other hardware issues while doing everything possible to avoid inflicting even more damage on the drive being processed.
It has two modes of operations:
1. The disk cloning/imaging mode: It simply copies data from one disk (the source) to another disk or a file (the target). It also creates a disk map file (the log) that specifies the sectors that cannot be read (the bad sectors). Such data may be processed by a third-party data recovery program. This mode is available in both free and commercial versions, with some small limitations for the former.
2. A virtual drive mode (the commercial version only): In this mode, HDDSuperClone installs a special driver that creates a virtual drive from the disk. This virtual drive becomes accessible to the host OS and other programs.
The HDDSuperClone driver uses all advanced methods to extract data from the problematic disk, but this is not all. The main advantage of this mode is the partial imaging of the source drive. When a program accesses some data on that virtual drive, HDDSuperClone also copies that data to the target disk/image file. When the same data is accesses next time, HDDSuperClone takes the data from the target disk/image rather than from the source disk. This mode greatly reduces tear and wear of the source disk. This is especially important when the disk is malfunctioning or dying.
This article will show you how R-Studio can work together with the HDDSuperClone in this mode. We'll try to recover data from a faulty drive (Seagate ST380817AS) that cannot be processed directly because of its poor conditions.
The course of the required actions is the following:
1. Connect the source drive and the target drive if such drive is necessary. If the source drive is small, it's possible to use a disk image file rather than another hard drive.
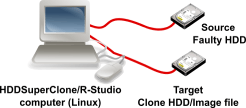
Hardware installation for HDDSuperClone and R-Studio
Click image to enlarge
The OS in the host computer is the Ubuntu 20.04.2 LTS, kernel Linux 5.4.0-67-generic x86_64.
2. Run HDDSuperClone and create a new project. Next, install the virtual driver before connecting the source and target. As the source drive is small, the target may be an image file in our case. Select the necessary Virtual Mode and click the Start button.
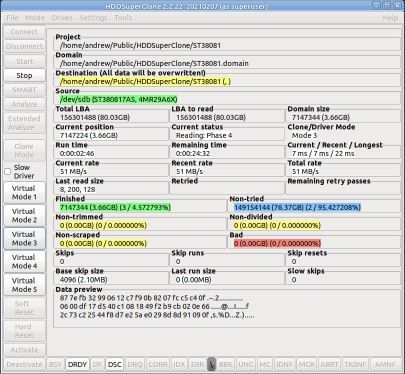
HDDSuperClone connected to the source drive
Click image to enlarge
You can read more about working with HDDSuperClone in its documentation: HDDSuperClone User Manual.
A virtual drive will appear in the system.
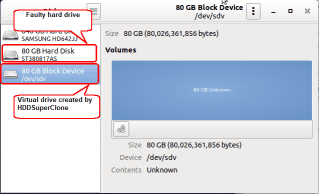
Virtual drive created by HDDSuperClone
Click image to enlarge
You need to wait for a couple of minutes to let the host OS finish processing of this virtual drive.
3. Run R-Studio and locate the virtual drive created by HDDSuperClone.
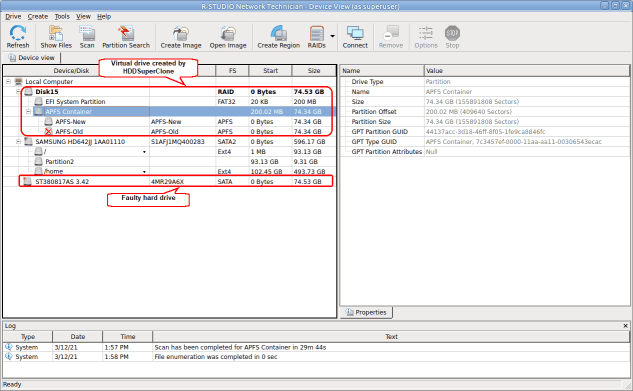
Faulty hard drive and its virtual drive created by HDDSuperClone in R-Studio
Click image to enlarge
Note that the real hard drive also appeared in R-Studio, but nothing could be read from it due to its poor physical conditions.
4. Start the scan process for the APFS Container found on the virtual drive created by HDDSuperClone.
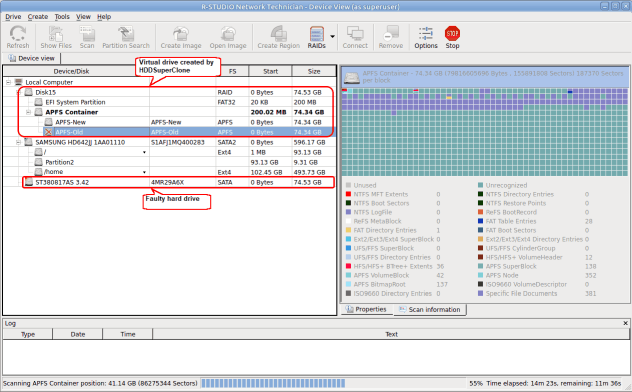
Scan process for the virtual drive created by HDDSuperClone
Click image to enlarge
And wait for the scan results
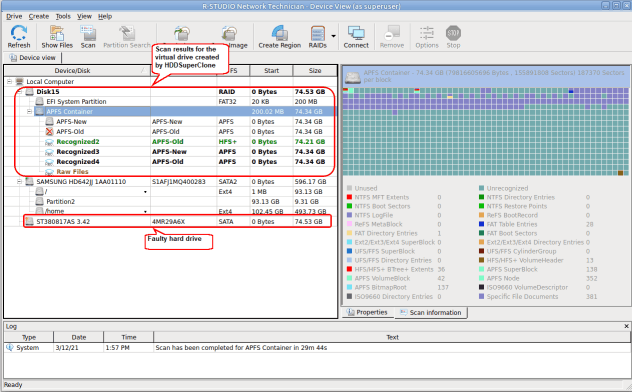
Scan results for the virtual drive created by HDDSuperClone
Click image to enlarge
Once the disk area where the APFS Container resides has been scanned, HDDSuperClone will take all the data from that area from the image file rather than from the source drive.
5. Enumerate files on one of the recognized partition, say, Recognized4.
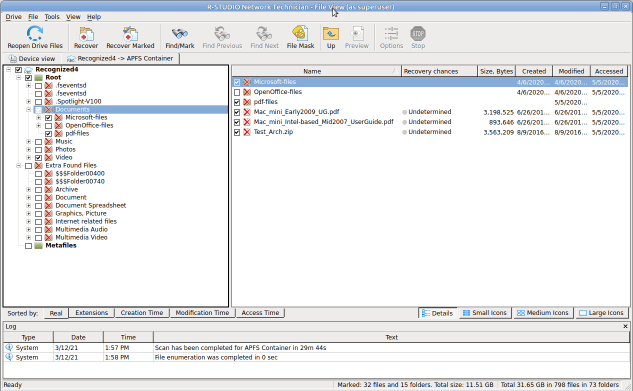
Files found on the Recognized2 partition
Click image to enlarge
Found files can be previewed, searched for, and marked for recovery.
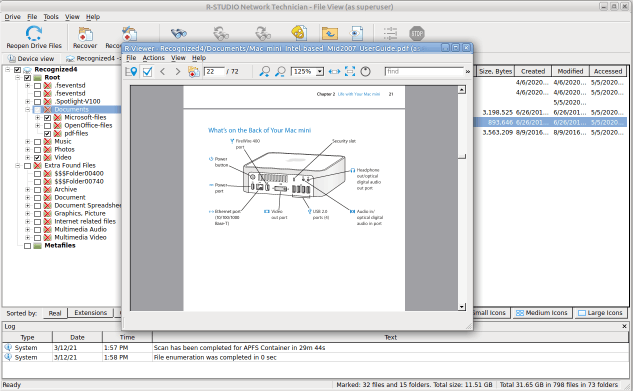
File preview for a pdf file
Click image to enlarge
Finally, the marked files and folders can be recovered.
Conclusion
As our article shows, R-Studio and HDDSuperClone can successfully work together. The combination of advanced disk imaging capabilities with HDDSuperClone and the superior data recovery performance of R-Studio greatly increases chances for successful data recovery from faulty hard drives. At the same time, the partial imaging performed by HDDSuperClone greatly reduces possible damage that may further deteriorate hard drive conditions.
- R-Studio Technician: activation using a USB stick
- Data Recovery Guide
- Why R-Studio?
- R-Studio for Forensic and Data Recovery Business
- R-STUDIO Review on TopTenReviews
- File Recovery Specifics for SSD devices
- How to recover data from NVMe devices
- Predicting Success of Common Data Recovery Cases
- Recovery of Overwritten Data
- Emergency File Recovery Using R-Studio Emergency
- RAID Recovery Presentation
- R-Studio: Data recovery from a non-functional computer
- File Recovery from a Computer that Won't Boot
- Clone Disks Before File Recovery
- HD Video Recovery from SD cards
- File Recovery from an Unbootable Mac Computer
- The best way to recover files from a Mac system disk
- Data Recovery from an Encrypted Linux Disk after a System Crash
- Data Recovery from Apple Disk Images (.DMG files)
- File Recovery after Re-installing Windows
- R-Studio: Data Recovery over Network
- How To Use R-Studio Corporate Package
- Data Recovery from a Re-Formatted NTFS Disk
- Data Recovery from an ReFS disk
- Data Recovery from a Re-Formatted exFAT/FAT Disk
- Data Recovery from an Erased HFS Disk
- Data Recovery from an Erased APFS Disk
- Data Recovery from a Re-Formatted Ext2/3/4FS Disk
- Data Recovery from an XFS Disk
- Data Recovery from a Simple NAS
- How to connect virtual RAID and LVM/LDM volumes to the operating system
- Specifics of File Recovery After a Quick Format
- Data Recovery After Partition Manager Crash
- File Recovery vs. File Repair
- Data Recovery from Virtual Machines
- How to Recover Files from a Remote Computer Using R-Studio Standalone License and Its Network Capabilities in Demo Mode
- How to Connect Disks to a Computer
- Emergency Data Recovery over Network
- Data Recovery over the Internet
- Creating a Custom Known File Type for R-Studio
- Finding RAID parameters
- Recovering Partitions on a Damaged Disk
- NAT and Firewall Traversal for Remote Data Recovery
- Data Recovery from an External Disk with a Damaged File System
- File Recovery Basics
- Default Parameters of Software Stripe Sets (RAID 0) in Mac OS X
- Data Recovery from Virtual Hard Disk (VHD/VHDX) Files
- Data Recovery from Various File Container Formats and Encrypted Disks
- Automatic RAID Parameter Detection
- IntelligentScan Data Recovery Technology
- Multi-pass imaging in R-Studio
- Runtime Imaging in R-Studio
- Linear Imaging vs Runtime Imaging vs Multi-Pass Imaging
- USB Stabilizer Tech for unstable USB devices
- Joint work of R-Studio and PC-3000 UDMA hardware
- Joint work of R-Studio and HDDSuperClone
- R-Studio T80+ - A Professional Data Recovery and Forensic Solution for Small Business and Individuals Just for 1 USD/day
- Backup Articles
- R-Drive Image Standalone and Corporate license transferring
- Fixing Windows update error 0x80070643 with R-Drive Image
- Backup with Confidence
- R-Drive Image as a free powerful partition manager
- Computer Recovery and System Restore
- Disk Cloning and Mass System Deployment
- Accessing Individual Files or Folders on a Backed Up Disk Image
- R-Drive Image startup / bootable version
- File Backup for Personal Computers and Laptops of Home and Self-Employed Users
- Creating a Data Consistent, Space Efficient Data Backup Plan for a Small Business Server
- How to Move the Already Installed Windows from an Old HDD to a New SSD Device and Create a Hybrid Data Storage System
- How to Move an Installed Windows to a Larger Disk
- How to Move a BitLocker-Encrypted System Disk to a New Storage Device
- How to backup and restore disks on Linux and Mac computers using R-Drive Image
- R-Drive Image and Virtual Machines
- Undelete Articles
- Get Deleted Files Back
- Free Recovery from SD and Memory cards
- R-Undelete: Video Recovery
- Recovery from an External Device with a Damaged File System
- File recovery from a non-functional computer
- Free File Recovery from an Android Phone Memory Card
- Free Photo and Video File Recovery Tutorial
- Easy file recovery in three steps
Rating: 4.8 / 5
R-TT may not be the easiest or most user-friendly solution, but the algorithm used for the renaming saved me THOUSAND of hours of opening ...


