- PRODUCTSFREEWAREFOR COMMERCIAL USEFOR PERSONAL AND BUSINESS USEBackup and System Restore:PC Privacy and Security:
- BUY ONLINE
- DISTRIBUTION


-
Data Recovery from an Erased APFS Disk


APFS (Apple File System) is a proprietary file system introduced by Apple Inc. for macOS High Sierra and iOS 10.3, and later. This file system is specially designed for flash and solid-state drives (SSD) to fully utilize their features. As SSD devices become larger in capacity and cheaper in cost, they are more often used as external storage devices.
Only Mac computers running High Sierra and newer can read from and write to such disks. Windows and Linux computers cannot read and write to APFS disks without third-party software.
This article will show how to use R-Studio to recover files from an external SSD disk with the APFS file system that has been erased and then formated again as a new APFS device.
Before We Begin
Please note that this article explains how to recover files from an erased APFS disk. If you need to recover files from disks with other file systems, read our other articles:
- From an Erased HFS Disk (macOS): Data Recovery from an Erased HFS or HFS+ Disk
- From an NTFS disk (Windows): R-Studio: Data Recovery from a Re-Formatted NTFS Disk
- From an ReFS disk (Windows): Data Recovery from an ReFS disk
- From an exFAT/FAT disk (Windows/macOS/Linux): Data Recovery from a Re-Formatted exFAT/FAT Disk
- From an Ext2/3/4FS disk (Linux): Data Recovery from a Re-Formatted Ext2/3/4FS Disk
- From an XFS Disk (Linux): Data Recovery from an XFS Disk
The disk must show no signs of any hardware failures. Otherwise, inspection by professional data recovery specialists is necessary. Any attempts to work with a disk with serious hardware malfunctions may seriously degrade your chances of recovering the data, as it is very likely to inflict more damage to your data recovery chances, even for a data recovery specialist.
Signs that a disk has a physical failure include:
- The system does not recognize the device at all, or it appears with an unusual or garbled name.
- A S.M.A.R.T. (Self-Monitoring, Analysis and Reporting Technology) utility warns that a severe hardware failure event has occurred. R-Studio can check S.M.A.R.T. conditions of your disk, and we explain how to do that below.
And one last reminder...
Do not connect the disk to a Mac computer that recognizes an APFS file system unless you're completely ready to start file recovery. It may effectively erase all the lost files without any visible signs of doing so.
Test Disk Setup: Initial Folder Structure and Files on the Drive
For this test, we used an external SSD disk formatted as an APFS storage device with the APFS_Old volume name. Then a file/folder typically set for an external disk was written to this disk.
Documents:
- Archives: .zip files created in WinZip
- PDFs: .pdf files created in Adobe Acrobat
- Microsoft Office: .doc and .docx files created in Word; .xls and .xlsx files created in Excel
- OpenOffice: .odt and .docx files created in Writer; .ods and .xlsx files created in Calc
Multimedia:
- Music: .mp3 files
- Pictures: .jpg and .png files
- Video: .avi, .flv, .m4v, .mov, .mp4, .mpeg, .mts, and .mkv files.
Fig.1 shows the file/folder structure of our test disk:
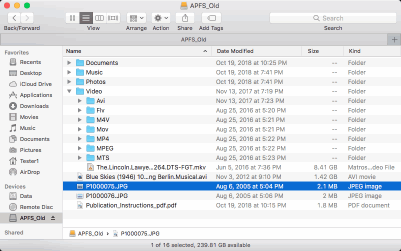
Fig.1: Files and folders on the test disk.
Click image to enlarge
Using the Disk Utility in the macOS, we erased the old file system and created a new one with the APFS_New name. This new file system appears completely empty in Finder.
Data recovery process
Preliminary preparation:
- We need a storage space large enough to store all recovered files. Any disk visible by your computer (including external or network drives) can be used for this purpose. In our case, we'll use the internal disk of the computer.
- Download and install R-Studio. You don't have to immediately purchase and register you copy. You may run the program in its demo mode to estimate the chances for successful file recovery. If they are high enough, you may buy R-Studio and register on-the-fly without interrupting file recovery process. R-Studio running in the demo mode can perform all data recovery operations except saving recovered files.
Note: We'll use the Mac version of R-Studio to illustrate the file recovery process, but you may use the Windows and Linux versions of R-Studio. R-Studio appearance will look different, but the functionality will be the same.
Mac computers running Mac OS X earlier than High Sierra do not support the APFS file system, but R-Studio can recover files from APFS disks even on such computers. Moreover, R-Studio for Windows or Linux can work with the APFS file system, despite the fact that the host OS cannot even recognize it.
If your Mac computer runs High Sierra or later, you should consider disabling the Trim command in your system. Read the File Recovery Specifics for SSD devices article for details. - Connect the test disk to your computer through the fastest available interface. Conventional Mac computers don't usually have SATA ports, so USB 3.0/Thunderbolt is the best option. USB 2.0 may appear too slow for large disks.
1. Run R-Studio and locate the erased disk
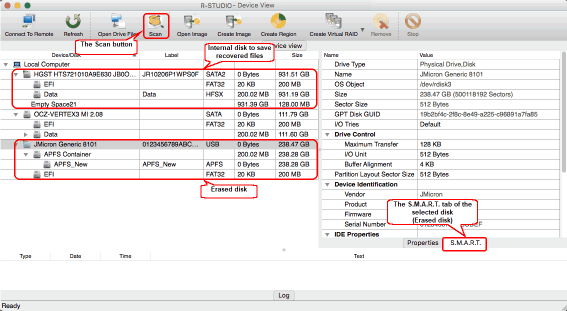
Fig.2: R-Studio Main panel with the connected erased disk.
Click image to enlarge
Check the S.M.A.R.T. status of the erased disk. This can be done even if it's connected through a USB port.

Fig.3. S.M.A.R.T. status of the erased disk
Click image to enlarge
- If the health status is CAUTION, there may be minor problems with the disk, but it should be safe to use the disk for data recovery purposes. The problems are likely to worsen, so check the S.M.A.R.T. parameters periodically to ensure that the health status hasn't gone to BAD. Creating an image of the disk is recommended, but this will require additional storage space.
- If the health status is BAD, the disk conditions are critical and chances of hardware failure are high. The best recommendation for this case is to stop working with the disk and bring it to professional data recovery specialists. You may continue to work with the disk at your own risk, but disk imaging is very strongly recommended.
All S.M.A.R.T. attributes of our disk are OK, and we can proceed with file recovery.
2. Select the SSD device where the erased disk was located, click the Scan button, and specify scan parameters.
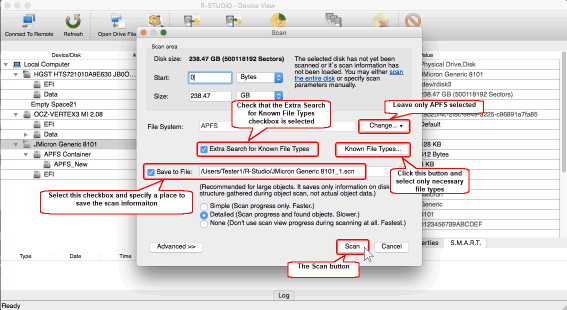
Fig.4. Disk scan dialog box and scan parameters
Click image to enlarge
Click the Change button and leave only the APFS file system selected to avoid searching for other file systems. Select Save to File and specify the place to save scan info. If the disk scan has to be interrupted, it can be resumed by loading the saved scan information.
Click the Known File Types button and select only those file types that may have resided on the disk. Select all file types, even those you don't want to recover. This is necessary to find the required files correctly. See the File Recovery Basics: How Data Recovery Works article if you would like to learn why.
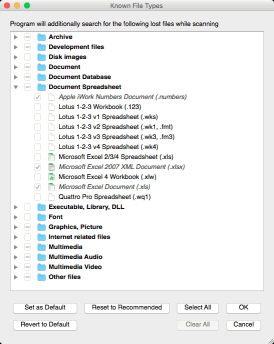
Fig.5. Known file types selected for the erased APFS disk
Click image to enlarge
When you select all the necessary options, click the Scan button.
3. The scan will start and R-Studio will show its progress.
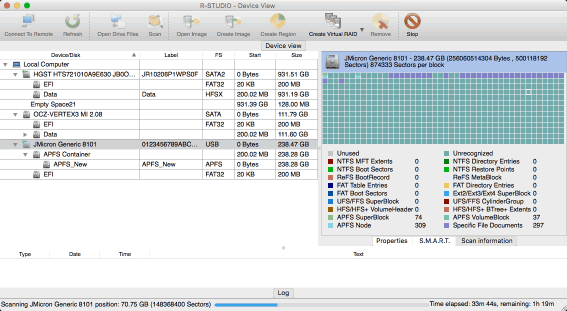
Fig.6. Disk scan in progress for the SSD device
Click image to enlarge
4. When the scan is over, inspect its results.
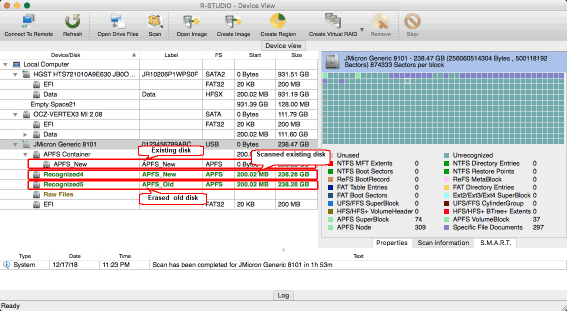
Fig.7. Scan results
Click image to enlarge
R-Studio should find the new APFS disk (Recognized4 - APFS_New in our case) and the erased APFS disk (Recognized5 - APFS_Old). R-Studio may find some other partitions that previously resided on the disk. Their size and position may give you a clue on how to find the one you're looking for. See R-Studio online help for more details: Data Recovery Using R-Studio.
It looks natural to open Recognized5, as it has the APFS_Old label, but when we double-click this partition, we see the following message:
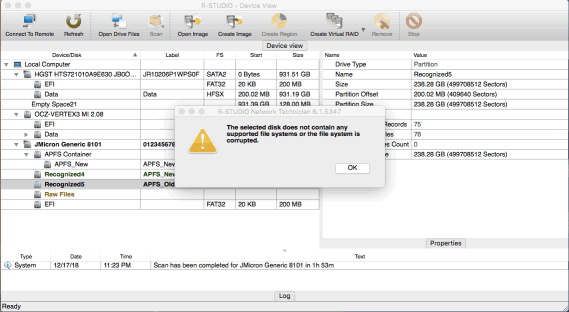
Fig.8. Attempt to open the old APFS disk
Click image to enlarge
Clearly we must search for our lost files elsewhere.
The next candidate is the Recognized4 partition. When we open it, we can see the remnants of the erased file system and some Extra Found Files. As the new disk is completely blank, those files must belong to the erased file system.

Fig.9. Lost files on the scanned new APFS disk
Click image to enlarge
5. Inspect and preview files by double-clicking a selected file.
Some lost files are found through the analysis of the remnants of the file system on the erased disk. Their file names, paths, and some file attributes can be recovered.
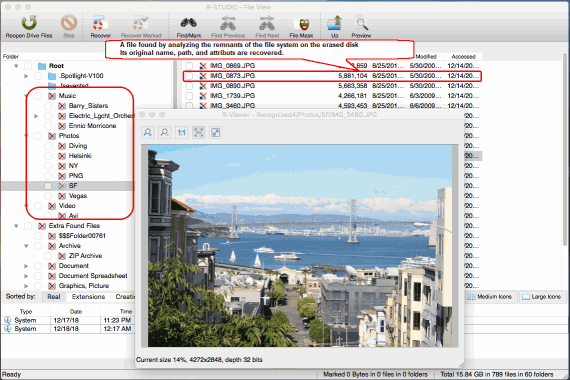
Fig.10. Lost files form the erased file system
Click image to enlarge
The other files are found through the search for Known File Types (search for file signatures, or raw file recovery). Their file names, paths, and file attributes cannot be recovered. R-Studio either uses the internal file tags to create meaningful file names, or generates a random name like 0280.mp4.
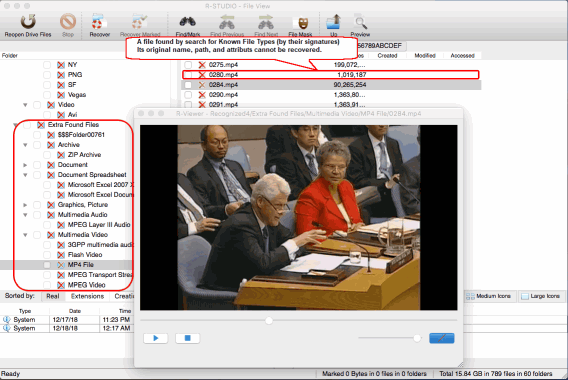
Fig.11. Lost files found by the search for Known File Types
Click image to enlarge
You may search for a particular file or set of files using the advanced find and mark capabilities of R-Studio. See R-Studio help for more details: Searching for a File.
Try to preview as many files as possible to estimate chances for successful file recovery. Large picture and video files are particularly useful for this purpose.
When you're sure that chances for successful recovery of your lost files are high, you can purchase a license and register R-Studio. You can do this on-the-fly, without interrupting file recovery. See the R-Studio for Mac install/uninstall/register article for details.
When your copy of R-Studio is registered, you may start the actual file recovery.
6. Mark all necessary files and folders for recovery, click the Recover Marked button, and choose a place to save the recovered files.
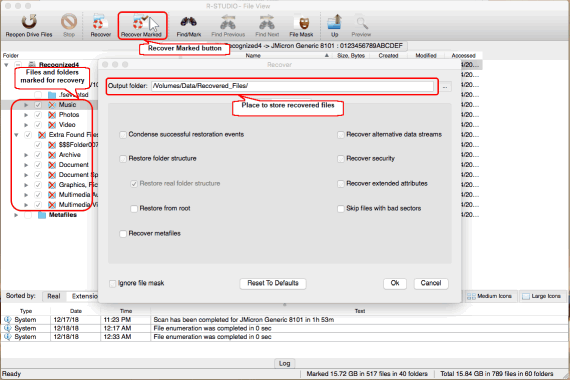
Fig.12. Files and folders marked for recovery and recovery options
Click image to enlarge
If necessary, specify some other recover parameters. See R-Studio on-line help for details: Basic File Recovery. Then click the OK button.
File recovery will start and R-Studio will show its progress.
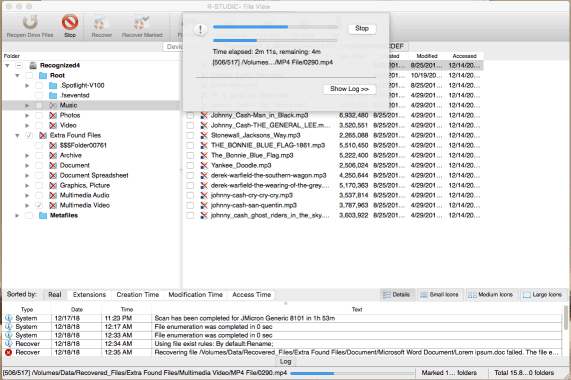
Fig.13. File recovery progress
Click image to enlarge
When the recovery is over, R-Studio will show a final report with the results.
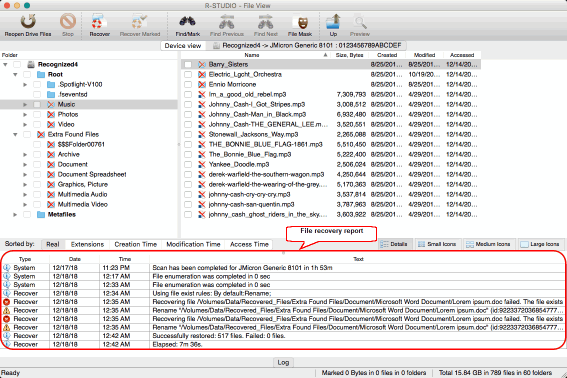
Fig.14. File recovery results and report
Click image to enlarge
Sometimes R-Studio may throw some warnings that the files it's recovering already exist. It treats such files as specified in the Advanced tab of the Recover dialog box. By default it renames duplicate files.
Data recovery results
Results can be seen in the folder selected on the Recover dialog box.
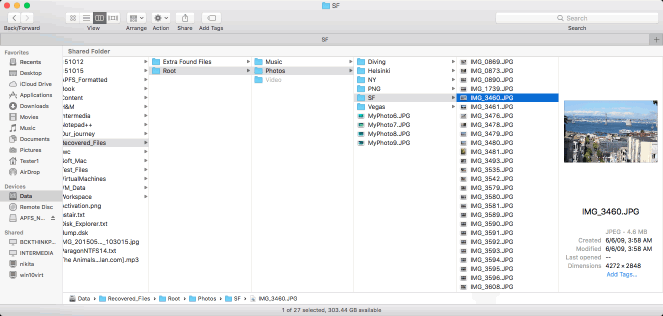
Fig.15. Recovered Files
Click image to enlarge
Conclusions
R-Studio was able to successfully recover files from an erased APFS disk. It could restore some parts of the erased file system with file names, paths, and other attributes. The rest of the files were recovered without those attributes, but their content remained intact.
The key point of such success is the fact that nothing was written to the disk after it had been erased, and the Trim command was disabled in the system while recovering files.
R-Studio scanned the erased disk and found lost files in its demo mode, that is, without purchasing and registering the software. It was registered only when it became clear that the file recovery should be successful. Registration can be performed on-the-fly, without interrupting the recovery process.
- R-Studio Technician: activation using a USB stick
- Data Recovery Guide
- Why R-Studio?
- R-Studio for Forensic and Data Recovery Business
- R-STUDIO Review on TopTenReviews
- File Recovery Specifics for SSD devices
- How to recover data from NVMe devices
- Predicting Success of Common Data Recovery Cases
- Recovery of Overwritten Data
- Emergency File Recovery Using R-Studio Emergency
- RAID Recovery Presentation
- R-Studio: Data recovery from a non-functional computer
- File Recovery from a Computer that Won't Boot
- Clone Disks Before File Recovery
- HD Video Recovery from SD cards
- File Recovery from an Unbootable Mac Computer
- The best way to recover files from a Mac system disk
- Data Recovery from an Encrypted Linux Disk after a System Crash
- Data Recovery from Apple Disk Images (.DMG files)
- File Recovery after Re-installing Windows
- R-Studio: Data Recovery over Network
- How To Use R-Studio Corporate Package
- Data Recovery from a Re-Formatted NTFS Disk
- Data Recovery from an ReFS disk
- Data Recovery from a Re-Formatted exFAT/FAT Disk
- Data Recovery from an Erased HFS Disk
- Data Recovery from an Erased APFS Disk
- Data Recovery from a Re-Formatted Ext2/3/4FS Disk
- Data Recovery from an XFS Disk
- Data Recovery from a Simple NAS
- How to connect virtual RAID and LVM/LDM volumes to the operating system
- Specifics of File Recovery After a Quick Format
- Data Recovery After Partition Manager Crash
- File Recovery vs. File Repair
- Data Recovery from Virtual Machines
- How to Recover Files from a Remote Computer Using R-Studio Standalone License and Its Network Capabilities in Demo Mode
- How to Connect Disks to a Computer
- Emergency Data Recovery over Network
- Data Recovery over the Internet
- Creating a Custom Known File Type for R-Studio
- Finding RAID parameters
- Recovering Partitions on a Damaged Disk
- NAT and Firewall Traversal for Remote Data Recovery
- Data Recovery from an External Disk with a Damaged File System
- File Recovery Basics
- Default Parameters of Software Stripe Sets (RAID 0) in Mac OS X
- Data Recovery from Virtual Hard Disk (VHD/VHDX) Files
- Data Recovery from Various File Container Formats and Encrypted Disks
- Automatic RAID Parameter Detection
- IntelligentScan Data Recovery Technology
- Multi-pass imaging in R-Studio
- Runtime Imaging in R-Studio
- Linear Imaging vs Runtime Imaging vs Multi-Pass Imaging
- USB Stabilizer Tech for unstable USB devices
- Joint work of R-Studio and PC-3000 UDMA hardware
- Joint work of R-Studio and HDDSuperClone
- R-Studio T80+ - A Professional Data Recovery and Forensic Solution for Small Business and Individuals Just for 1 USD/day
- Backup Articles
- R-Drive Image Standalone and Corporate license transferring
- Fixing Windows update error 0x80070643 with R-Drive Image
- Backup with Confidence
- R-Drive Image as a free powerful partition manager
- Computer Recovery and System Restore
- Disk Cloning and Mass System Deployment
- Accessing Individual Files or Folders on a Backed Up Disk Image
- R-Drive Image startup / bootable version
- File Backup for Personal Computers and Laptops of Home and Self-Employed Users
- Creating a Data Consistent, Space Efficient Data Backup Plan for a Small Business Server
- How to Move the Already Installed Windows from an Old HDD to a New SSD Device and Create a Hybrid Data Storage System
- How to Move an Installed Windows to a Larger Disk
- How to Move a BitLocker-Encrypted System Disk to a New Storage Device
- How to backup and restore disks on Linux and Mac computers using R-Drive Image
- R-Drive Image and Virtual Machines
- Undelete Articles
- Get Deleted Files Back
- Free Recovery from SD and Memory cards
- R-Undelete: Video Recovery
- Recovery from an External Device with a Damaged File System
- File recovery from a non-functional computer
- Free File Recovery from an Android Phone Memory Card
- Free Photo and Video File Recovery Tutorial
- Easy file recovery in three steps
Rating: 5.0 / 5
I used some software for data recovery on MAC, but THIS IS only one, that help me!!!
THX :)
bye
Tom from Hungary
Needless to say a RAID0 set created using Apple`s Disk Utility was broken and formatted as a new RAID0. I immediately recognized my mistake and shut down the server.
After some web surfing and saki I found R-Studio.
After the other utilities I normally use failed, R-Studio was able to create an image of the broken (and reformatted) RAID disks.
The entire volume ...
________________________________
5+ I was able to repair my RAID-5 for Mac volume to 20 TB - it`s the best solution. I would recommend.
I would just like to thank you for an excellent product. I was able to recover nearly a terabyte of data after a raid 6 array failed. My customer was ecstatic over the results