- Contents
- Index
- Introduction to R-Studio
-
Data Recovery Using R-Studio
- Basic File Recovery
- Advanced Data Recovery
- Mass File Recovery
-
Volume Sets and RAIDs
- Volume Sets, Stripe Sets, and Mirrors
- Basic RAID 4 and RAID 5 Operations
- Working with RAID6 (Double Xor) Presets
- Working with RAID 6 Presets
- Working with RAIDs with Parity Delays
- Working with Advanced RAID Layouts
- Nested and Non-Standard RAID Levels
- Finding RAID Parameters
- Checking RAID Consistency
- Syntax of a Description File for RAID Configurations
- Description Files for RAID Configurations
- Various Disk and Volume Managers
- Data Recovery over Network
-
R-Studio Technician/T80+
- USB Activation
- Portable version
- Show Files (Advanced)
- Multitasking
- Additional Recovery Options
- Mounting Virtual Objects in the System as Virtual Drives
- Opening Virtual Disks from the Files Panel
- Hidden Devices
- File Information
- Symbolic Link Processing
- Custom Recovery Lists
- Drive Copy Wizard
- File Maps
- I/O Monitor and Sector Map Files
- Runtime Imaging
- Multi-pass Imaging
- Reverse RAIDs
- Working with Third-Party Hardware
- Forensic Mode
- Text/hexadecimal Editor
- Technical Information and Troubleshooting
- R-Studio Emergency
- R-Studio Agent Emergency
© 2026 R-Tools Technology Inc.
All rights reserved.
DeepSpar USB Stabilizer 10GB™
This hardware works under Windows 10/11-64 bits
The USB Stabilizer 10Gb is a further development of the USB Stabilizer . In addition to all standard features of the USB Stabilizer this device has more advanced feature:
• Simultaneous work with 3 independent devices.
• A maximum speed of more than 800 MBps data transfer.
• Device current graphs in real time on their I/O monitor.
• Customizable algorithms for unattended operations.
• Additional hardware handling commands.
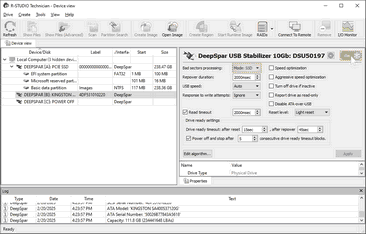
These 3 input ports are:
Port [A]: M2 M-Key NVMe/USB Type C
Port [B]: USB 3
Port [C]: USB 3/SATA
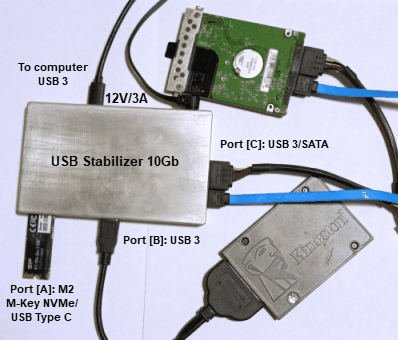
You may learn more about USB Stabilizer 10Gb on its vendor's USB Stabilizer 10Gb site.
Installing USB Stabilizer 10Gb:
The USB Stabilizer 10Gb should be connected to a USB 3 port only!. Connecting to USB 2/1 ports may result in malfunctioning of the device: some ports may not work correctly.
Check that the Enable DeepSpar device option is selected on the Main tab of the Settings dialog box
| 1 | Connect the USB Stabilizer 10Gb to your computer and power it on |
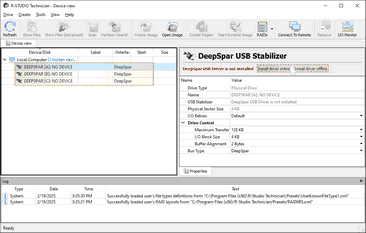
There should be no device connected.
| 2 | Locate 3 DEEPSPAR NO DEVICE objects in the Device/Disk panel, and click the Install driver button on the Properties tab. |
You may install the drivers either online or offline.
R-Studio will start installing the drivers. You need to restart your system to complete installation.
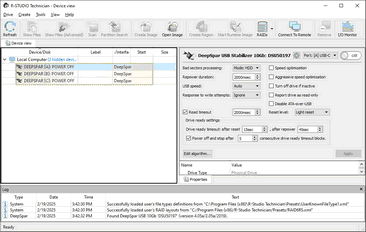
| > | 3 DEEPSPAR: POWER OFF objects will appear in the the Device/Disk panel. |
R-Studio is now ready for work with USB Stabilizer 10Gb . You may read about USB Stabilizer 10Gb parameters in its manual.
Working with USB Stabilizer 10Gb:
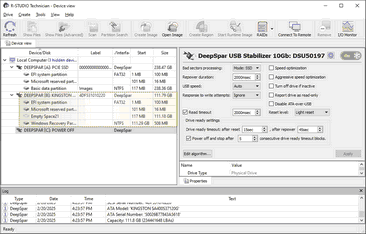
Below is an example of a simultaneous work with 3 independent devices:
1. An M.2 NVMe Realteck SSD device , 256GB.
2. A USB-connected device (a SATA Kingston 120GB SSD device connected to a USB<->SATA adaptor).
3. A SATA HDD (Western Digital WD1200BEVT HDD 120GB Capacity).
Working with M2 M-Key NVMe devices.
Such device should be inserted into the [A] M2 M-Key NVMe slot. Be careful with such devices as they may be very prone to static electricity. Consult its respective manual when necessary.
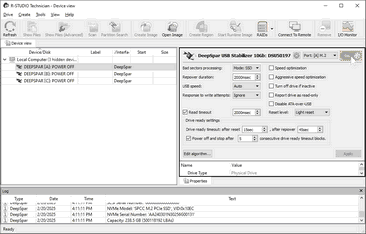
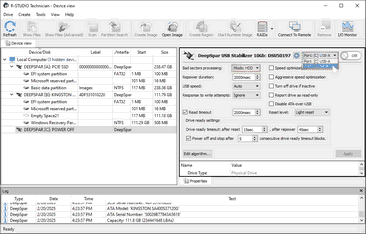
| 1 | Select the DEEPSPAR [A] object and Port [A] M.2 in the drop-down box. |
| 2 | Click the Power On slider. |
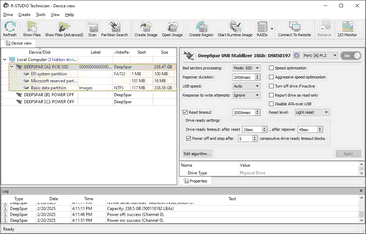
| > | DeepSpar USB Stabilizer 10G will initialize the device and show its content. |
The device is initialized and ready for work.
Working with USB-connected devices
Such devices can be USB sticks, external USB drives, or any other devices connected to their respective USB adapters. For our case, it's an SSD device connected to the port [B] USB-A through an SSD<->USB 3 adapter.
| 1 | Select the DEEPSPAR [B] object, select Mode: SSD in the Bad sector processing drop-down box, and click the Power slider |
| > | DeepSpar USB Stabilizer 10G will initialize the device and show its content. |
The device is initialized and ready for work.
Working with SATA devices.
The SATA device is connected to the [C] SATA 3 port using a SATA 3-compatible data and power cables.
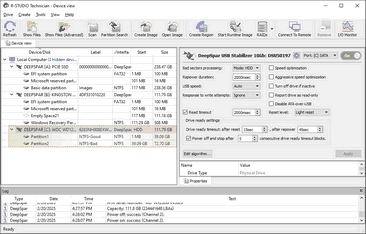
| 1 | Select the DEEPSPAR [C] object, Port: [C] SATA in the drop-down box, and click the Power slider. |
| > | DeepSpar USB Stabilizer 10G will initialize the device and show its content. |
Now all three devices are initialized and ready to work with.
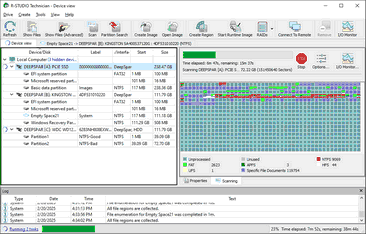
Scanning the M.2 SSD device [A]:
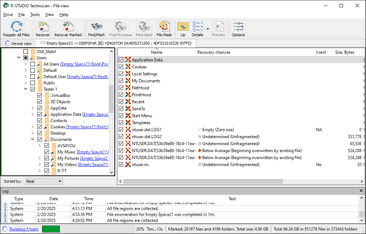
Recovering data from the SSD device [B]:
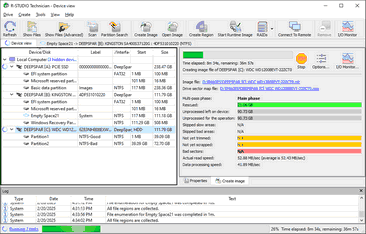
Imaging the HDD device [C]:
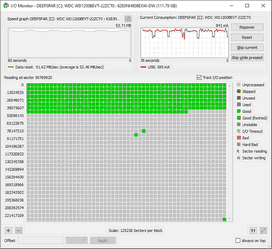
I/O Monitor for USB Stabilizer
In addition to standard data, it also shows a drive current graph
You may skip a certain sector when necessary. Click the Skip current button to do so. The Skip while pressed button makes R-Studio skip sectors while this button is pressed.
Additional options on the Advanced multi-pass imaging settings
Some additional options will appear on the Advanced multi-pass imaging settings window when creating a multi-pass image.
Due to specifics of USB Stabilizer 10G work, it will take some time for the device to disappear in the Device pane after its disconnection.
You may disable/enable work with DeepSpar USB Stabilizer 10Gb on the Main tab of the Settings panel. You need to restart R‑Studio for the changes to take effect.
- R-Studio Technician: activation using a USB stick
- Data Recovery Guide
- Why R-Studio?
- R-Studio for Forensic and Data Recovery Business
- R-STUDIO Review on TopTenReviews
- File Recovery Specifics for SSD devices
- How to recover data from NVMe devices
- Predicting Success of Common Data Recovery Cases
- Recovery of Overwritten Data
- Emergency File Recovery Using R-Studio Emergency
- RAID Recovery Presentation
- R-Studio: Data recovery from a non-functional computer
- File Recovery from a Computer that Won't Boot
- Clone Disks Before File Recovery
- HD Video Recovery from SD cards
- File Recovery from an Unbootable Mac Computer
- The best way to recover files from a Mac system disk
- Data Recovery from an Encrypted Linux Disk after a System Crash
- Data Recovery from Apple Disk Images (.DMG files)
- File Recovery after Re-installing Windows
- R-Studio: Data Recovery over Network
- How To Use R-Studio Corporate Package
- Data Recovery from a Re-Formatted NTFS Disk
- Data Recovery from an ReFS disk
- Data Recovery from a Re-Formatted exFAT/FAT Disk
- Data Recovery from an Erased HFS Disk
- Data Recovery from an Erased APFS Disk
- Data Recovery from a Re-Formatted Ext2/3/4FS Disk
- Data Recovery from an XFS Disk
- Data Recovery from a Simple NAS
- How to connect virtual RAID and LVM/LDM volumes to the operating system
- Specifics of File Recovery After a Quick Format
- Data Recovery After Partition Manager Crash
- File Recovery vs. File Repair
- Data Recovery from Virtual Machines
- How to Recover Files from a Remote Computer Using R-Studio Standalone License and Its Network Capabilities in Demo Mode
- How to Connect Disks to a Computer
- Emergency Data Recovery over Network
- Data Recovery over the Internet
- Creating a Custom Known File Type for R-Studio
- Finding RAID parameters
- Recovering Partitions on a Damaged Disk
- NAT and Firewall Traversal for Remote Data Recovery
- Data Recovery from an External Disk with a Damaged File System
- File Recovery Basics
- Default Parameters of Software Stripe Sets (RAID 0) in Mac OS X
- Data Recovery from Virtual Hard Disk (VHD/VHDX) Files
- Data Recovery from Various File Container Formats and Encrypted Disks
- Automatic RAID Parameter Detection
- IntelligentScan Data Recovery Technology
- Multi-pass imaging in R-Studio
- Runtime Imaging in R-Studio
- Linear Imaging vs Runtime Imaging vs Multi-Pass Imaging
- USB Stabilizer Tech for unstable USB devices
- Joint work of R-Studio and PC-3000 UDMA hardware
- Joint work of R-Studio and HDDSuperClone
- R-Studio T80+ - A Professional Data Recovery and Forensic Solution for Small Business and Individuals Just for 1 USD/day
- Backup Articles
- R-Drive Image Standalone and Corporate license transferring
- Fixing Windows update error 0x80070643 with R-Drive Image
- Backup with Confidence
- R-Drive Image as a free powerful partition manager
- Computer Recovery and System Restore
- Disk Cloning and Mass System Deployment
- Accessing Individual Files or Folders on a Backed Up Disk Image
- R-Drive Image startup / bootable version
- File Backup for Personal Computers and Laptops of Home and Self-Employed Users
- Creating a Data Consistent, Space Efficient Data Backup Plan for a Small Business Server
- How to Move the Already Installed Windows from an Old HDD to a New SSD Device and Create a Hybrid Data Storage System
- How to Move an Installed Windows to a Larger Disk
- How to Move a BitLocker-Encrypted System Disk to a New Storage Device
- How to backup and restore disks on Linux and Mac computers using R-Drive Image
- R-Drive Image and Virtual Machines
- Undelete Articles
- Get Deleted Files Back
- Free Recovery from SD and Memory cards
- R-Undelete: Video Recovery
- Recovery from an External Device with a Damaged File System
- File recovery from a non-functional computer
- Free File Recovery from an Android Phone Memory Card
- Free Photo and Video File Recovery Tutorial
- Easy file recovery in three steps


