- Contents
- Index
- Introduction to R-Studio
-
Data Recovery Using R-Studio
- Basic File Recovery
- Advanced Data Recovery
- Mass File Recovery
-
Volume Sets and RAIDs
- Volume Sets, Stripe Sets, and Mirrors
- Basic RAID 4 and RAID 5 Operations
- Working with RAID6 (Double Xor) Presets
- Working with RAID 6 Presets
- Working with RAIDs with Parity Delays
- Working with Advanced RAID Layouts
- Nested and Non-Standard RAID Levels
- Finding RAID Parameters
- Checking RAID Consistency
- Syntax of a Description File for RAID Configurations
- Description Files for RAID Configurations
- Various Disk and Volume Managers
- Data Recovery over Network
-
R-Studio Technician/T80+
- USB Activation
- Portable version
- Show Files (Advanced)
- Multitasking
- Additional Recovery Options
- Mounting Virtual Objects in the System as Virtual Drives
- Opening Virtual Disks from the Files Panel
- Hidden Devices
- File Information
- Symbolic Link Processing
- Custom Recovery Lists
- Drive Copy Wizard
- File Maps
- I/O Monitor and Sector Map Files
- Runtime Imaging
- Multi-pass Imaging
- Reverse RAIDs
- Working with Third-Party Hardware
- Forensic Mode
- Text/hexadecimal Editor
- Technical Information and Troubleshooting
- R-Studio Emergency
- R-Studio Agent Emergency
© 2026 R-Tools Technology Inc.
All rights reserved.
Data Recovery over Network
Generally, data restoring over network is very much the same as that on a local computer.
R‑Studio Agent should be running on the network computer where data are to be recovered.
Read the Connecting over the Internet topic to learn how to establish connection between R‑Studio and R‑Studio Agent over the Internet.
To connect to a remote computer
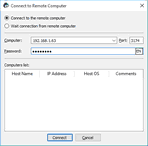
| 1 | Click the Connect to Remote button or select Connect To Remote on the Drive menu and select Connect to the remote computer |
A list of nearby computers will appear in the Computer List on the Connect to Remote Computer dialog box.
| 2 | Select a computer from the list on the Connect to Remote Computer dialog box and enter the password |
Otherwise, you need to specify in the Computer: field the name or IP address of the remote computer where data are to be recovered. The Port should coincide with the port specified for the R‑Studio Agent .
The Password: field is for the password of R‑Studio Agent running on the remote computer. If you want to see the entered password, right-click the field and select Show password on the shortcut menu.
Note: If the remote computer is started with R‑Studio Agent Emergency , leave this field blank.
| > | R‑Studio will connect to the remote computer and show its drive and logical disk structure of the remote computer below the device/disk structure of your local computer |
It can be processed the same way as that on a local computer.
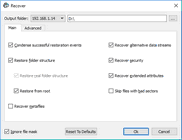
When the Recover dialog box appears, you may select whether you want to save recovered files on the local or remote computer. Saving recovered files on a remote computer may be useful when the remote computer has a healthy drive because you do not have to transfer files over network. It may be an external USB drive, for example.
When R‑Studio connects to the remote computer, it check if R‑Studio Agent is present and its password. If there is no R‑Studio Agent installed, R‑Studio may try to remotely install it. See the R‑Studio Agent topic for details.
- R-Studio Technician: activation using a USB stick
- Data Recovery Guide
- Why R-Studio?
- R-Studio for Forensic and Data Recovery Business
- R-STUDIO Review on TopTenReviews
- File Recovery Specifics for SSD devices
- How to recover data from NVMe devices
- Predicting Success of Common Data Recovery Cases
- Recovery of Overwritten Data
- Emergency File Recovery Using R-Studio Emergency
- RAID Recovery Presentation
- R-Studio: Data recovery from a non-functional computer
- File Recovery from a Computer that Won't Boot
- Clone Disks Before File Recovery
- HD Video Recovery from SD cards
- File Recovery from an Unbootable Mac Computer
- The best way to recover files from a Mac system disk
- Data Recovery from an Encrypted Linux Disk after a System Crash
- Data Recovery from Apple Disk Images (.DMG files)
- File Recovery after Re-installing Windows
- R-Studio: Data Recovery over Network
- How To Use R-Studio Corporate Package
- Data Recovery from a Re-Formatted NTFS Disk
- Data Recovery from an ReFS disk
- Data Recovery from a Re-Formatted exFAT/FAT Disk
- Data Recovery from an Erased HFS Disk
- Data Recovery from an Erased APFS Disk
- Data Recovery from a Re-Formatted Ext2/3/4FS Disk
- Data Recovery from an XFS Disk
- Data Recovery from a Simple NAS
- How to connect virtual RAID and LVM/LDM volumes to the operating system
- Specifics of File Recovery After a Quick Format
- Data Recovery After Partition Manager Crash
- File Recovery vs. File Repair
- Data Recovery from Virtual Machines
- How to Recover Files from a Remote Computer Using R-Studio Standalone License and Its Network Capabilities in Demo Mode
- How to Connect Disks to a Computer
- Emergency Data Recovery over Network
- Data Recovery over the Internet
- Creating a Custom Known File Type for R-Studio
- Finding RAID parameters
- Recovering Partitions on a Damaged Disk
- NAT and Firewall Traversal for Remote Data Recovery
- Data Recovery from an External Disk with a Damaged File System
- File Recovery Basics
- Default Parameters of Software Stripe Sets (RAID 0) in Mac OS X
- Data Recovery from Virtual Hard Disk (VHD/VHDX) Files
- Data Recovery from Various File Container Formats and Encrypted Disks
- Automatic RAID Parameter Detection
- IntelligentScan Data Recovery Technology
- Multi-pass imaging in R-Studio
- Runtime Imaging in R-Studio
- Linear Imaging vs Runtime Imaging vs Multi-Pass Imaging
- USB Stabilizer Tech for unstable USB devices
- Joint work of R-Studio and PC-3000 UDMA hardware
- Joint work of R-Studio and HDDSuperClone
- R-Studio T80+ - A Professional Data Recovery and Forensic Solution for Small Business and Individuals Just for 1 USD/day
- Backup Articles
- R-Drive Image Standalone and Corporate license transferring
- Fixing Windows update error 0x80070643 with R-Drive Image
- Backup with Confidence
- R-Drive Image as a free powerful partition manager
- Computer Recovery and System Restore
- Disk Cloning and Mass System Deployment
- Accessing Individual Files or Folders on a Backed Up Disk Image
- R-Drive Image startup / bootable version
- File Backup for Personal Computers and Laptops of Home and Self-Employed Users
- Creating a Data Consistent, Space Efficient Data Backup Plan for a Small Business Server
- How to Move the Already Installed Windows from an Old HDD to a New SSD Device and Create a Hybrid Data Storage System
- How to Move an Installed Windows to a Larger Disk
- How to Move a BitLocker-Encrypted System Disk to a New Storage Device
- How to backup and restore disks on Linux and Mac computers using R-Drive Image
- R-Drive Image and Virtual Machines
- Undelete Articles
- Get Deleted Files Back
- Free Recovery from SD and Memory cards
- R-Undelete: Video Recovery
- Recovery from an External Device with a Damaged File System
- File recovery from a non-functional computer
- Free File Recovery from an Android Phone Memory Card
- Free Photo and Video File Recovery Tutorial
- Easy file recovery in three steps


