- PRODUCTSFREEWAREFOR COMMERCIAL USEFOR PERSONAL AND BUSINESS USEBackup and System Restore:PC Privacy and Security:
- BUY ONLINE
- DISTRIBUTION

- Contents
- Index
- Introduction to R-Studio
-
Data Recovery Using R-Studio
- Basic File Recovery
- Advanced Data Recovery
- Mass File Recovery
-
Volume Sets and RAIDs
- Volume Sets, Stripe Sets, and Mirrors
- Basic RAID 4 and RAID 5 Operations
- Working with RAID6 (Double Xor) Presets
- Working with RAID 6 Presets
- Working with RAIDs with Parity Delays
- Working with Advanced RAID Layouts
- Nested and Non-Standard RAID Levels
- Finding RAID Parameters
- Checking RAID Consistency
- Syntax of a Description File for RAID Configurations
- Description Files for RAID Configurations
- Various Disk and Volume Managers
- Data Recovery over Network
-
R-Studio Technician/T80+
- USB Activation
- Portable version
- Show Files (Advanced)
- Multitasking
- Additional Recovery Options
- Mounting Virtual Objects in the System as Virtual Drives
- Opening Virtual Disks from the Files Panel
- Hidden Devices
- File Information
- Symbolic Link Processing
- Custom Recovery Lists
- Drive Copy Wizard
- File Maps
- I/O Monitor and Sector Map Files
- Runtime Imaging
- Multi-pass Imaging
- Reverse RAIDs
- Working with Third-Party Hardware
- Forensic Mode
- Text/hexadecimal Editor
- Technical Information and Troubleshooting
- R-Studio Emergency
- R-Studio Agent Emergency
© 2026 R-Tools Technology Inc.
All rights reserved.
Images
An image is an exact, byte by byte, copy of any object in the Drives panel . When created, images can be processed like their original objects.
Images are very useful if there is a risk of total data loss due to hardware malfunction. If bad blocks are constantly appearing on a drive, you must immediately create an image of this drive. All data search, scan and restoring can be done from this image.
While creating images, R‑Studio can simultaneously perform drive scan and save scan information to lessen time necessary to process the drive.
The image can be saved on the remote computer if it is created via network . R‑Studio can also load and process images created with the DeepSpar Disk Imager™ .
An imaging process can be stopped and then resumed later on.
R‑Studio Corporate version and higher can create images directly on hard drives making in fact disk clones.
To create an image ,
| 1 | Select an object in the R‑Studio 's Drives panel and click the Create Image button |
 Other ways to create the image
|
• Select the object and select Create Image on the Drive menu or • Right-click the selected object and select Create Image File on the shortcut menu |
| 2 | Specify image options, a file name, and destination for the image on the Create Image dialog box |
Note: To store an image file, you need a free space equal to at least the object size.

Create Image dialog box

Create Image dialog box

Create Image dialog box
Image Options
|
Image filename |
Specifies the name and path for the image file |
|
Image type: |
Compressed image (R-Drive Image compatible): If this option is selected, R‑Studio will create an image file which can be compressed, split into several parts, and password-protected. This image file is fully compatible with the images created by R-Drive Image , but incompatible with very old versions of R‑Studio . Byte by byte image to a file: If this option is selected, R‑Studio will create a simple exact copy of the object. Byte to byte image to a physical disk : R‑Studio will create an exact copy of the disk on another hard drive. Data on the target drive will be overwritten. Available in the Corporate, Technician, and T80+ licenses. Some other image formats are also available in the Technician, and T80+ licenses. You may read more about these formats in the Supported Virtual Disk and Disk Image Formats page. |
|
Image compression ratio |
You may compress the data in the image to save space. Active only if the Compressed image (R-Drive Image compatible) is selected. |
|
Estimated size |
Shows the estimated size of the image file. An actual image size depends on how much empty space is on the selected partition and what file types are there . Active only if the Compressed image (R-Drive Image compatible) is selected. |
|
Image split size |
You may set this option to Automatic and let Windows decide how to split the image file. This mostly depends on the file system on the destination drive. You may also either explicitly specify the split size, or choose a preset for various devices with removable storage. Select Fixed size for that. Active only if the Compressed image (R-Drive Image compatible) is selected. |
|
Password Encrypt image |
You may protect your image file with a password. Note: If you leave the Encrypt image option clear this feature will provide a relatively moderate protection against conventional unauthorized access. If this option is selected, R‑Studio will encrypt the image using the AES-XTS algorithm. Note: Only files in the RDR format can be password protected and encrypted. |
|
Create scan information file |
If this option is selected, R‑Studio will perform drive scan simultaneously with image creation. See the Drive Scan help page to learn scan options. |
|
Read retries |
Specifies a value for I/O Tries , or how many times R‑Studio will try to read a bad sector . R‑Studio treats bad sectors in the following way: It reads a certain part of drive (predefined by Windows) and • If Default read attempts is set to 0, the entire part with bad sectors will be filled with the specified pattern. • If Default read attempts is set to a non-zero value, R‑Studio reads again that part sector by sector, repeating the attempts the specified number of times. If R‑Studio still cannot read a bad sector, it fills the sectors with the specified pattern. In this case only the bad sectors will be filled with the pattern, but that extremely slows the drive read process. For example, if you set Default read retries to 1, a bad sector will be read 2 times. |
|
Pattern to fill bad blocks |
Specifies a pattern R‑Studio will use to fill bad sectors in this image. You may specify the pattern either in the ANSI or Hex data format. Note: R‑Studio will never ever try to write anything on the drive from which data is to recover or an image is to create. This pattern fills bad sectors only in the image. |
|
Enable multi-pass image creation |
These options are available only in the Technician/T80+ versions. Read more about these options in the I/O Monitor and Sector Map files and Multi-pass imaging help page. |
If a remote computer is connected for Data Recovery over Network , the Create Image dialog box will have a different look. You may save the image to the local or remote computer.
R-Studio Technician/T80+
These options are available only in the Technician/T80+ versions.

Create Image dialog box
Additional output folders
|
Additional output folders |
Additional output folders where image files will be stored when R-Studio runs out of space. |

Create Image dialog box
Post Actions Options
|
Shutdown the computer on all tasks completion |
If this check box is selected, R‑Studio will shut down your computer when all task, including this image creation have been completed. |
|
E-Mail notifications |
If this check box is selected, R‑Studio will inform you about the outcome of the operation via email. |
| > | R‑Studio will start creating the image, the Progress message showing the progress. |
You may change some options during the imaging process. Click the Options button and change them as necessary/
You may stop the imaging process and then resume it later on. Click the Stop button and the Cancel drive operation dialog box will appear. Select Stop if yo want to keep the partially created image or Discard if you don't need this image file.
To resume the creation of the image for the same object, select the same file name for the image. You'll be able to create a new image file or continue to create the image for the object.

Resuming image creation
R‑Studio will create a new file for every new start of imaging for the .rdi and .vmdk file types.
To process an already created Image , the image file should be opened.
To open an image
| 1 | Click the Open Image button , or |
Select Open Image File on the Drive menu
If a remote computer is connected for Data Recovery over Network , the Open Image File dialog box will appear when you select a place to load the image file from. You may load it from the local or remote computer.
| 2 | Select the required image file |
If the image is a multi-volume one, and not all parts are at the same place, the dialog box will appear

Multi-volume image dialog box
Specify paths to other image parts and click the OK button.
| > | An Image object will appear in the Drives panel |
Depending whether this is a byte-by-byte , compressed ( R-Drive Image compatible), multi-volume , or VMDK image, its appearance in the Drives panels is different.
You may perform all data search, scan, and recovery from this image as it were a regular drive/disk object.
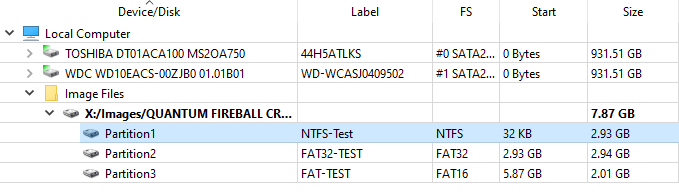
A byte by byte image
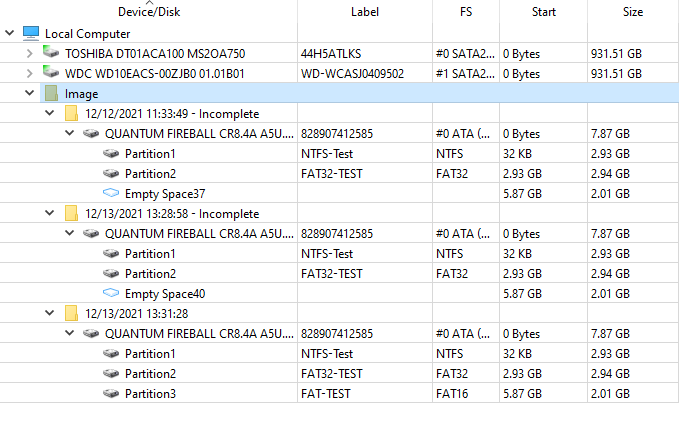
A multi-volume image
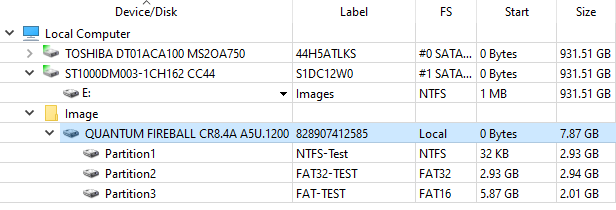
A VMDK image
To close an image
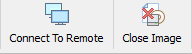
| * | Select the image and click the Close Image button, |
• or right-click the image and select Close Image on the shortcut menu
• or select the image and press the F8 key.
To close all image
| * | Select Close All Images on the Tools menu |
A logical disk (or disks) containing in an image can be mounted in the operating system as a device which makes its content accessible to any program including any other data recovery software.
To mount a logical disk in an image
| 1 | Right-click the logical disk in the image in the Drives panel and select Mount on the shortcut menu |
| 2 | Select a disk letter to assign to the mounted logical disk and click OK |
| > | A Virtual disk object will appear in the Drives panel |
and this virtual disk will be available to system in the read-only mode
To unmount a virtual disk from the system
| 1 | Right-click the virtual disk in the image in the Drives panel and select Unmount on the shortcut menu |
- R-Studio Technician: activation using a USB stick
- Data Recovery Guide
- Why R-Studio?
- R-Studio for Forensic and Data Recovery Business
- R-STUDIO Review on TopTenReviews
- File Recovery Specifics for SSD devices
- How to recover data from NVMe devices
- Predicting Success of Common Data Recovery Cases
- Recovery of Overwritten Data
- Emergency File Recovery Using R-Studio Emergency
- RAID Recovery Presentation
- R-Studio: Data recovery from a non-functional computer
- File Recovery from a Computer that Won't Boot
- Clone Disks Before File Recovery
- HD Video Recovery from SD cards
- File Recovery from an Unbootable Mac Computer
- The best way to recover files from a Mac system disk
- Data Recovery from an Encrypted Linux Disk after a System Crash
- Data Recovery from Apple Disk Images (.DMG files)
- File Recovery after Re-installing Windows
- R-Studio: Data Recovery over Network
- How To Use R-Studio Corporate Package
- Data Recovery from a Re-Formatted NTFS Disk
- Data Recovery from an ReFS disk
- Data Recovery from a Re-Formatted exFAT/FAT Disk
- Data Recovery from an Erased HFS Disk
- Data Recovery from an Erased APFS Disk
- Data Recovery from a Re-Formatted Ext2/3/4FS Disk
- Data Recovery from an XFS Disk
- Data Recovery from a Simple NAS
- How to connect virtual RAID and LVM/LDM volumes to the operating system
- Specifics of File Recovery After a Quick Format
- Data Recovery After Partition Manager Crash
- File Recovery vs. File Repair
- Data Recovery from Virtual Machines
- How to Recover Files from a Remote Computer Using R-Studio Standalone License and Its Network Capabilities in Demo Mode
- How to Connect Disks to a Computer
- Emergency Data Recovery over Network
- Data Recovery over the Internet
- Creating a Custom Known File Type for R-Studio
- Finding RAID parameters
- Recovering Partitions on a Damaged Disk
- NAT and Firewall Traversal for Remote Data Recovery
- Data Recovery from an External Disk with a Damaged File System
- File Recovery Basics
- Default Parameters of Software Stripe Sets (RAID 0) in Mac OS X
- Data Recovery from Virtual Hard Disk (VHD/VHDX) Files
- Data Recovery from Various File Container Formats and Encrypted Disks
- Automatic RAID Parameter Detection
- IntelligentScan Data Recovery Technology
- Multi-pass imaging in R-Studio
- Runtime Imaging in R-Studio
- Linear Imaging vs Runtime Imaging vs Multi-Pass Imaging
- USB Stabilizer Tech for unstable USB devices
- Joint work of R-Studio and PC-3000 UDMA hardware
- Joint work of R-Studio and HDDSuperClone
- R-Studio T80+ - A Professional Data Recovery and Forensic Solution for Small Business and Individuals Just for 1 USD/day
- Backup Articles
- R-Drive Image Standalone and Corporate license transferring
- Fixing Windows update error 0x80070643 with R-Drive Image
- Backup with Confidence
- R-Drive Image as a free powerful partition manager
- Computer Recovery and System Restore
- Disk Cloning and Mass System Deployment
- Accessing Individual Files or Folders on a Backed Up Disk Image
- R-Drive Image startup / bootable version
- File Backup for Personal Computers and Laptops of Home and Self-Employed Users
- Creating a Data Consistent, Space Efficient Data Backup Plan for a Small Business Server
- How to Move the Already Installed Windows from an Old HDD to a New SSD Device and Create a Hybrid Data Storage System
- How to Move an Installed Windows to a Larger Disk
- How to Move a BitLocker-Encrypted System Disk to a New Storage Device
- How to backup and restore disks on Linux and Mac computers using R-Drive Image
- R-Drive Image and Virtual Machines
- Undelete Articles
- Get Deleted Files Back
- Free Recovery from SD and Memory cards
- R-Undelete: Video Recovery
- Recovery from an External Device with a Damaged File System
- File recovery from a non-functional computer
- Free File Recovery from an Android Phone Memory Card
- Free Photo and Video File Recovery Tutorial
- Easy file recovery in three steps