- Contents
- Index
- Introduction to R-Studio for Mac
-
Data Recovery Using R-Studio
- Basic File Recovery
- Advanced Data Recovery
- Mass File Recovery
-
Volume Sets and RAIDs
- Volume Sets, Stripe Sets, and Mirrors
- Basic RAID 4 and RAID 5 Operations
- Working with RAID6 Presets
- Working with RAID6 (Double Xor) Presets
- Working with RAIDs with Parity Delays
- Working with Advanced RAID Layouts
- Nested and Non-Standard RAID Levels
- Finding RAID Parameters
- Checking RAID consistency
- Syntax of a Description File for RAID Configurations
- Description Files for RAID Configurations
- Various Disk and Volume Managers
- Data Recovery over Network
-
R-Studio Technician/T80+
- USB Activation (Technician only)
- Show Files (Advanced)
- Multitasking
- Additional Recovery Options
- Connecting Virtual Objects to the System as Virtual Drives
- Opening Virtual Disks from the Files Panel
- Hidden Devices
- Extended File Information
- Symbolic Link Processing
- Custom Recovery Lists
- Drive Copy Wizard
- File Maps
- I/O Monitor and Sector Map Files
- Runtime Imaging
- Multi-pass Imaging
- Reverse RAIDs
- Working with the Third-Party Hardware
- Forensic Mode
- Text/Hexadecimal Editor
- Technical Information and Troubleshooting
- R-Studio Emergency
- R-Studio Agent Emergency
© 2025 R-Tools Technology Inc.
All rights reserved.
R-Studio Settings
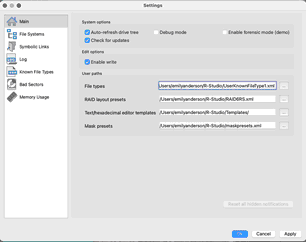
You may specify some global setting for R-Studio on the Settings dialog box. You may reach it by selecting Preferences on the R-Studio menu.
Main
|
System Options |
|
|
Auto-refresh Drive Tree |
If this box is selected, R‑Studio automatically refreshes the list of connected drives. You may disable it if R‑Studio experiences problems with connected devices. |
|
Debug Mode |
If this check box is selected, R‑Studio for Linux displays an additional command Create FS Snapshot on the shortcut menu for an object with a file system . An FS Snapshot contains system data for the file system only (file descriptions without file contents). If a problem appears, this snapshot can be sent to R‑Studio technical support to identify the problem. This option greatly slows R‑Studio . |
|
Enable forensic mode (demo) |
If this check box is selected, R‑Studio turns on the Forensic mode in demo mode. |
|
Check for update |
If this box is selected, R‑Studio will automatically check for updates. |
|
Edit options |
|
|
If this check box is selected, R‑Studio Technician/T80+ enables you to write any changes made in the Text/hexadecimal editor . It enables wiping objects in R-Studio and R-Studio Corporate . |
|
|
Max changes buffer size |
Maximum amount of data stored for the Undo command in the Text/hexadecimal editor . R‑Studio Technician ( /T80+ ) |
|
User paths |
|
|
File types |
Specifies a file name and path to the file where the descriptions of user's known file types are stored. You need to re-start R‑Studio or click the Reload User's File Types button on the Known File Types tab for the new file to take effect. |
|
RAID layout presets |
Specifies a file name and path to the file where the descriptions of user's RAID layouts are stored |
|
Text/hexadecimal editor templates |
Specifies the path for pattern description files for Text/hexadecimal editor . |
|
Mask presets |
Specifies a file name and path to the file with file mask presets. |
|
Reset all hidden notifications |
This button enables all previously disabled notification and warning messages. |
File Systems
|
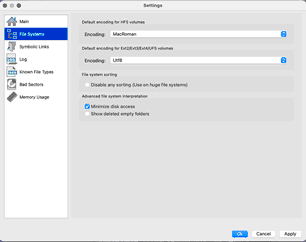
Default encoding for HFS volumes |
|
|
Encoding |
Select the national encoding for the HFS partitions . |
|
|
|
|
Encoding |
Select the national encoding for the Ext2, Ext3, Ext4, and UFS partitions. |
|
File system sorting |
|
|
Disable any sorting |
Select this option if the number of files on the drive is so large that R‑Studio sorts files in selected folders for too long time. |
|
Advanced file system interpretation |
|
|
Minimize drive access |
Select this option if a lot of bad sectors are on the drive. R‑Studio will reduce access to internal files in the file system to speed up the interpretation of file system data. |
|
Show deleted empty folders |
Select this option if you want to view empty deleted folders. |
All settings are available in the Technician/T80+ version only!
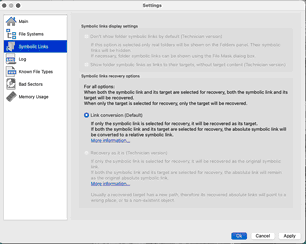
Symbolic links (of symlinks for short) are object that contains references to other files or folders directory in the form of absolute or relative paths and that affect pathname resolution. For example, if a symlink C:\ProgramData\Documents points to D:\Recovered Files\Root\Users\Public\Documents , entering it will result in entering D:\Recovered Files\Root\Users\Public\Documents .
|
Link conversion (Default) |
|
|
Both an object and its symbolic link are selected for recovery: |
If both an object and its symbolic link are selected for recovery, both the object and its symbolic link will be recovered. The file path in that symbolic link will be converted from absolute to relative. Example: If the object C:\ProgramData\Documents is a symbolic link to C:\Users\Public\Documents , it will be converted to a symbolic link to ..\Users\Public\Documents . Therefore, the symbolic link will point to its object regardless of the place to which the object has been recovered. |
|
Only an object is selected for recovery: |
Only the selected object will be recovered. |
|
Only a symbolic link is selected for recovery: |
The selected symbolic link will be recovered as a real object. |
The Data Recovery Topics topic explains processing of symbolic links recovery in more detail.
Log
 Log options
|
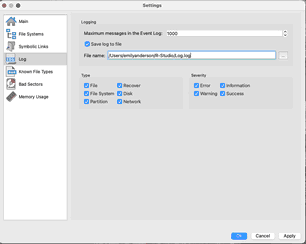
Maximum messages in the Event Log |
Specifies the number of messages stored in the log file |
|
Logging |
|
|
Save log to file |
If this checkbox is selected, R-Studio writes its log into a log file specified in the File name field. |
|
File name |
Specifies the file name of the log file. If that file already exists, the data will be appended to that file. |
|
Type |
|
|
Files |
If this checkbox is selected, R-Studio logs all events with files. |
|
File System |
If this checkbox is selected, R-Studio logs all events with the file system. |
|
Partition |
If this checkbox is selected, R-Studio logs all events with FAT . |
|
Recover |
If this checkbox is selected, R-Studio logs all events with the recovering processes. |
|
Disk |
If this checkbox is selected, R-Studio logs all events with disks. |
|
Network |
If this checkbox is selected, R-Studio logs all events with network operation. |
|
Severity |
|
|
Error |
If this checkbox is selected, R-Studio adds error messages into its log. |
|
Warning |
If this checkbox is selected, R-Studio adds warning messages into its log. |
|
Information |
If this checkbox is selected, R-Studio adds information messages into its log. |
|
Success |
If this checkbox is selected,, R-Studio adds success messages into its log. |
|
NEVER WRITE A LOG FILE ON THE DISK FROM WHICH YOU RECOVER DATA!!! Or you may obtain unpredictable results and lose all your data. |
|
|
Note: If in the Recover dialog box the Condense successful restoration events check box is selected, the Log will display only Error , Warning , and Information event messages. |
|
Known File Types
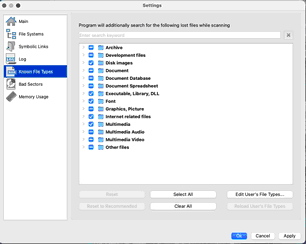
You may specify which Known File Types will be enabled/disabled by default. You may also specify know file types to search for during a specific scan session on the Scan dialog box.
|
Reset |
Click this button to reset the settings to the previous state. Active until the Apply button is clicked. |
|
Select All |
Click this button to select all file types in the list. |
|
Clear All |
Click this button to clear all file types in the list except some predefined ones. |
|
Reload User's File Types |
Click this button to apply new file types after the user's file types file has been changes from the Main tab. |
|
Edit User's File Types |
Click this button to add a new customer's Known File Type , or to edit already existing ones. See the Customizing File Types help page for more details |
|
Reset to Recommended |
Click this button to reset the settings to the default (Recommended) file set. |
Bad Sectors
|
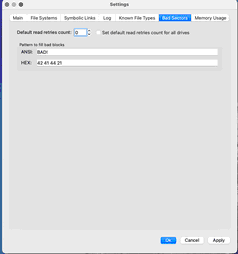
Default read retries count |
Specifies how many times R-Studio will try to read a bad sector . You may specify this parameter for each drive separately on the Properties tab. R-Studio treats bad sectors in the following way: It reads a certain part of disk (predefined by Windows) and • If Default read retries is set to 0, the entire part with bad sectors will be filled with the specified pattern. • If Default read retries is set to a non-zero value, R-Studio reads again that part sector by sector, repeating the attempts the specified number of times. If R-Studio still cannot read a bad sector, it fills the sectors with the specified pattern. In this case only the bad sectors will be filled with the pattern, but that extremely slows the disk read process. For example, if you set Default read retries to 1, a bad sector will be read 2 times. |
|
Set default read retries count for all drives |
Select this option to set Default read retries count for all drives to this value. |
|
Pattern to fill bad blocks |
Specifies a pattern R-Studio will use to fill bad sectors in files to recover, in images , or when showing data in the Text/Hexadecimal Editor . You may specify the pattern either in the ANSI or Hex data format. Note: R-Studio will never ever try to write anything on the disk from which data is to recover or an image is to create. |
Memory Usage
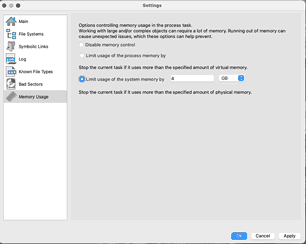
These settings control how much memory R-Studio uses for its work. They help preventing R-Studio from locking when trying to perform very memory-consuming tasks like scanning large disks or processing file systems with a lot of files.
|
Disable memory control |
If this option is selected, the memory control is disabled. |
|
Limit usage of the process memory by |
If this option is selected, R‑Studio will automatically stop performing the task when the amount of used virtual memory reaches the specified value. |
|
Limit usage of the process memory by |
If this option is selected, R‑Studio will automatically stop performing the task when the amount of used physical memory reaches the specified value. |
You may see how much memory R-Studio actually uses on the Memory Usage dialog box.
- R-Studio Technician: activation using a USB stick
- Data Recovery Guide
- Why R-Studio?
- R-Studio for Forensic and Data Recovery Business
- R-STUDIO Review on TopTenReviews
- File Recovery Specifics for SSD devices
- How to recover data from NVMe devices
- Predicting Success of Common Data Recovery Cases
- Recovery of Overwritten Data
- Emergency File Recovery Using R-Studio Emergency
- RAID Recovery Presentation
- R-Studio: Data recovery from a non-functional computer
- File Recovery from a Computer that Won't Boot
- Clone Disks Before File Recovery
- HD Video Recovery from SD cards
- File Recovery from an Unbootable Mac Computer
- The best way to recover files from a Mac system disk
- Data Recovery from an Encrypted Linux Disk after a System Crash
- Data Recovery from Apple Disk Images (.DMG files)
- File Recovery after Re-installing Windows
- R-Studio: Data Recovery over Network
- How To Use R-Studio Corporate Package
- Data Recovery from a Re-Formatted NTFS Disk
- Data Recovery from an ReFS disk
- Data Recovery from a Re-Formatted exFAT/FAT Disk
- Data Recovery from an Erased HFS Disk
- Data Recovery from an Erased APFS Disk
- Data Recovery from a Re-Formatted Ext2/3/4FS Disk
- Data Recovery from an XFS Disk
- Data Recovery from a Simple NAS
- How to connect virtual RAID and LVM/LDM volumes to the operating system
- Specifics of File Recovery After a Quick Format
- Data Recovery After Partition Manager Crash
- File Recovery vs. File Repair
- Data Recovery from Virtual Machines
- How to Recover Files from a Remote Computer Using R-Studio Standalone License and Its Network Capabilities in Demo Mode
- How to Connect Disks to a Computer
- Emergency Data Recovery over Network
- Data Recovery over the Internet
- Creating a Custom Known File Type for R-Studio
- Finding RAID parameters
- Recovering Partitions on a Damaged Disk
- NAT and Firewall Traversal for Remote Data Recovery
- Data Recovery from an External Disk with a Damaged File System
- File Recovery Basics
- Default Parameters of Software Stripe Sets (RAID 0) in Mac OS X
- Data Recovery from Virtual Hard Disk (VHD/VHDX) Files
- Data Recovery from Various File Container Formats and Encrypted Disks
- Automatic RAID Parameter Detection
- IntelligentScan Data Recovery Technology
- Multi-pass imaging in R-Studio
- Runtime Imaging in R-Studio
- Linear Imaging vs Runtime Imaging vs Multi-Pass Imaging
- USB Stabilizer Tech for unstable USB devices
- Joint work of R-Studio and PC-3000 UDMA hardware
- Joint work of R-Studio and HDDSuperClone
- R-Studio T80+ - A Professional Data Recovery and Forensic Solution for Small Business and Individuals Just for 1 USD/day
- Backup Articles
- R-Drive Image Standalone and Corporate license transferring
- Fixing Windows update error 0x80070643 with R-Drive Image
- Backup with Confidence
- R-Drive Image as a free powerful partition manager
- Computer Recovery and System Restore
- Disk Cloning and Mass System Deployment
- Accessing Individual Files or Folders on a Backed Up Disk Image
- R-Drive Image startup / bootable version
- File Backup for Personal Computers and Laptops of Home and Self-Employed Users
- Creating a Data Consistent, Space Efficient Data Backup Plan for a Small Business Server
- How to Move the Already Installed Windows from an Old HDD to a New SSD Device and Create a Hybrid Data Storage System
- How to Move an Installed Windows to a Larger Disk
- How to Move a BitLocker-Encrypted System Disk to a New Storage Device
- How to backup and restore disks on Linux and Mac computers using R-Drive Image
- R-Drive Image and Virtual Machines
- Undelete Articles
- Get Deleted Files Back
- Free Recovery from SD and Memory cards
- R-Undelete: Video Recovery
- Recovery from an External Device with a Damaged File System
- File recovery from a non-functional computer
- Free File Recovery from an Android Phone Memory Card
- Free Photo and Video File Recovery Tutorial
- Easy file recovery in three steps


