- PRODUCTSFREEWAREFOR COMMERCIAL USEFOR PERSONAL AND BUSINESS USEBackup and System Restore:PC Privacy and Security:
- BUY ONLINE
- DISTRIBUTION
-
File Recovery from an Unbootable Mac Computer


Note: If you need to recover files from the system disk of your operational Mac computer, read our article: The best way to recover files from a Mac system disk
Note: You cannot use this program to work with Mac computers based on Apple Silicon.
Even a Mac user sometimes can find that his or her computer doesn't start anymore. Its hardware seems to be functioning, but the computer isn't operable anymore. Quite often that may happen after an unsuccessful system update or system crash.
The Mac system provides a system recovery option, but such operation may permanently destroy user's files, such as family photos, music collections, important documents, as so on. So, it's a quite reasonable step to recover such files before recovering the system. Such procedure is called an "emergency recovery" and can be performed using special recovery tools like R-Studio Emergency.
This article will give you step-by-step instructions on how to perform such emergency recovery and save your endangered files. In addition, you may use R-Studio's on-line help if you need some more information.
Also you don't have to buy R-Studio immediately to start recovering files. You may do most actions in its Demo mode except saving recovered files. When you have enough reasons to believe that you will be able to recover files successfully, you my buy R-Studio and register it without interrupting the file recovery process.
Preliminary Steps
Before we begin we need to do some preliminary steps:
First, we need to find place to store recovered files. You may use the following devices:
- External devices such as USB sticks, memory cards, and other similar FAT/exFAT-formatted devices. Such devices are inexpensive and easily available, they can be read by all operating systems, but keep in mind: FAT-formatted devices cannot store files larger that 2GB. So, if you plan to recover large video files, format them as exFAT devices.
- External hard drives formatted by Mac computers (with the HFS/HFS+ file system). R-Studio Emergency can write files to such disks, although some files and folders on those disks may have access problems on Mac computers.
Finder shows such inaccessible folders and files in the following way:

Inaccessible Folders in Finder
Click image to enlarge
To get access to such data, do the following:
1. Under an administrator account, control-click the folder and select Get Info on the contextual menu.

Info of an inaccessible folder
Click image to enlarge
Click the Lock icon in the Sharing & Permissions section to unlock the folder properties. The system will ask you for the account password.
2. Click the Privilege column and select Read & Write on the contextual menu.
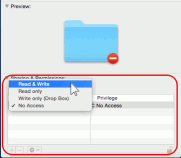
Setting the access rights for the folder
Click image to enlarge
3. If this is a folder with other folders and files, click the Properties icon and select Apply to enclosed items...
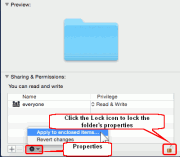
Setting access rights for enclosed items in the folder
Click image to enlarge
Then click the Lock icon to lock the properties back.
Windows computers cannot read such disks without some third-party software installed. Linux computers are able to access files on such disks, but some access right problems may appear. - External hard drives formatted by Windows computers (with the NTFS file system). Mac computers can only read such disks without any third-party software, and Linux computers have full access to such disks.
- Network disks. Such disks may be on other network computers or NAS devices. Below we'll explain how to connect such disks to R-Studio Emergency.
Then we need to create an R-Studio Emergency startup disk.
Using a Mac Computer
Download the ZIP archive of R-Studio Emergency, unzip it, and write files to a FAT32-formatted USB device.
Please note that you cannot use this disk to start non-EFI computers (old Macs, for example), nor can you just copy those files to a CD/DVD disc to create an R-Studio Emergency startup disc. If you need a CD disk, burn it using the ISO image.
Using a Windows Computer
You may create a USB startup disk for R-Studio Emergency using a Windows Computer. See R-Studio on-line Help: Creating Startup Disks for details. That disk can be used to start any computer.
Now we can start the file recovery procedure:
Starting a Mac computer with R-Studio Emergency
1. Connect a USB disk.
2. Switch the Mac on
3. While loading, keep the Option key on the Mac keyboard pressed (the Alt key if you use a non-Apple keyboard).
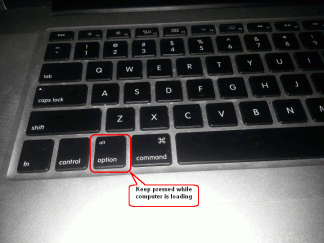
The Options key
Click image to enlarge
4. Select the EFI boot disk and press Enter.
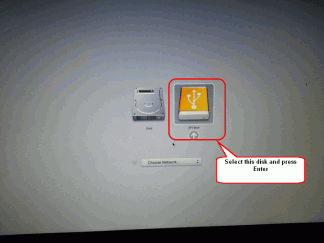
The R-Studio Emergency startup disk
Click image to enlarge
R-Studio Emergency will start loading.
5. Select R-Studio Emergency GUI (Graphic Mode)
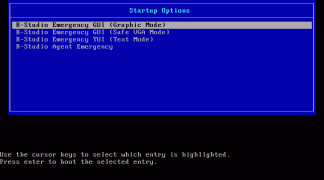
The Startup Options screen
Click image to enlarge
Wait until the R-Studio Emergency Demo Activation dialog box appears.
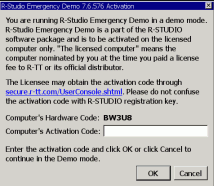
Activation screen
Click image to enlarge
You don't have to enter the activation code immediately; you may click the Cancel button and work with R-Studio Emergency in its Demo mode. In this mode, you may perform all file recovery actions except saving recovered files.
The Main panel of R-Studio will appear.
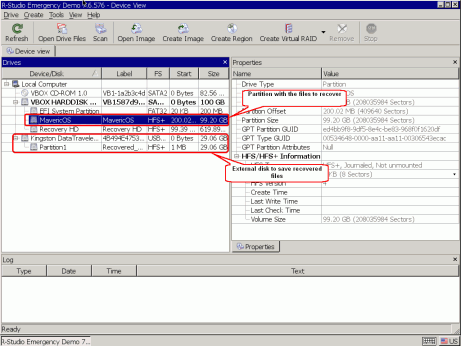
R-Studio's Main panel
Click image to enlarge
File Recovery
If R-Studio has recognized a file system on the partition, just double-click it to enumerate the files. When the file/folder structure appears, navigate to the Users folder, and mark folders and files for recovery.
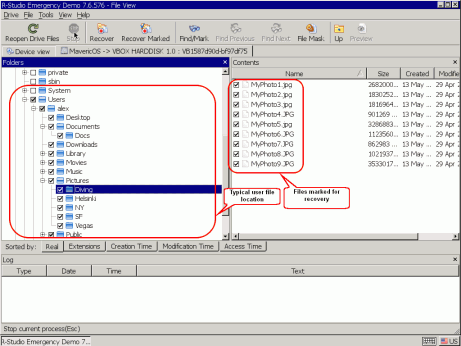
Files marked for recovery
Click image to enlarge
Searching for and marking files for recovery
You may do that in several ways:
- Sorting files by their types (extensions):
Click the Extensions tab on the Sorted by: bar.
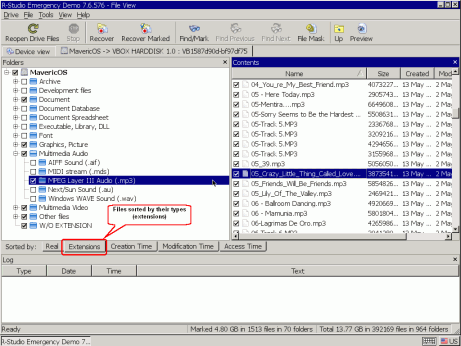
Files sorted by their types (extensions)
Click image to enlarge
- Sorting files by their times (Creation/Modification/Access):
Click the necessary tab on the Sorted by: bar.
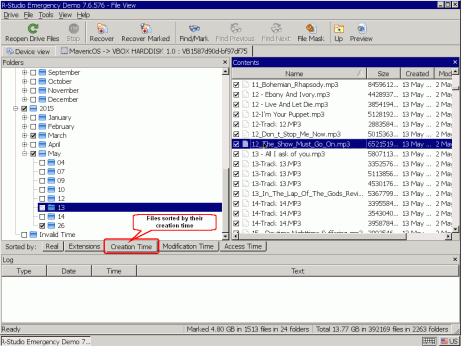
Files sorted by their creation time
Click image to enlarge
You may see paths to the individual files on the Contents pane if you select Path on the View -> Contents -> View Columns menu. - Finding specific files
Also, you can find and mark specific files to recover by using the Find/Mark dialog box. Click the Find/Mark button and specify the file(s), their options, and what to do with them
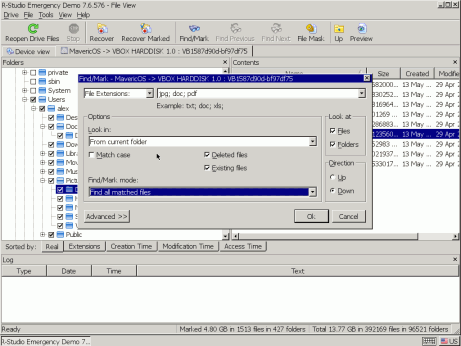
Find dialog box
Click image to enlarge
See the R-Studio on-line Help: Searching for a File for more information on Find/Mark options.
You may estimate the chances of recovering files by using the built-in graphic previewer. Just double-click a selected file, be it a deleted or existing one. The previewer supports most graphic formats.
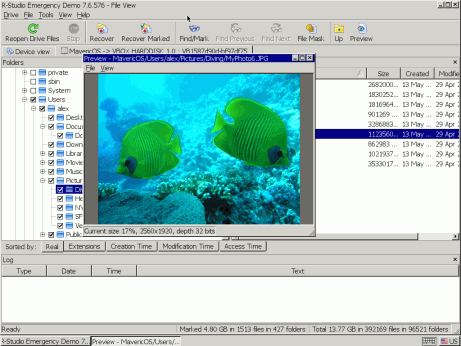
File previewer
Click image to enlarge
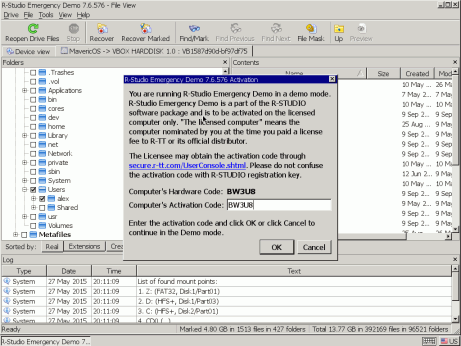
If you've found all the files that you want and are satisfied with their preview results, you may activate your R-Studio Emergency if it's running in the Demo mode. That will not affect any obtained information; you may continue file recovery right after entering the Activation Code.
To activate your copy of R-Studio Emergency, write down the computer's hardware code. Please note that this hardware code is unique for each computer. If you start R-Studio Emergency on another one, the hardware code will be different.
Click image to enlarge
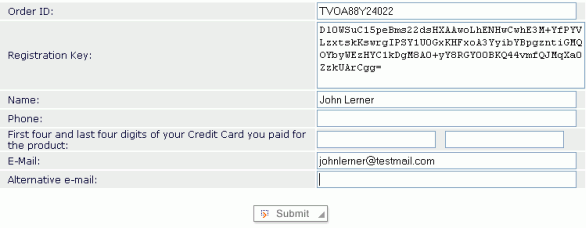
You must fill in at least three fields to enter the Registered User's Console.
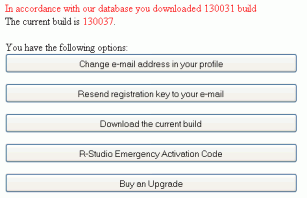
Then click the R-Studio Emergency Activation Code button.
Click image to enlarge

Click image to enlarge
Please note that the R-Studio is licensed per machine, not per user, and you may generate a computer's Activation Code for licensed computers only. An R-Studio license cannot be transferred to another computer after the software has been installed or run and registered. So you should enter the Hardware Code of the computer to be licensed only.
Click image to enlarge
Write down the Activation Code, and store it in a safe place. Every time you start R-Studio Emergency, you'll need to enter it during activation.
You may enter the Activation Code on the R-Studio Emergency Demo Activation dialog box during startup or, while working, by selecting Activate on the Help menu.
Click image to enlarge
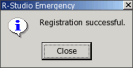
R-Studio Emergency will show that the registration is successful:
Click image to enlarge
Now you may save recovered files.
To start network configuration, select Network configuration on the Tools menu.
The Network configuration dialog box will appear and R-Studio will automatically start acquiring a network address using DHCP.
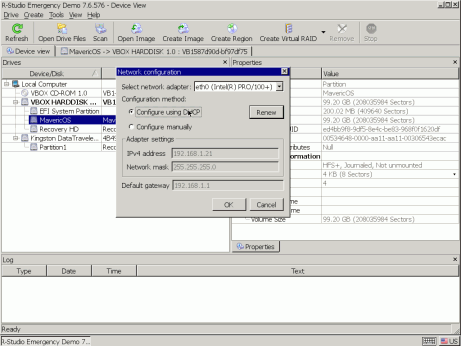
Network Configuration dialog box
Click image to enlarge
You may cancel this process by selecting Configure manually. Then you need to enter the address manually. If your computer has several network interfaces, you may select which interface is to be used.
Then you need to specify a network share to which the data will be saved. Select Map network drive on the Tools menu. The Map network drive dialog box will appear.
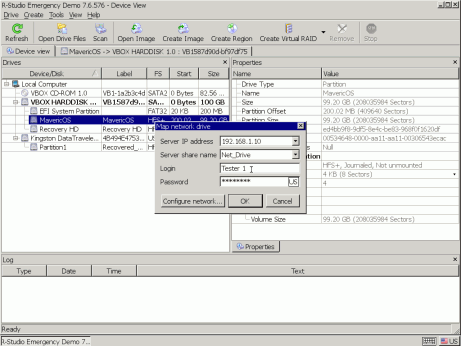
Map network drive dialog boxb
Click image to enlarge
For example, if the network drive's path is //SERVER/Net_Drive, then Server IP address is the IP address of the SERVER computer (192.168.1.20), and Server share name is Net_Drive.
Once you've selected all files to recover, click the Recover Marked button. The Recover dialog box will appear:
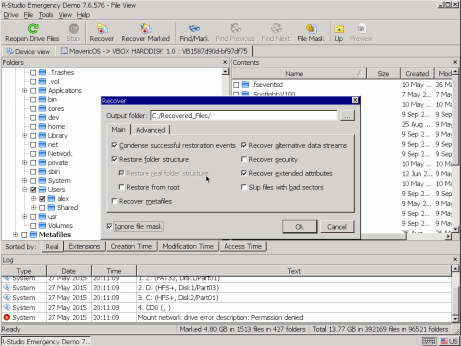
Recovery dialog box
Click image to enlarge
See the R-Studio on-line Help: Recover options for more details.
Specify the recovery options and output folder to store recovered files.
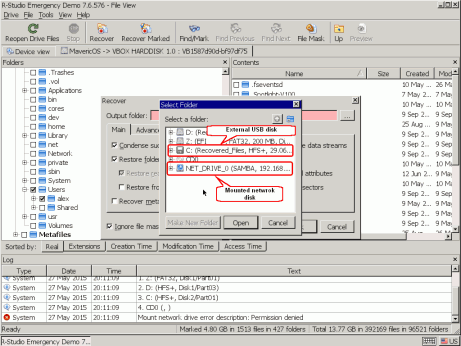
Output folder for recovered files
Click image to enlarge
When all file recovery settings are specified, click the OK button. R-Studio will start file recovery showing its progress.
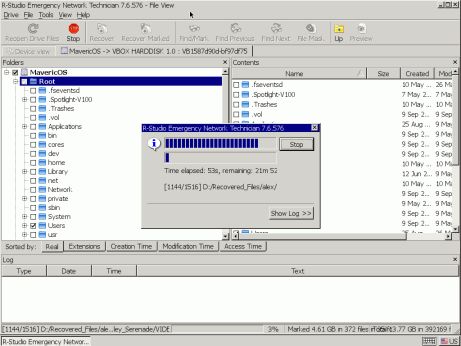
File Recovery Progress
Click image to enlarge
The Log panel will show results of file recovery.
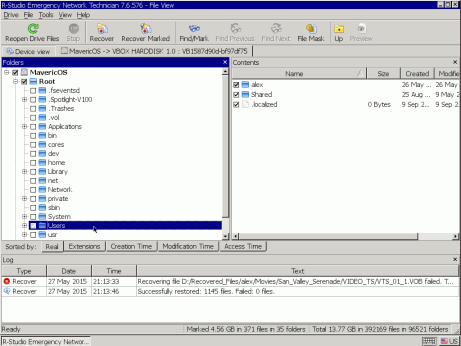
File recovery results
Click image to enlarge
Scanning the disk
If R-Studio cannot find the partition with the files you want to recover, you need to scan the disk. Disk scan is also required to recover deleted files because when macOS deletes files it deletes all information about it.
When the scan is finished, R-Studio will show you one or several recognized partitions so you can choose the right one and recover files from it as it's been described in the File recovery from an existing partition section.
To scan the partition, right-click the partition to be scanned and specify the required scan parameters on the Scan dialog box.
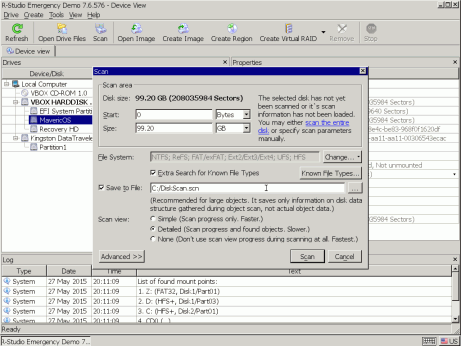
Scan dialog box
Click image to enlarge
See the R-Studio on-line Help: Disk Scan for more details.
Scanning for Known File Types
This is a very useful feature for file recovery from deleted or reformatted partitions. While scanning, R-Studio can recognize to which particular file type the data belong. Using that information, R-Studio can find more files to recover. Those found files appear in the Extra Found Files folder in the scan result.
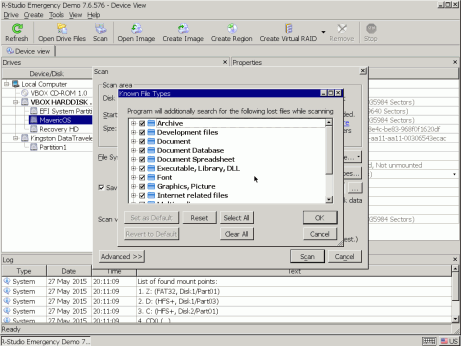
Known File Types dialog box
Click image to enlarge
By default, R-Studio tries to recognize the default list of supported file types, increasing time required for the scan. You may reduce it by selecting only those file types that you need. Click the Known File Types... button and select the required file types on the File Types dialog box. These selections will be applied to that scan session only.
You may create your own known file types if necessary. Read the Creating a Custom Known File Type for R-Studio for more details.
When you're ready with the scan parameters, click the Scan button. R-Studio will start scanning. When it finishes the scan, it will show the recognized partitions it's found on the disk.
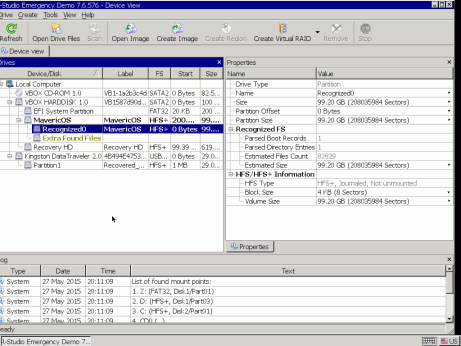
Scan results
Click image to enlarge
R-Studio shows them in different colors depending on which elements of the partition have been found.
|
| This represents an existing logical disk or partition. |
|
| Both boot records and file entries are found for this partition. |
|
| Only file entries are found for this partition. |
|
| Only boot records are found for this partition. |
|
| This represents the empty space on the object. |
To successfully recover files from a recognized partition, it is necessary to find one that corresponds correctly to the real logical disk on which the files resided. No strict rules can be applied to that, but the following tips should be taken into account:
- If you are going to recover files from a disk with a damaged file system, most likely the right recognized partition will be one coded in green.
- If you are going to recover files from a previously deleted or formatted partition, most likely the right recognized partition will be one coded in yellow.
Also, always check the recognized partition's file system, start point, and size. These characteristics should be the same for both the recognized partition and real logical disk/partition. When in doubt, try to preview a couple of files from the recognized partition. If the files are seen correctly, this is the right partition.
In our example, we have only one Recognized0, so the choice is easy. Just double-click the partition and recover the files as we did that for the existing partition.
Computer Shutdown
When you finish file recovery, remove the USB disk, and turn your computer off manually.
- R-Studio Technician: activation using a USB stick
- Data Recovery Guide
- Why R-Studio?
- R-Studio for Forensic and Data Recovery Business
- R-STUDIO Review on TopTenReviews
- File Recovery Specifics for SSD devices
- How to recover data from NVMe devices
- Predicting Success of Common Data Recovery Cases
- Recovery of Overwritten Data
- Emergency File Recovery Using R-Studio Emergency
- RAID Recovery Presentation
- R-Studio: Data recovery from a non-functional computer
- File Recovery from a Computer that Won't Boot
- Clone Disks Before File Recovery
- HD Video Recovery from SD cards
- File Recovery from an Unbootable Mac Computer
- The best way to recover files from a Mac system disk
- Data Recovery from an Encrypted Linux Disk after a System Crash
- Data Recovery from Apple Disk Images (.DMG files)
- File Recovery after Re-installing Windows
- R-Studio: Data Recovery over Network
- How To Use R-Studio Corporate Package
- Data Recovery from a Re-Formatted NTFS Disk
- Data Recovery from an ReFS disk
- Data Recovery from a Re-Formatted exFAT/FAT Disk
- Data Recovery from an Erased HFS Disk
- Data Recovery from an Erased APFS Disk
- Data Recovery from a Re-Formatted Ext2/3/4FS Disk
- Data Recovery from an XFS Disk
- Data Recovery from a Simple NAS
- How to connect virtual RAID and LVM/LDM volumes to the operating system
- Specifics of File Recovery After a Quick Format
- Data Recovery After Partition Manager Crash
- File Recovery vs. File Repair
- Data Recovery from Virtual Machines
- How to Connect Disks to a Computer
- Emergency Data Recovery over Network
- Data Recovery over the Internet
- Creating a Custom Known File Type for R-Studio
- Finding RAID parameters
- Recovering Partitions on a Damaged Disk
- NAT and Firewall Traversal for Remote Data Recovery
- Data Recovery from an External Disk with a Damaged File System
- File Recovery Basics
- Default Parameters of Software Stripe Sets (RAID 0) in Mac OS X
- Data Recovery from Virtual Hard Disk (VHD/VHDX) Files
- Data Recovery from Various File Container Formats and Encrypted Disks
- Automatic RAID Parameter Detection
- IntelligentScan Data Recovery Technology
- Multi-pass imaging in R-Studio
- Runtime Imaging in R-Studio
- Linear Imaging vs Runtime Imaging vs Multi-Pass Imaging
- USB Stabilizer Tech for unstable USB devices
- Joint work of R-Studio and PC-3000 UDMA hardware
- Joint work of R-Studio and HDDSuperClone
- R-Studio T80+ - A Professional Data Recovery and Forensic Solution for Small Business and Individuals Just for 1 USD/day
- Backup Articles
- R-Drive Image Standalone and Corporate license transferring
- Fixing Windows update error 0x80070643 with R-Drive Image
- Backup with Confidence
- R-Drive Image as a free powerful partition manager
- Computer Recovery and System Restore
- Disk Cloning and Mass System Deployment
- Accessing Individual Files or Folders on a Backed Up Disk Image
- R-Drive Image startup / bootable version
- File Backup for Personal Computers and Laptops of Home and Self-Employed Users
- Creating a Data Consistent, Space Efficient Data Backup Plan for a Small Business Server
- How to Move the Already Installed Windows from an Old HDD to a New SSD Device and Create a Hybrid Data Storage System
- How to Move an Installed Windows to a Larger Disk
- How to Move a BitLocker-Encrypted System Disk to a New Storage Device
- How to backup and restore disks on Linux and Mac computers using R-Drive Image
- Undelete Articles
- Get Deleted Files Back
- Free Recovery from SD and Memory cards
- R-Undelete: Video Recovery
- Recovery from an External Device with a Damaged File System
- File recovery from a non-functional computer
- Free File Recovery from an Android Phone Memory Card
- Free Photo and Video File Recovery Tutorial
- Easy file recovery in three steps
Rating: 5.0 / 5
I used some software for data recovery on MAC, but THIS IS only one, that help me!!!
THX :)
bye
Tom from Hungary
Needless to say a RAID0 set created using Apple`s Disk Utility was broken and formatted as a new RAID0. I immediately recognized my mistake and shut down the server.
After some web surfing and saki I found R-Studio.
After the other utilities I normally use failed, R-Studio was able to create an image of the broken (and reformatted) RAID disks.
The entire volume ...
________________________________
5+ I was able to repair my RAID-5 for Mac volume to 20 TB - it`s the best solution. I would recommend.
I would just like to thank you for an excellent product. I was able to recover nearly a terabyte of data after a raid 6 array failed. My customer was ecstatic over the results