- PRODUCTSFREEWAREFOR COMMERCIAL USEFOR PERSONAL AND BUSINESS USEBackup and System Restore:PC Privacy and Security:
- BUY ONLINE
- DISTRIBUTION

- Contents
- Index
- Introduction to R-Linux
- Data Recovery Using R-Linux
- Text/Hexadecimal Viewer
- Technical Information and Troubleshooting
© 2026 R-Tools Technology Inc.
All rights reserved.
Disk Scan
In order to completely analyze data structure on an object, it must be scanned. Any object on the Drives panel can be scanned. In addition, you may create a region to scan only a part of an object. The Regions topic explains how to create and work with regions . Scan is also greatly improves estimations for chances of successful file recovery .
You may select scan area and some other scan parameters. Scan information may be saved to a file and later this file may be opened.
Attention: Scanning large areas may be a very lengthy process!
NEVER TRY TO SAVE SCAN INFORMATION ON THE OBJECT BEING SCANNED!!!
Or you may obtain unpredictable results and lose all your data.
To scan an object
| 1 | Select an object on the R-Linux 's Drives panel |
| 2 | Click the Scan button |
 Other ways to start scan
|
• Right-click the selected disk and select Scan on the context menu , or • Select Scan on the Drive menu |
| 3 | Specify the required parameters on the Scan dialog box and click the Scan button |

Scan dialog box
Scan options
|
Disk Size: |
Shows the size of the object to be scanned |
|
Start: |
Sets the start point of the area to be scanned. |
|
Size: |
Sets the size of the area to be scanned. |
|
Numbers in these fields can be in bytes or sectors. See the Data Formats and Multipliers topic for more details on data formats. |
|
|
File Systems: |
Specifies the file systems which objects are to be searched for. Current version supports: Ext2/3/4FS. |
|
Extra search for Known File Types |
Enables search for Known File Types . |
|
Save scan Info to File: |
If this checkbox is selected, R-Linux will save scan information to a specified file. Later this file may be opened. Please note, that this option does not save actual disk data, only information on disk data structure gathered during disk scan. |
|
Buttons |
|
|
Scan |
Starts scanning |
|
Advanced |
Activates advanced scan options |
|
Known File Types... |
Selects file types that R-Linux will recognize during the disk scan. |
|
Cancel |
Closes the dialog box |
|
NEVER TRY TO SAVE SCAN INFORMATION ON THE OBJECT BEING SCANNED!!! Or you may obtain unpredictable results and lose all your data. |
|
Known File Types : While scanning, R-Linux can recognize to which particular file type the data belong. Using such information, R-Linux can obtain more information about data/file structure on the object being scanned. By default, R-Linux tries to recognize all supported file types, greatly increasing time required for the scan. You may reduce it by selecting only those file types that you need. Click the Known File Types... button and select the required file types on the File Types dialog box.

File Types dialog box
Known File Types
|
Set as Default |
Click this button to set the current list of selected file types as default values. |
|
Revert to Default |
Click this button to revert the default settings specified on the Known File Types tab of the Settings panel. |
|
Reset to Recommended |
Click this button to revert to factory-preset default settings. |
|
Select All |
Click this button to select all file types in the list. |
|
Clear All |
Click this button to clear all file types in the list except some predefined ones. |
List of known file types
|
* By default, files of this type are not selected. If necessary, select them manually |
|||
|
Document |
|||
|
Adobe PDF document |
Microsoft Word2 document |
Microsoft WordPad document |
OLE Storage |
|
PostScript document |
Rich Text document |
TEX document |
Word for Macintosh document |
|
WordPerfect document |
|
|
|
|
Document: Spreadsheet |
|||
|
Lotus worksheet |
Lotus3 worksheet * |
Microsoft Excel2 worksheet |
Microsoft Excel3/4 worksheet |
|
Quattro Pro worksheet |
|
|
|
|
Document: Database |
|||
|
Data Interchange Format file |
Microsoft Access database |
dBase III database |
Microsoft SQL database |
|
Microsoft SQL Log |
|
|
|
|
Document: MS Office (OLE MS) (Word/Excel/PowerPoint) |
|||
|
Microsoft Word document |
Microsoft Excel document |
Microsoft PowerPoint document |
|
|
Internet-related files |
|||
|
Compiled HTML file |
HTML document |
Internet shortcut |
Outlook Express Messages |
|
Windows Address Book |
XML document |
XML document (Unicode) |
The Bat! Address book |
|
The Bat! Message Base |
The Bat! Message Index |
|
|
|
Font |
|||
|
Adobe PostScript Font |
Adobe Printer Font |
BDF Unix font |
BGI font |
|
CPI DOS font |
TrueType font |
|
|
|
Graphics/Picture |
|||
|
AVHRR Satellite image |
Adobe Photoshop image |
Agfa/Matrix Scodl image |
Alias Wavefront Raster image |
|
AutoCAD Binary image |
AutoCAD image |
Autodesc Animator Pro color map |
Autodesc Animator Pro image |
|
Autodesc Animator image |
Autologic image |
BMF image |
ColoRIX image |
|
CompuServe GIF image |
ComputerEyes Raw image |
Continuous Edge Graphic image |
Corel Texture image |
|
CorelDraw CMX image |
CorelDraw image |
Cubicomp Picture Maker image |
Dr. Halo palette |
|
Enhanced MetaFile image |
Epson Stylus image |
Erdas LAN/GIS image |
Fractal Image Format |
|
GEM Raster image * |
GEM VDI image |
GOES Satellite image |
Gridded Binary image |
|
HP Command Language image |
HP Raster image |
Hitachi Raster image |
IBM Picture Maker image |
|
JPEG image |
JPEG-LS image |
HSI JPEG image |
Jovian Logic image |
|
LBM/IFF image |
Lotus PIC image |
Macintosh PICT image |
Macintosh PICT image |
|
Macintosh Paint image |
Macintosh Paint image |
Microsoft Paint image |
PBM image |
|
PGM image |
PIX image |
PM image |
PNG image |
|
PPM image |
Pictor PC Paint image |
Quick Link II fax image |
RenderMan image |
|
SGI image |
STAD image |
Sketch image |
Sun Raster image |
|
Tagged Image Format File |
TrueVision image |
Utah Raster Toolkit image |
VITec image |
|
Windows Animated cursor |
Windows Bitmap image |
Windows Fax Cover image |
Windows MetaFile image |
|
Windows cursor |
Windows icon |
WordPerfect Graphics image |
X PixMap image |
|
X Window Dump image |
ZSoft PCX image |
|
|
|
Multimedia: Audio Files |
|||
|
AIFF sound |
AVR sound |
Advanced Streaming Format file |
AudioCD file |
|
CMF music |
Creative Voice file |
DiamondWare sound |
EA ASF/MUS audio file |
|
Extended M3U playlist |
MIDI Instrument definition |
MIDI music |
MIDI stream |
|
MPEG Layer I audio file * |
MPEG Layer II audio file * |
MPEG Layer III audio file |
MUS music |
|
Next/Sun sound |
Ogg Vorbis audio file |
RIFF MIDI music |
RK Audio sound |
|
Sierra AUD sound |
VQF sound |
Westwood AUD sound |
Windows Media Audio File |
|
Windows WAVE sound |
X-MIDI music |
ZyXEL sound |
|
|
Multimedia: Video Files |
|||
|
ANIM animation |
Adobe Filmstrip animation |
BINK video |
DVM video |
|
DeluxePaint animation |
Director video |
Intel DVI video |
Interplay MVE video |
|
LZA animation |
MPEG video |
NEOchrome animation |
Nullsoft Video |
|
QV-10 video |
QuickTime video |
RPL video |
Shockwave video |
|
Smacker video |
VideoCD video |
Windows AVI video |
|
|
Multimedia Files |
|||
|
RIFF Multimedia File |
Real Networks audio/video |
|
|
|
Archive Files |
|||
|
7-Zip archive |
ACE archive |
AIN archive |
ARJ archive |
|
ARX archive |
Aladdin Systems StuffIt archive |
BAG archive |
BIX archive |
|
BOA archive |
BZip2 archive |
BlackHole archive |
Blink archive |
|
CPIO archive |
CRUSH archive |
ChArc archive |
Compress archive |
|
FOXSQZ archive |
GZip archive |
HA archive * |
HAP archive |
|
HPACK archive |
Hyper archive |
InstallShield Cabinet archive |
InstallShield Data archive |
|
InstallShield archive |
JAM archive |
JAR archive |
JRC archive |
|
LHA/LZARK archive |
LIMIT archive |
LZA archive |
LZOParchive |
|
LZSH archive |
LZX archive |
Microsoft Cabinet archive |
Microsoft Compress 5 archive |
|
Microsoft Compress 6 archive |
PAKLEO archive |
Pack archive * |
QFC archive |
|
Quantum archive * |
Quark archive |
RAR archive |
RPM archive |
|
ReSOF archive |
SAR archive |
SBC archive |
SCO archive * |
|
SQZ archive |
SZip archive |
StuffIt archive |
TAR archive |
|
UFA archive |
UHArc archive |
UltraCompressor 2 archive |
UltraCrypt 2 archive |
|
WIN-Freeze archive * |
WRAptor archive |
WinImp archive |
YAC archive |
|
YBS archive |
ZIP archive |
ZOO archive |
ZZip archive |
|
Executable/Library/DLL |
|||
|
DOS Style Executable |
ELF Executable (UNIX) |
ELF Library (UNIX) |
ELF Module (UNIX) |
|
Java Bytecode |
Novell NetWare executable |
RDOFF executable |
|
|
Development files |
|||
|
COM Type library Library |
Microsoft ClassWizard file |
Microsoft Linker database |
Microsoft Precompiled header |
|
Microsoft Program database |
Microsoft Visual C++ project |
Microsoft Visual Studio project |
Microsoft Visual Studio workspace |
|
OMF Object library |
Windows Compiled resource (16bit) * |
Windows Compiled resource (32bit) |
|
|
Other file types |
|||
|
RegEdit file |
RegEdit file (UNICODE) |
WinHelp |
WinHelp Contents |
|
Windows Clipboard file * |
Windows Color Profile |
Windows National locale |
Windows Password file |
|
Windows Policy file |
Windows Registry file |
Windows Registry hive |
Windows shortcut |
| > | R-Linux starts scanning the object, and its panel will show information about new found objects: |
The Log pane will show scan progress. Scan may be stopped by clicking the Stop button on the tab. Later the scan process may be resumed with different scan parameters. Some scan parameters may also be changed during the scan process. Click the Options button and change them on the Scanning dialog box .
R-Linux Main panel
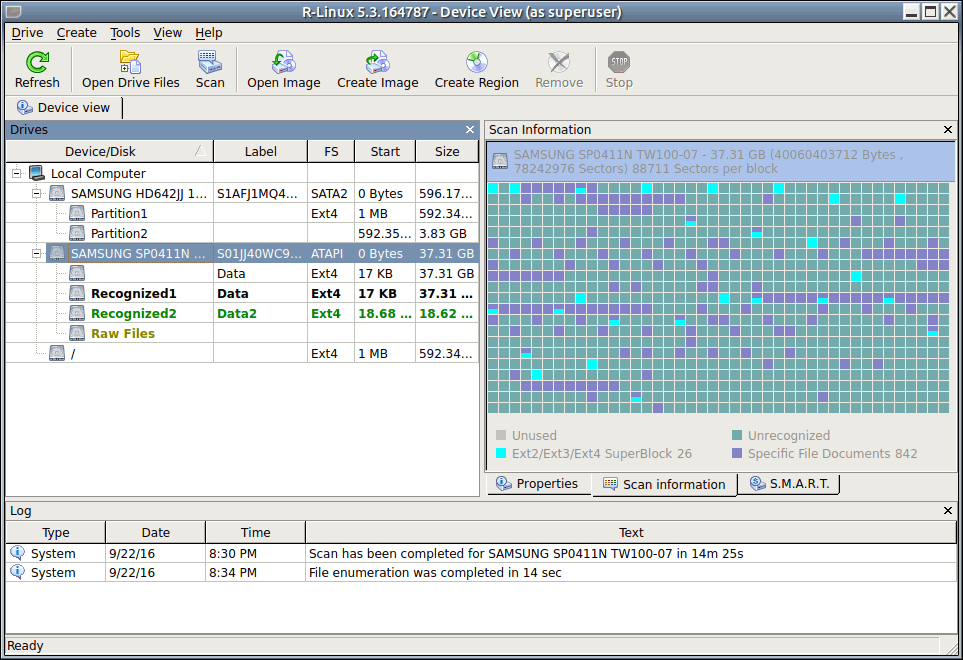
You may see which file object(s) is/are on a particular disk part. Click the corresponding rectangle on the Scan Information pane and view the information on the Scan Information dialog box.

Scan Information dialog box
Select the file object and click Open in Hex Viewer to view the file object in the Text/Hexadecimal Viewer .
When an object is scanned, a number of Recognized partitions will appear. R-Linux shows them in different colors depending on which elements of the partition have been found.
|
|
An existing partition |
|
|
An existing partition after disk scan |
|
|
Both boot records and file entries are found for this partition |
|
|
Only file entries are found for this partition |
|
|
Only boot records are found for this partition |
|
|
A deleted partition |
|
|
Empty space on the object |
|
|
Files that have been found using scan for known file types . |
Although such recognized partitions are virtual objects, files can be searched for and recovered from recognized partitions as from real partitions using Basic File Recovery .
To see the information about a newly found object, simply click it on the Drives panel. Click this link to see the information about the object Recognized5 on the partition: .
When an object in a scanned drive is selected, R‑Linux shows the scanned area of the object.

Object's scanned area
All scanned information may be deleted on the context menu for a scanned object.
Scan information may be saved in a file. Previously saved scan information may be loaded. This can be done on the Drive or context menu for a selected object.
Resuming incomplete scans or scanning the object with different parameters
You may resume the scan of an incompletely scanned object or rescan the already scanned object with different parameters. The Scan dialog will be a little bit different in this case.

Scan dialog box for incomplete scans
You may rescan the entire disk, scan unscanned areas, or scan an explicitly specified area.
Scan of multiple areas
You may simultaneously scan several successive or overlapping areas. Click the Advanced button, specify an offset and size for a new area to scan on the Advanced Scan dialog box and click the Add button. You may specify and add several scan areas. You may select which areas should be scanned. Selected scan areas can be merged. Right-click a necessary area and select either Merge Down , Merge Down All , and Merge Selected . You may also select/unselect unscanned areas.

Advanced Scan dialog box
R-Linux accumulates the information from successive scans and keeps track of changes in this information obtained from different scans.
Managing scan information
Scan information may be saved to a file. Previously saved scan information may be loaded.
To save scan information
| 1 | Select an object on the R-Linux Drives panel |
| 2 | Select Save Scan Information on the Drive or context menu and save the scan information in a file |
The default file extension is *.scn.
To load scan information
| 1 | Select an object on the R-Linux Drives panel |
| 2 | Select Open Scan Information on the Drive or context menu and select the required file with the scan information |
The default file extension is *.scn.
| > | The scan information will appear in the Drives panel |
To remove scan information
| 1 | Select an object on the R-Linux Drives panel |
| 2 | Select Delete Scan Information on the Drive or context menu |
| > | The scan information will disappear from the Drives panel |
NEVER TRY TO SAVE SCAN INFORMATION ON THE OBJECT BEING SCANNED!!!
Or you may obtain unpredictable results and lose all your data.
- R-Studio Technician: activation using a USB stick
- Data Recovery Guide
- Why R-Studio?
- R-Studio for Forensic and Data Recovery Business
- R-STUDIO Review on TopTenReviews
- File Recovery Specifics for SSD devices
- How to recover data from NVMe devices
- Predicting Success of Common Data Recovery Cases
- Recovery of Overwritten Data
- Emergency File Recovery Using R-Studio Emergency
- RAID Recovery Presentation
- R-Studio: Data recovery from a non-functional computer
- File Recovery from a Computer that Won't Boot
- Clone Disks Before File Recovery
- HD Video Recovery from SD cards
- File Recovery from an Unbootable Mac Computer
- The best way to recover files from a Mac system disk
- Data Recovery from an Encrypted Linux Disk after a System Crash
- Data Recovery from Apple Disk Images (.DMG files)
- File Recovery after Re-installing Windows
- R-Studio: Data Recovery over Network
- How To Use R-Studio Corporate Package
- Data Recovery from a Re-Formatted NTFS Disk
- Data Recovery from an ReFS disk
- Data Recovery from a Re-Formatted exFAT/FAT Disk
- Data Recovery from an Erased HFS Disk
- Data Recovery from an Erased APFS Disk
- Data Recovery from a Re-Formatted Ext2/3/4FS Disk
- Data Recovery from an XFS Disk
- Data Recovery from a Simple NAS
- How to connect virtual RAID and LVM/LDM volumes to the operating system
- Specifics of File Recovery After a Quick Format
- Data Recovery After Partition Manager Crash
- File Recovery vs. File Repair
- Data Recovery from Virtual Machines
- How to Recover Files from a Remote Computer Using R-Studio Standalone License and Its Network Capabilities in Demo Mode
- How to Connect Disks to a Computer
- Emergency Data Recovery over Network
- Data Recovery over the Internet
- Creating a Custom Known File Type for R-Studio
- Finding RAID parameters
- Recovering Partitions on a Damaged Disk
- NAT and Firewall Traversal for Remote Data Recovery
- Data Recovery from an External Disk with a Damaged File System
- File Recovery Basics
- Default Parameters of Software Stripe Sets (RAID 0) in Mac OS X
- Data Recovery from Virtual Hard Disk (VHD/VHDX) Files
- Data Recovery from Various File Container Formats and Encrypted Disks
- Automatic RAID Parameter Detection
- IntelligentScan Data Recovery Technology
- Multi-pass imaging in R-Studio
- Runtime Imaging in R-Studio
- Linear Imaging vs Runtime Imaging vs Multi-Pass Imaging
- USB Stabilizer Tech for unstable USB devices
- Joint work of R-Studio and PC-3000 UDMA hardware
- Joint work of R-Studio and HDDSuperClone
- R-Studio T80+ - A Professional Data Recovery and Forensic Solution for Small Business and Individuals Just for 1 USD/day
- Backup Articles
- R-Drive Image Standalone and Corporate license transferring
- Fixing Windows update error 0x80070643 with R-Drive Image
- Backup with Confidence
- R-Drive Image as a free powerful partition manager
- Computer Recovery and System Restore
- Disk Cloning and Mass System Deployment
- Accessing Individual Files or Folders on a Backed Up Disk Image
- R-Drive Image startup / bootable version
- File Backup for Personal Computers and Laptops of Home and Self-Employed Users
- Creating a Data Consistent, Space Efficient Data Backup Plan for a Small Business Server
- How to Move the Already Installed Windows from an Old HDD to a New SSD Device and Create a Hybrid Data Storage System
- How to Move an Installed Windows to a Larger Disk
- How to Move a BitLocker-Encrypted System Disk to a New Storage Device
- How to backup and restore disks on Linux and Mac computers using R-Drive Image
- R-Drive Image and Virtual Machines
- Undelete Articles
- Get Deleted Files Back
- Free Recovery from SD and Memory cards
- R-Undelete: Video Recovery
- Recovery from an External Device with a Damaged File System
- File recovery from a non-functional computer
- Free File Recovery from an Android Phone Memory Card
- Free Photo and Video File Recovery Tutorial
- Easy file recovery in three steps