- PRODUCTSFREEWAREFOR COMMERCIAL USEFOR PERSONAL AND BUSINESS USEBackup and System Restore:PC Privacy and Security:
- BUY ONLINE
- DISTRIBUTION
-
Emergency File Recovery Using R-Studio Emergency


Many computer users have shared the unfortunate experience at least once (but some perhaps twice or - with some really bad luck-even more) of discovering that their computer doesn't start anymore. The computer's hardware seems to be functioning, and the operating system can be restored back from a system recovery disk. But those scary messages tell the user that such a system recovery will destroy all the data - all family photos, movie and music collections, and valuable financial docs could be lost for good.
Well, that could happen, but it won't, thanks to a special procedure called an " emergency file recovery," in which the computer is started from a special startup disk containing a file recovery tool.
R-Studio Emergency is an excellent choice for tackling this procedure under these circumstances. So let's see how R-Studio Emergency could save your endangered files.
To give you step-by-step instructions on how to perform emergency file recovery using R-Studio Emergency, we'll use the case of a notebook, as a typical example. The notebook's hardware is simple: a 10GB hard drive equally partitioned into two logical disks, C: (the system one, NTFS-formatted; its label is SYSTEM) and D: (FAT32 formatted; its label is DATA). The system logical disk appears damaged, and the computer cannot start.
Hard Drive Inspection
The goal of inspecting the hard drive is to make sure that it doesn't have any hardware-based problems. Symptoms that a hard drive has hardware problems:
- Your system does not recognize the device anymore, or it appears under an unusual name.
- The hard drive makes unusual noises, clicks, starts too slowly.
- Bad blocks constantly appear on your hard drive.
- SMART inspecting programs report a severe hardware failure event.
Important! If you believe that the hard drive in the computer is malfunctioning, use R-Studio Emergency to create an image of the entire hard drive. DO NOT DO ANYTHING ELSE WITH IT BY YOURSELF ANYMORE! Don't try to run a scan or recovery procedure. Don't try to use some other data recovery software. Remember, tampering with a drive in this condition will surely inflict more damage to your files. At best, you'll have to pay extra money to a professional data recovery service. At worst, you'll lose all your data for good. Bring the drive to qualified data recovery professionals. They have special equipment, software, and, most important, the required skills to work with such drives.
Moreover, it is a good practice to always create images and recover files from them, even if the hard drive and other hardware work normally. This keeps your data safe from accidental data corruption. See the Working with Images section for more information.
If there are no problems detected, we can go further to actual file recovery.
Preparation for File Recovery
We'll need some additional material for data recovery:
1. A computer connected to the Internet. We'll use it to create R-Studio Emergency startup disks and obtain a computer's Activation Code to register R-Studio Emergency. If this other computer is on the same local network as the damaged computer, it can be used as a place to store recovered files. Below we'll explain how.
2. A place to store recovered files and other information like scan info and disk images. We can use:
- A formatted USB flash drive. This is the best choice if its size is enough to store all recovered files.
- An external USB hard drive formatted as NTFS or Ext2/3fs.
Please note:
a. An NTFS hard drive should be properly disconnected from a Windows computer through the Safely Remove Hardware icon on the tray menu rather than by simply unplugging it from the computer. If you haven't properly disconnected the USB drive, R-Studio Emergency will see it as a read-only disk. To correct the situation, you may connect the USB disk to a Windows computer and properly disconnect it using the Safely Remove Hardware icon on the system tray menu.
Also, non-Windows computers may see NTFS disks as read-only or not be able to read files from that disk at all.
b. An Ext2/3fs hard drive requires some additional third-party drivers to read data on it if it's connected to a non-Linux computer, like a Windows or a Mac machine. - A network computer. It should have an accessible network share. Below we'll explain how to connect this share as a network drive in R-Studio Emergency.
And always remember the most important rule: NEVER TRY TO SAVE RECOVERED FILES/FOLDERS ON THE SAME LOGICAL DISK WHERE THEY RESIDE!!! Or you may obtain unpredictable results and lose all your data.
3. If you already purchased R-Studio, the order information such as Order ID, your e-mail, R-Studio registration key, etc. You may find this information in the e-mails you received upon purchasing R-Studio.
Even before registering, you can estimate the chances that R-Studio Emergency will be able to recover your files successfully, and purchase it later. Unregistered R-Studio Emergency can perform any data recovery operation (including wiping a disk or partition), except working on network and saving recovered files. But you may preview files to estimate the chances of recovering them successfully.
Creating R-Studio Emergency Startup Disks
If your computer has a CD/DVD recording drive, you should download R-Studio Emergency GUI ISO Image for Macintosh, UNIX, Linux, and Windows users (Intel based) and create the startup CD/DVD disc using any CD/DVD-burning software.
Windows users may also download R-Studio Emergency Startup Media Creator to install it and create a startup CD/DVD disc, a startup disk on FAT/FAT32-formatted removable media (including a USB flash memory disk), or two floppy disks. The creation process is simple, and you may find detailed instructions in R-Studio online help: R-Studio Emergency.
You may download the required files either from the Registered User's Console or from the download page.
Starting Your Computer Using R-Studio Emergency Startup Disks
Make the device with R-Studio Emergency bootable in the BIOS of your computer. Refer to the computer's documentation for details. Most likely, your system will automatically start from a CD/DVD drive if it finds that a startup disc is present in it.
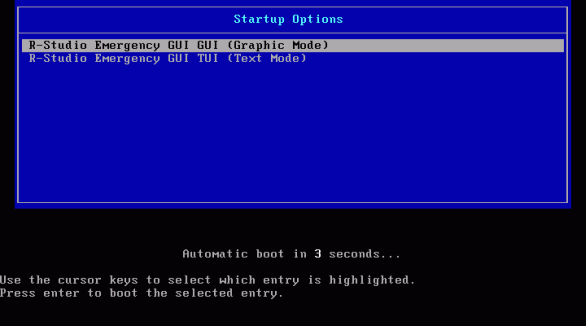
Then start your computer. The Startup Options screen will appear.
Click image to enlarge
Select R-Studio Emergency GUI GUI (Graphic Mode) to start R-Studio Emergency in its graphic mode. In this mode, R-Studio Emergency has all the functionality of R-Studio itself, aside from its limited graphic file preview. Almost all controls of this version are similar to those of R-Studio itself. So you can always consult the R-Studio online help when a question arises.
Select R-Studio Emergency GUI TUI (Text Mode) if you experience a problem with the graphic system. In this mode, R-Studio still has a graphic interface, but it is made out of text characters and uses standard graphic modes supported by all graphic systems. The functionality of this mode is a bit more limited than that of the Graphic Mode, but you still can perform most data recovery operations, and it supports a mouse. However, previewing graphic files is impossible. You may find more information on how to work with R-Studio Emergency in its Text Mode on the R-Studio online help.
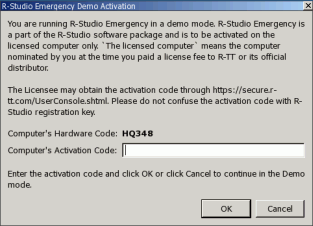
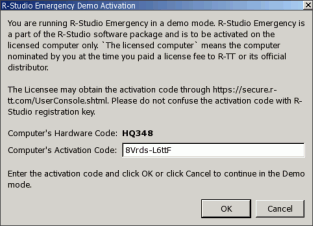
The first screen you see when R-Studio Emergency starts is the R-Studio Emergency Demo Activation dialog box.
Click image to enlarge
Enter the Activation Code if you already have it, or click the Cancel button to work with R-Studio Emergency in the Demo mode to evaluate your chances of recovering your files successfully. If you already purchased R-Studio Emergency and want to obtain the Activation Code right now, you may go to the R-Studio Emergency Activation section to learn how to do that.
Inspecting the Damaged Computer
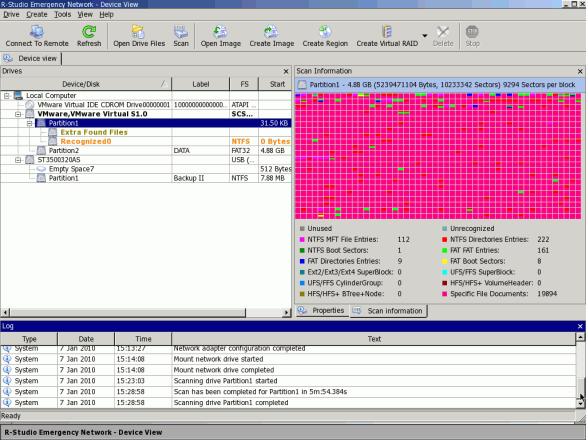
When R-Studio starts, its Main panel appears. Looking at it, you may see the computer's hardware and estimate which data is damaged on the hard drive

Click image to enlarge
In our case, the Drives panel shows that there are two hard drives on the computer.
|
| Computer's internal disk where the lost files reside |
|
| External USB hard drive, where you'll save your recovered files, scan info, etc |
There are two partitions on the internal hard drive, one with a damaged file system (Partition1), the other with a valid FAT32 file system (Partition2). If there were a deleted partition, it would be shown as an Empty Space object.
Note: Sometimes Windows leaves small empty spaces when creating a partition on a hard drive. Empty Space7 on the second hard drive is an example.
If you plan to use a network drive to save recovered files and other information, it's time to set up a network connection and connect a network drive. Go to the Network Setup section for more information.
File Recovery
For our case, we need to perform two data recovery tasks:
1. Recover files from an existing logical disk (Partition2)
2. Recover files from a damaged logical disk. (Partition1)
File Recovery from the Existing Logical Disk/Partition
We start with recovering files from the existing logical disk Partition2.
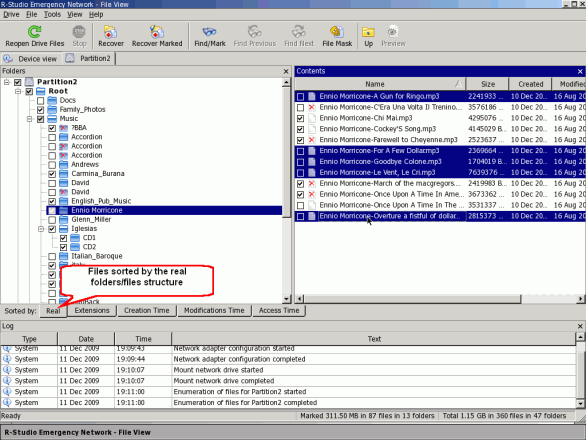
Double-click the existing logical disk from which you want to recover your files. R-Studio will enumerate the files and show the folder/file structure on this partition.
Click image to enlarge
Mark files and folders you want to recover.
R-Studio will show which files and folders are marked for recovery.
Folders panel
|
| Deleted folder |
|
| Marked folder (all child objects in this folder are marked) |
|
| Partially marked folder (some child objects in this folder are marked) |
|
| Cross-linked deleted folder (a FAT folder containing data that also belong to other FAT folders) |
|
| Questionable deleted folder (a FAT folder found by R-Studio, but with apparently invalid content) |
Files panel
|
| Deleted file |
|
| Marked file. It'll be recovered when the Recover Marked button is clicked. |
|
| Selected file. It'll be recovered when the Recover Button is clicked |
You may use the following methods to find and mark files for recovery:
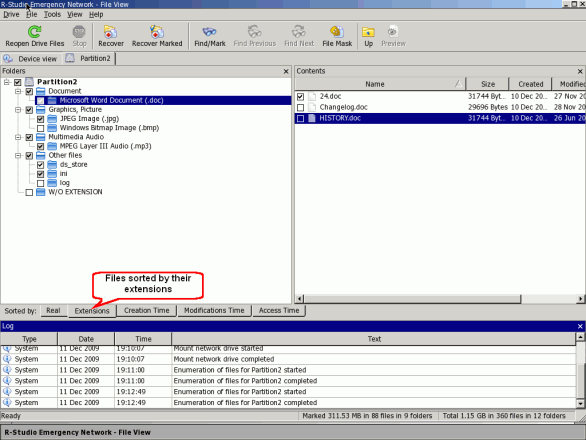
- Sorting files by their types (extensions).
Select the Extensions tab on the Sorted by bar. R-Studio will show files sorted by their types (extensions) found on the logical disk.
Click image to enlarge - Sorting files by their times (Creation, Modification, Access).
Select the appropriate tab on the Sorted by bar. R-Studio will show files sorted by their respective times:
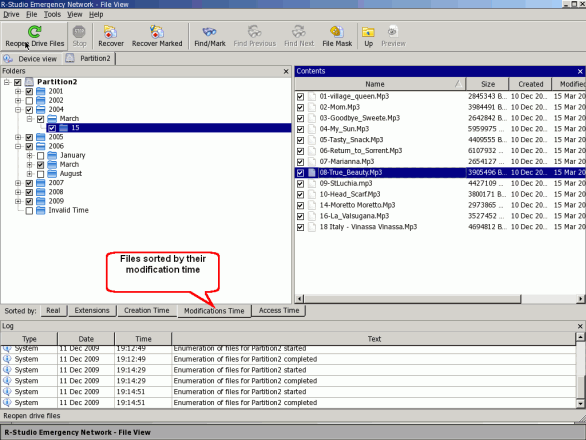
Click image to enlarge
You may see paths to the individual files on the Contents pane if you select Path on the View -> Contents -> View Columns menu.
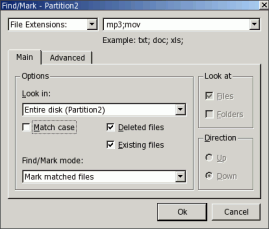
Also, you can find and mark specific files to recover by using the Find/Mark dialog box. Click the Find/Mark button and specify the file(s), their options, and what to do with them.
Click image to enlarge
You may specify to find either specific files, files with certain extensions, or all files that meet general search patter. Advanced users may use regular expressions.
| If this option is selected | R-Studio treats specified strings as |
| Files | File names. Use ? (a question mark) for one unspecified character and * (an asterisk) for an unlimited number of them to specify file masks. |
| File Extensions | File extensions. |
| Regular Expressions | Regular expressions. |
| All Files | R-Studio applies Advanced Options to all files. |
Then you need to specify search options.
| If this check box is selected, | |
| Match case | R-Studio makes a case-sensitive search. |
| Deleted files | R-Studio makes a search among deleted files/folders. |
| Existing files | R-Studio makes a search among existing files/folders. |
| Look at Files | R-Studio includes files in a search. |
| Look at Folders | R-Studio includes folders in a search. |
| Direction | Specifies search direction from the current position. Available only if From current folder is selected in Look in:. |
| Look in: | Specifies where R-Studio searches for, and marks, files. It can look for them on the Entire disk, From current folder, In the Current folder and subfolders, and in the Current folder only. If From current folder is selected, you may also specify the Direction for the search from the current position in the current folder |
Then you need to specify in the Find/Mark mode what you want to do with the found files and folders.
| Find all matched files | R-Studio searches for all matched files. The search results appear on the Find Results panel. |
| Find first matched file | R-Studio stops at the first found file. |
| Mark matched files | R-Studio marks all found files. |
| Unmark matched files | R-Studio unmarks all found files. |
Please note that when performing a new find and mark/unmark task, R-Studio does not takes into consideration the previous marked/unmarked state of files. For example, if you first mark all doc files, and then all txt files, all doc files remain marked, too. To unmark them, you should specify doc once again and select Unmark matched files.
If You Do Not Find Files That You Want to Recover
Sometimes R-Studio can find the files but not the entire file paths to them. It puts such files into the Extra Found Files folder. Try to search for the files there. If that does not help, try to find them by using file search globally on the entire disk.
The Advanced tab allows you to apply time and size parameters for the search pattern.
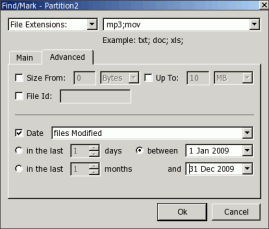
Click image to enlarge
If necessary, see more details in R-Studio online help: Searching for a File.
The Find Results panel appears if Find All Files is selected on the Find/Mark Mode drop-down list, or you may turn it on manually from the View -> Find Results menu.
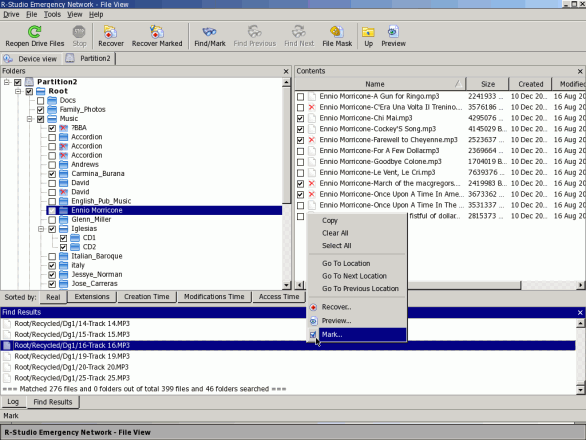
Click image to enlarge
A shortcut menu is available on this panel with most important data recovery commands. You may reach this menu by right-clicking a file on the panel.
You may estimate the chances of recovering files by using the built-in graphic previewer. Just double-click a selected file, be it a deleted or existing one. The previewer supports most graphic formats.
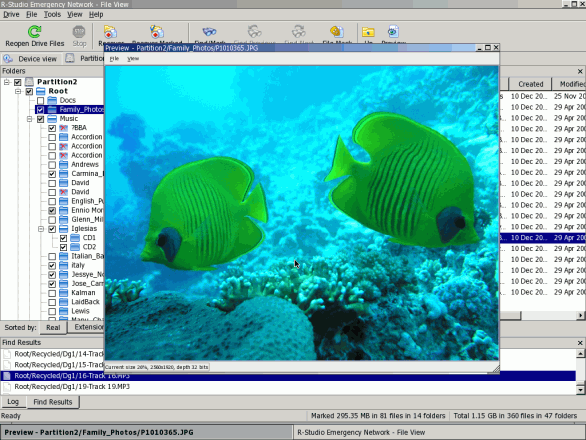
Click image to enlarge
If you've found all the files that you want and are satisfied with their preview results, you may activate your R-Studio Emergency if it's running in the Demo mode. That will not affect any obtained information; you may continue file recovery right after entering the Activation Code. Go to the R-Studio Emergency activation section for detailed instructions.
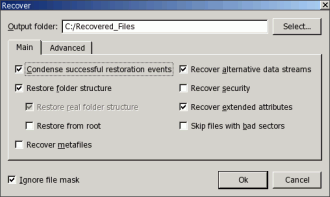
Once you've selected all files to recover, click the Recover Marked button. The Recover dialog box will appear:
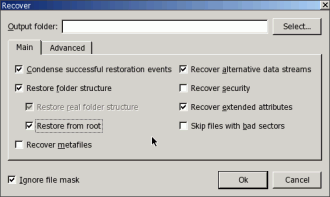
Click image to enlarge
Specify the recovery options. The table below shows the most important ones. You may leave the rest at their defaults. If you want to learn more about them, see the R-Studio online help: Recover options.
| If this check box is selected | R-Studio recovers |
| Restore folder structure | The entire path to the selected object. |
| Restore from root | The entire path to the selected object, starting from the root folder of the disk. |
| Recover real folder structure | The folder/folder structure as it really occurs on the disk rather than in the way you have sorted your searches. Enabled when the files are sorted by their extensions or date. |
| Ignore file mask | All content of a selected folder, ignoring a specified file mask |
| Skip files with bad sectors | If this check box is selected, R-Studio skips files with bad sectors and lists them on the Files with bad sectors dialog box when the recovery has been completed. You may separately decide later what to do with those files. |
If this check box is cleared, R-Studio tries to read those sectors several times (specified on the Settings/Bad Sectors dialog box) and, if it cannot read them, fills bad sectors in the recovered file with the pattern specified on the same box. Information about such files will appear in the Log panel.
You may see more information in the R-Studio online help:Bad Sectors.
Then you need to specify a destination for storing recovered files. Click the Select button.
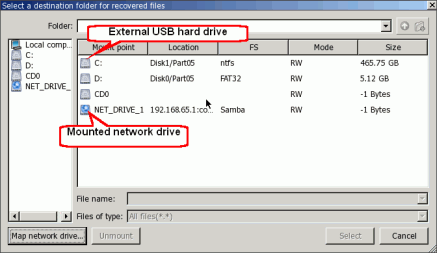
Click image to enlarge
You may select either an external USB hard drive (C:) or a network drive. When selecting the destination, please pay attention to the Mode column. It should be RW (Read and Write) to be able to store the recovered files.
Let's select the NET_DRIVE_1 and the ./Recovered_Files/ folder on it.
If you are going to recover many files, you should specify some options for mass file recovery on the Advanced tab.
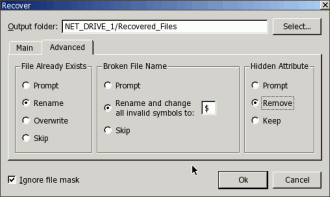
Click image to enlarge
File Already Exists: These options instruct R-Studio what to do if there already exists a file with the same name.
| If this option is selected | |
| Prompt | R-Studio asks the user what to do for each such file. It stops file recovery until it receives the answer. |
| Rename | R-Studio adds a File ID to the file name. If a file already exists with the same name and that file ID, a number will be added to the file name and file ID. |
| Overwrite | R-Studio overwrites the old file with the new one. |
| Skip | R-Studio skips all new files with the same name leaving the old one. |
Broken File Name: These options instruct R-Studio what to do if a file to be recovered appears to have an invalid name.
| If this option is selected | |
| Prompt | R-Studio shows the standard Broken File Name dialog box for each file with a broken file name. It stops file recovery until it receives the answer. |
| Rename and change all invalid symbols to: | R-Studio changes all invalid characters to the character specified. |
| Skip | If this option is selected, R-Studio skips all files with broken file names. |
Hidden Attribute: These options instruct R-Studio what to do if a file to be recovered appears to have a hidden attribute. Such attribute may make the file invisible in Windows Explorer.
When all file recovery settings are specified, click the OK button. R-Studio will start file recovery, showing the progress.
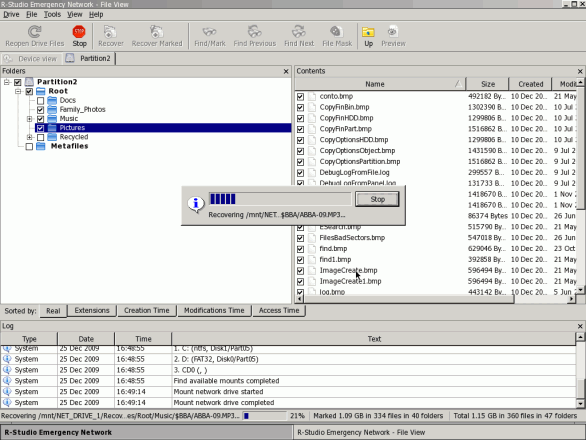
Click image to enlarge
The Log panel will show results of file recovery.
We've finished file recovery from the existing logical disk Partition2.
File Recovery from a Damaged Logical Disk/Partition
Now we'll continue file recovery and recover files from the damaged logical disk Partition1.
First you need to have R-Studio scan the partition in order to find which information on the partition remains on the disk. When the scan is finished, R-Studio will show you one or several recognized partitions so you can choose the right one and recover files from it as it's been described in the File recovery from an existing logical disk/partition section.
To scan the partition,
Right-click the partition to be scanned and specify the required scan parameters on the Scan dialog box.
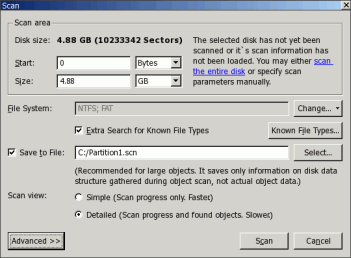
Click image to enlarge
| Disk size: | Shows the size of the object to be scanned |
| Start: | Sets the start point of the area to be scanned |
| Size: | Sets the size of the area to be scanned |
By default, R-Studio selects these numbers to match the entire object to be scanned. This is the best choice when we scan for Known File Types (see below).
File System: Specifies the file systems whose objects are to be searched for.
The current version of R-Studio supports: FAT, NTFS, exFAT, Ext2/3/4FS, HFS, and UFS file systems.
Please note that if you need to scan an HFS, HFS+, or HFSX disk, you must always enable the Extra Search for Known File Types option. This is very important because when files are being deleted on the HFS, HFS+, or HFSX file systems, the computer completely removes all system information on them, and there is no way to recover the deleted files except by using the Extra Search for Known File Types option. For more details, see the R-Studio online help: Data Recovery on HFS/HFS+ file system. For our case, select the NTFS and FAT file systems.
Save scan Info to File: If this check box is selected, R-Studio will save scan information to a specified file. This option does not save actual disk data, only information on disk data structure gathered during disk scan.
We recommend you always save scan information in case you have to temporarily stop data recovery and turn the computer off. This file may be opened later and you won't have to rescan the disk once again.
When you select Save scan Info to File, a warning message will appear:
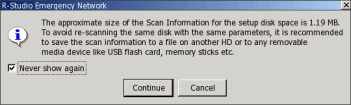
Click image to enlarge
Click the Continue button and select the place to store the scan information. In this example, this file is stored on the external USB disk.
NEVER TRY TO SAVE SCAN INFORMATION ON THE OBJECT BEING SCANNED!!!
Doing so may produce unpredictable results, and you may lose all your data.
Leave the rest of the options as they are. If you want to learn more about them, see the R-Studio online help: Disk Scan.
Scanning for Known File Types
This is a very useful feature for file recovery from deleted or reformatted partitions. While scanning, R-Studio can recognize to which particular file type the data belong. Using that information, R-Studio can find more files to recover. Those found files appear in the Extra Found Files folder in the scan result.
By default, R-Studio tries to recognize the default list of supported file types, greatly increasing time required for the scan. You may reduce it by selecting only those file types that you need. Click the Known File Types... button and select the required file types on the File Types dialog box.
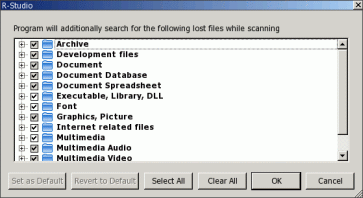
Click image to enlarge
These selections will be applied to that scan session only.
You may see the list of supported Known File Types on the R-Studio online help: Known File Types.
You may create your own Known File Types for files not in the list. See the R-Studio online help: Customizing File Types and our article Creating a Custom Known File Type for R-Studio.
When you're ready with the scan parameters, click the Scan button. R-Studio will start scanning. When it finishes the scan, it will show the recognized partitions it's found on the disk.
Click image to enlarge
R-Studio shows them in different colors depending on which elements of the partition have been found.
|
| This represents an existing logical disk or partition. |
|
| Both boot records and file entries are found for this partition. |
|
| Only file entries are found for this partition. |
|
| Only boot records are found for this partition. |
|
| This represents the empty space on the object. |
To successfully recover files from a recognized partition, it is necessary to find one that corresponds correctly to the real logical disk on which the files resided. No strict rules can be applied to that, but the following tips should be taken into account:
- If you are going to recover files from a disk with a damaged file system, most likely the right recognized partition will be one coded in green.
- If you are going to recover files from a previously deleted or reformatted partition, most likely the right recognized partition will be one coded in yellow.
Also, always check the recognized partition's file system, start point, and size. These characteristics should be the same for both the recognized partition and real logical disk/partition. When in doubt, try to preview a couple of files from the recognized partition. If the files are seen correctly, this is the right partition.
In our example, we have only one Recognized0, so the choice is easy.
Double-click Recognized0. R-Studio will enumerate files on this recognized partition and show found files and folders.
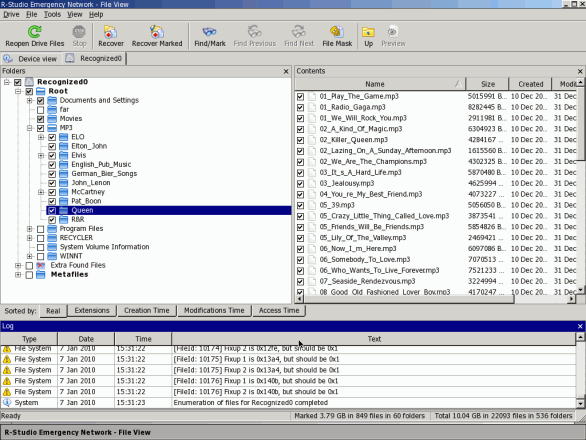
Click image to enlarge
Mark files to recover, as you did when recovering files from the existing logical disk.
If you cannot find files on the Recognized0 partition, then go back to the Device view panel, click Extra Found Files, and select those file types you want to recover. You may preview graphical files to be sure that you select the correct files and that they can be recovered.
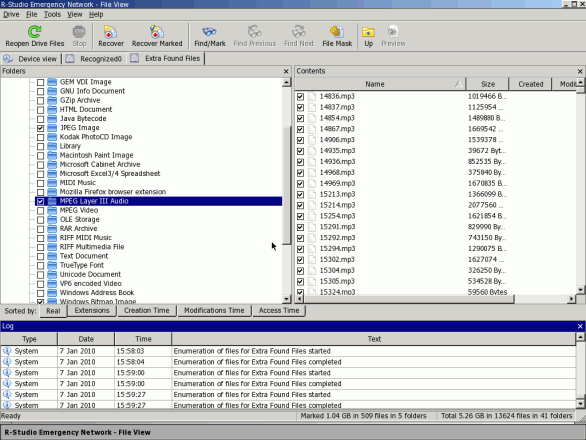
Click image to enlarge
Please note that file names cannot be recovered when extra found files are recovered and you can successfully recover only unfragmented files.
Then click the Recover Marked button, specify the recover options on the Recover dialog box as you did when recovering files from the existing logical disk, and click the OK button.
Click image to enlarge
Please note that in this example, we selected the /Recovered_Files/ folder on the external USB hard drive to store the recovered files.
R-Studio will start recovering marked files.
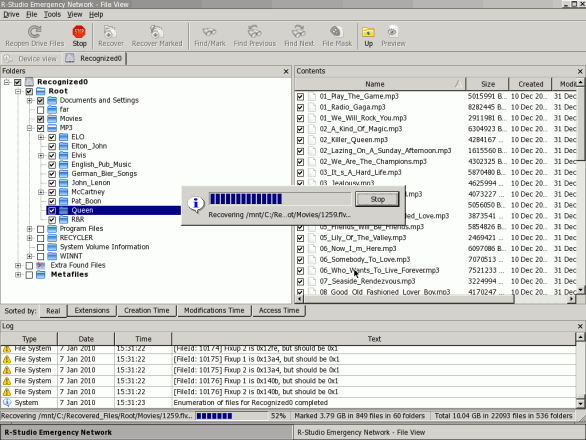
Click image to enlarge
When it finishes file recovery, R-Studio will show the results in its Log panel.
Computer Shutdown
When you finish file recovery, remove the CD disc or USB disk, and turn your computer off manually.
If you want to restart your computer, select Exit on the Drive menu, and click the OK button on the warning message.
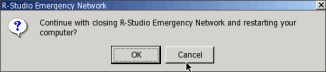
Click image to enlarge
R-Studio will restart your computer.
Working with Images
Images are exact, byte-by-byte copies of any objects on the Drives panel. When created, images can be processed like their original objects.
Images are very useful if there is a risk of total data loss due to hardware malfunction. If bad blocks are constantly appearing on a hard drive, you must immediately create an image of this drive. All data search, scan, and restoring can be done from this image. In addition, such images can be used to recover a disk after a computer crash, or for easy system migration.
You may create images anyplace that's bigger than the size of the object. The only exception is the object whose image you want to create. NEVER TRY TO SAVE IMAGES OF RECOVERED FILES/FOLDERS TO THE SAME LOGICAL DISK WHERE THEY RESIDE!!! Otherwise, you may obtain unpredictable results and lose all your data.
An image can be opened in R-Studio, and files can be recovered from the opened image in the same way as from the original object.
How to Create an Image
1. Select an object on the R-Studio's Drives panel and click the Create Image button.
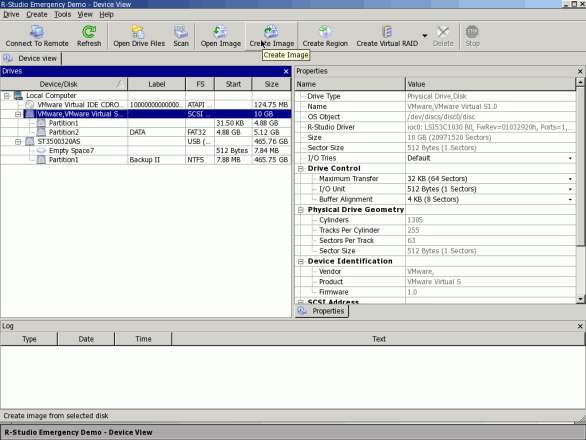
Click image to enlarge
2. Specify image options, a file name, and destination for the image on the Create Image dialog box.
Note: To store an image file, you need a free space equal to at least the object size.
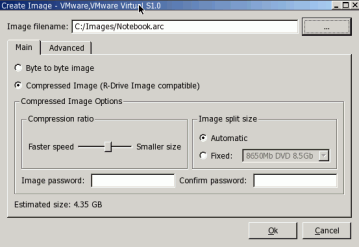
Click image to enlarge
| Image filename | Specifies the name and path for the image file. You may use both local and network drives to store images. See the Network Setup section for more details on connecting network drives. |
| Byte to byte image | If this option is selected, R-Studio will create a simple exact copy of the object. This image format is compatible with the previous versions of R-Studio |
| Compressed image (R-Drive Image compatible) | If this option is selected, R-Studio will create an image file that can be compressed, split into several parts, and password protected. This is fully compatible with the images created by R-Drive Image. |
| Compression ratio | You may compress the data in the image to save space. Active only if the option Compressed Image (R-Drive Image compatible) is selected. |
| Estimated size | Shows the estimated size of the image file. An actual image size depends on how much empty space is on the selected partition and what file types are there. Active only if the option Compressed Image (R-Drive Image compatible) is selected. |
| Image split size | You may set this option to Automatic and let Windows decide how to split the image file. This mostly depends on the file system on the destination disk. With the Fixed option, you may also either explicitly specify the split size, or choose a preset for various devices with removable storage. Active only if the option Compressed Image (R-Drive Image compatible) is selected. |
| Image password | You may protect your image file with a password. Note: This feature provides relatively moderate protection against conventional unauthorized access. Active only if the option Compressed Image (R-Drive Image compatible) is selected. |
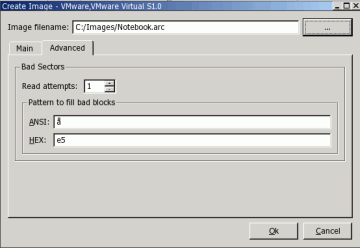
Click image to enlarge
| Read attempts | Specifies a value for I/O Tries, or how many times R-Studio will try to read a bad sector. |
| Pattern to fill bad blocks |
Specifies a pattern R-Studio will use to fill bad sectors in this image. You may specify the pattern either in the ANSI or Hex data format. Note: R-Studio will never, ever try to write anything to the disk from which data is to be recovered or an image is to be created. This pattern fills bad sectors only in the image. |
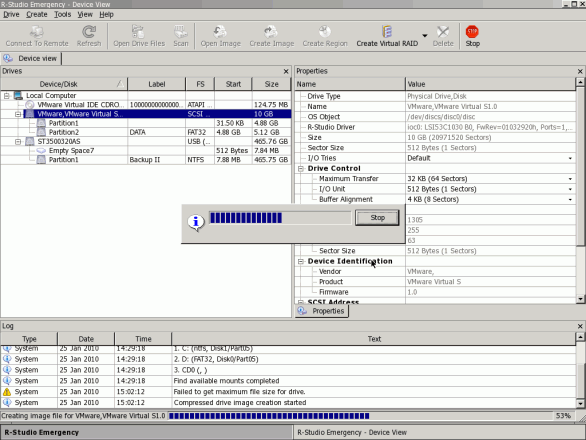
Click image to enlarge
R-Studio will start creating the image, the progress bar showing the progress.
How to Open an Image
1. Click the Open Image button:
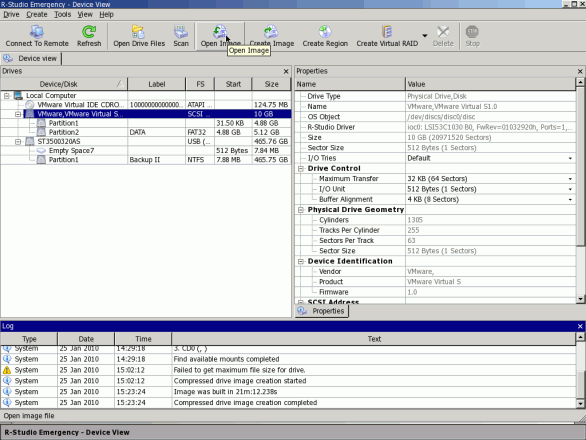
Click image to enlarge
2. Select the required image file:
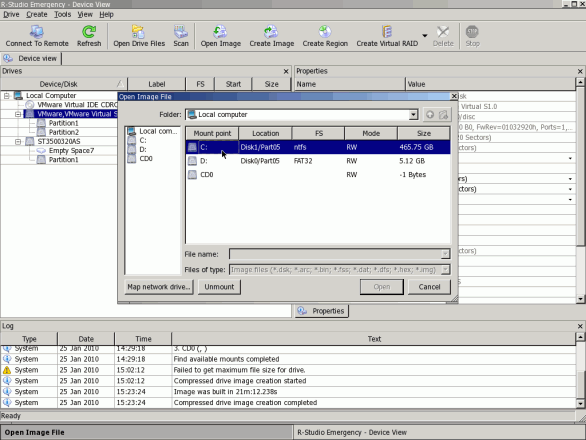
Click image to enlarge
An Image object will appear on the Drives panel:
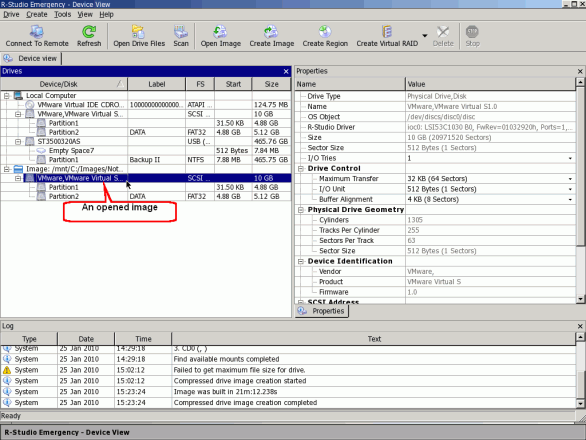
Click image to enlarge
You may perform all data search, scan, and recovery from this image as if it were a regular drive/disk object.
R-Studio Emergency Activation
You need to activate your copy of R-Studio Emergency to save recovered files. Without activation (if you click the Cancel button on the Activation dialog box), R-Studio Emergency will work in its Demo mode. In this mode it can perform any data recovery operation, except working on network and saving recovered files. But you may preview files to estimate the chances of recovering them.
To activate your copy of R-Studio Emergency, write down the computer's hardware code. Please note that this hardware code is unique for each computer. If you start R-Studio Emergency on another one, the hardware code will be different.
You may obtain the computer's Activation Code on the R-TT Web site. Using the Internet-connected computer, connect to the Registered User's Console, enter the required user data, and click the Submit button.
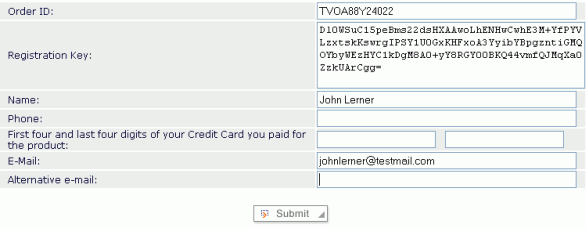
Click image to enlarge
You must fill in at least three fields to enter the Registered User's Console.
Then click the R-Studio Emergency Activation Code button.
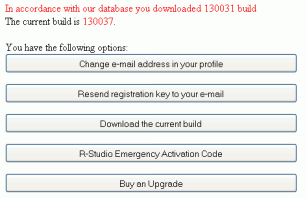
Click image to enlarge

Click image to enlarge
Please note that the R-Studio is licensed per machine, not per user, and you may generate a computer's Activation Code for licensed computers only. An R-Studio license cannot be transferred to another computer after the software has been installed or run and registered. So you should enter the Hardware Code of the computer to be licensed only.
![]()
Click image to enlarge
Write down the Activation Code, and store it in a safe place. Possibly the best place to store the Activation Code is to write it to a CD/DVD disc. Every time you start R-Studio Emergency, you'll need to enter it during activation.
You may enter the Activation Code on the R-Studio Emergency Demo Activation dialog box during startup or, while working, by selecting Activate on the Help menu.
Click image to enlarge
R-Studio Emergency will show that the registration is successful:
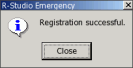
Click image to enlarge
Now you can use R-Studio Emergency to its fullest capability.
Network Setup
You may use both DHCP and manual configuration to obtain an IP address for the computer running R-Studio Emergency.
To start network configuration, select Network configuration on the Tools menu.
The Network configuration dialog box will appear and R-Studio automatically will start acquiring a network address using DHCP. The Log panel will show the Network adapter configuration started message.
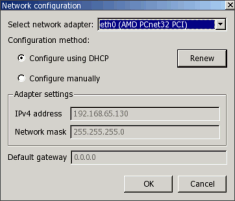
Click image to enlarge
You may cancel this process by selecting Configure manually. Then you need to enter the address manually. If your computer has several network interfaces, you may select which interface is to be used.
Once the network address is obtained, it appears on the dialog box, and the Log panel will show the Network adapter configuration completed message.
If R-Studio fails to obtain the address, the log will show the Network adapter configuration failed message. In that event, you have to either enter the address manually or fix a possible network problem.
Then you need to specify a network share to which the data will be saved. Select Map network drive on the Tools menu. The Map network drive dialog box will appear.
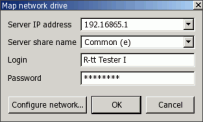
Click image to enlarge
Enter the necessary data, and click OK. The Log panel will show the Mount network drive started message. When the drive is connected, the Log panel will show the Mount network drive completed message.
If R-Studio fails to connect the network drive, the Log panel will show the Mount network drive failed message. You'll need to correct the network problem and try to connect the network drive once again.
- Data Recovery Guide
- Why R-Studio?
- R-Studio for Forensic and Data Recovery Business
- R-STUDIO Review on TopTenReviews
- File Recovery Specifics for SSD devices
- How to recover data from NVMe devices
- Predicting Success of Common Data Recovery Cases
- Recovery of Overwritten Data
- Emergency File Recovery Using R-Studio Emergency
- RAID Recovery Presentation
- R-Studio: Data recovery from a non-functional computer
- File Recovery from a Computer that Won't Boot
- Clone Disks Before File Recovery
- HD Video Recovery from SD cards
- File Recovery from an Unbootable Mac Computer
- The best way to recover files from a Mac system disk
- Data Recovery from an Encrypted Linux Disk after a System Crash
- Data Recovery from Apple Disk Images (.DMG files)
- File Recovery after Re-installing Windows
- R-Studio: Data Recovery over Network
- How To Use R-Studio Corporate Package
- Data Recovery from a Re-Formatted NTFS Disk
- Data Recovery from an ReFS disk
- Data Recovery from a Re-Formatted exFAT/FAT Disk
- Data Recovery from an Erased HFS Disk
- Data Recovery from an Erased APFS Disk
- Data Recovery from a Re-Formatted Ext2/3/4FS Disk
- Data Recovery from an XFS Disk
- Data Recovery from a Simple NAS
- How to connect virtual RAID and LVM/LDM volumes to the operating system
- Specifics of File Recovery After a Quick Format
- Data Recovery After Partition Manager Crash
- File Recovery vs. File Repair
- Data Recovery from Virtual Machines
- How to Connect Disks to a Computer
- Emergency Data Recovery over Network
- Data Recovery over the Internet
- Creating a Custom Known File Type for R-Studio
- Finding RAID parameters
- Recovering Partitions on a Damaged Disk
- NAT and Firewall Traversal for Remote Data Recovery
- Data Recovery from an External Disk with a Damaged File System
- File Recovery Basics
- Default Parameters of Software Stripe Sets (RAID 0) in Mac OS X
- Data Recovery from Virtual Hard Disk (VHD/VHDX) Files
- Data Recovery from Various File Container Formats and Encrypted Disks
- Automatic RAID Parameter Detection
- IntelligentScan Data Recovery Technology
- Multi-pass imaging in R-Studio
- Runtime Imaging in R-Studio
- Linear Imaging vs Runtime Imaging vs Multi-Pass Imaging
- USB Stabilizer Tech for unstable USB devices
- Joint work of R-Studio and PC-3000 UDMA hardware
- Joint work of R-Studio and HDDSuperClone
- R-Studio T80+ - A Professional Data Recovery and Forensic Solution for Small Business and Individuals Just for 1 USD/day
- Backup Articles
- R-Drive Image Standalone and Corporate license transferring
- Backup with Confidence
- R-Drive Image as a free powerful partition manager
- Computer Recovery and System Restore
- Disk Cloning and Mass System Deployment
- Accessing Individual Files or Folders on a Backed Up Disk Image
- Creating a Data Consistent, Space Efficient Data Backup Plan for a Small Business Server
- How to Move the Already Installed Windows from an Old HDD to a New SSD Device and Create a Hybrid Data Storage System
- How to Move an Installed Windows to a Larger Disk
- How to Move a BitLocker-Encrypted System Disk to a New Storage Device
- How to backup and restore disks on Linux and Mac computers using R-Drive Image
- Undelete Articles
- Get Deleted Files Back
- Free Recovery from SD and Memory cards
- R-Undelete: Video Recovery
- Recovery from an External Device with a Damaged File System
- File recovery from a non-functional computer
- Free File Recovery from an Android Phone Memory Card
- Free Photo and Video File Recovery Tutorial
- Easy file recovery in three steps
Rating: 4.8 / 5
R-TT may not be the easiest or most user-friendly solution, but the algorithm used for the renaming saved me THOUSAND of hours of opening ...
Bought it and 100% recommend it for anyone with a similar issue.
I was reluctant as it seemed pricey compared to other programs, but damn worth every penny. It managed to even find files I thought were wiped from existence.
Kudos to r-tools, thank you!
I`m an IT professional who has worked from home for over a decade. Early on in my career, I configured an HP ProLiant Server (Raid 1+0) as a workstation that I would remote into from my laptop. As technology evolved, I began to use it only for email and as a config file repository.
A short while ago, one of the drives degraded, but the HP ProLiant Server (Raid 1+0) still functioned fine on the remaining drive. I was complacent and didn`t replace the ...