- PRODUCTSFREEWAREFOR COMMERCIAL USEFOR PERSONAL AND BUSINESS USEBackup and System Restore:PC Privacy and Security:
- BUY ONLINE
- DISTRIBUTION
-
File Recovery after Re-installing Windows


Sometimes, it happens. Mysteriously, Windows appears freshly installed on some other logical disk than the one that was actually planned. Moreover, that particular disk contained very important files that are accessible no more and getting those files back becomes now the most urgent task. Well, this task can be solved using special data recovery programs such as R-Studio. This article will explain in detail how to do that.
Preliminary information.
We begin with some brief information about how Windows stores files on a disk and what happens with them when someone makes a fresh Windows install on that disk. (If you need more information about that, please refer to our article File Recovery Basics which discuss this subject more thoroughly.) We need this information to understand what can be recovered and how that can be done.
Almost all modern operating systems, (including Windows, MacOS, and Linux), store information about files and folders, like file names, sizes, time stamps, and exact physical locations of the file data, separately from the file data itself. Modern OS in the Windows family, like Windows XP, 7, 8/8.1, 10 use disks with the NTFS file system, where such information about files and folders is kept in the Master File Table (MFT).
When an OS manipulates files, it usually make changes to the information about the files and leaves file data unchanged until it needs that disk space for something, such as storing new file data. So, if even such file information is gone, there are chances that the file data still remains on the disk. But if any data on the disk is overwritten, then the old data is gone. No program or commercially available data recovery method can recover it.
There are two methods that all file recovery software uses:
1. Analysis of that file information on the disk. Quite often it is possible to find file some remnants of the information on old files (usually a copy of old MFT), and recover them with all their information like file names, time stamps, or even with the entire file and folder structure.
2. A raw file search. It works by analyzing the contents of the disk for "file signatures". File signatures are common patterns that signify the beginning or end of a file. Almost every file type has at least one file signature. This second data recovery method can recover file data with greater success than the first method, but it cannot reconstruct the original file names, date/time stamps or the entire folder and file structure of the disk. Another drawback of this method is that can recover only un-fragmented files. If necessary, you may create your own known file types.
Now we'll look on what happens when a fresh Windows install takes place and on prospects to recover files.
An important note:Even if they may seem not much impressive, it's still worth trying to perform file recovery, taking into account that R-Studio allows its users to perform all file recovery tasks, except saving recovered files, in its Demo mode, that is, without buying the program. In this mode you may estimate what can be recovered and whether the results are worth the money you'll spend. Sometimes file recovery results appear much better than expected.
Case 1. New Windows has been installed on the same and one partition on the disk:

Fig.1. New Windows has been installed on the same partition
Click image to enlarge
Such an install replaces the old Windows system files with the new ones and deletes old user files. What is worse, it completely overwrites the old MFT with a new one, thus fully destroying all file information about them. Also data for some old user files may be overwritten by new Windows system files, but usually those overwritten files are few, provided that no new user files has been written.
So, we may expect that most files that can be recovered will be recovered using the raw file search, that is, only un-fragmented, and without their file names and other information. With luck, there may be some remnants of the old file information scattered on the disk that can be used to recover some files with their names and other information. Almost for sure the entire old file/folder structure cannot be recovered.
Case 2: The disk has been divided into two new partitions, and new Windows has been installed on one:

Fig.2. Disk has been repartitioned: two new partitions instead one old partition. New Windows has been installed on new Partition 1.
Click image to enlarge
We can expect the same results for file recovery as for Case 1, taking into account the fact that there's additional, and usually small, area on the disk that is also overwritten:
Most files that can be recovered will be recovered using the raw file search, that is, only un-fragmented, and without their file names and other information. With some good luck, there may be some remnants of the old file information scattered on the disk that can be used to recover some files with their names and other information. Almost for sure the entire old file/folder structure cannot be recovered.
Case 3: The disk has been repartitioned: a new one partition instead of two old ones. New Windows has been installed on it:

Fig.3. Disk has been repartitioned: a new one partition instead two old ones. New Windows has been installed on a new Partition 1.
Click image to enlarge
We can expect the same results for file recovery from old Partition 1 as for Case 1:
Most files that can be recovered will be recovered using the raw file search, that is, only un-fragmented, and without their file names and other information. With some good luck, there may be some remnants of the old file information scattered on the disk that can be used to recover some files with their names and other information. Almost for sure the entire old file/folder structure cannot be recovered.
The situation is quite different for old Partition 2: most likely the old file information can be found, and all files can be recovered with their names and other information. Moreover, the entire old file/folder structure can be successfully recovered.
Case 4. New Windows has been installed on one partition of the disk with two partitions:

Fig.4. New Windows has been installed on a new Partition 1.
Click image to enlarge
We can expect the same results for file recovery from old Partition1 as for Case 1:
Most files that can be recovered will be recovered using the raw file search, that is, only un-fragmented, and without their file names and other information. With some good luck, there may be some remnants of the old file information scattered on the disk that can be used to recover some files with their names and other information. Almost for sure the entire old file/folder structure cannot be recovered.
Old Partition 2 will appear in new Windows as a new Partition 2 with all its file system intact. No file recovery is needed as the old files with all file/folder structure will be completely accessible through new Windows.
File recovery example
As an example, we'll discuss user's file recovery for Case 3, as it also covers Cases 1, 2, and 4.
There was a Windows computer with a hard disk divided into two partitions, with user's files stored on both. Files were JPG, MP3, and video. The computer ran under Windows 8.
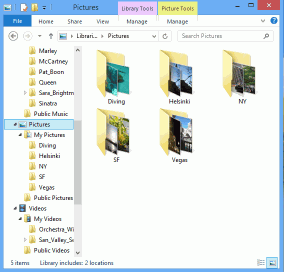
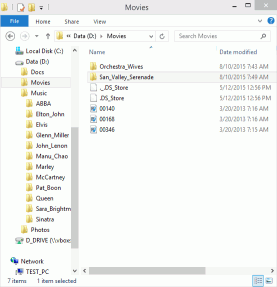
Fig.5. User files on Windows 8
Click images to enlarge
During an erroneous Windows 10 fresh install, the disk was repartitioned from two partitions to one, and Windows 10 was installed on the new, and the only, partition. The task is to recover user's files from both old partitions.
Before we begin we need to do some preliminary work
1. We'll use a startup disk with R-Studio Emergency for file recovery to avoid installing the program (and thus overwriting some old files) to the computer from which we're going to recover files. If this device is large enough to store recovered files, it's possible to use it for this purpose as well.
2. If the device with R-Studio isn't large enough, we need to prepare a place to store recovered files. Depending on their expected size, it may be another memory stick, an external USB drive, or even a network storage device.
3. Download and install R-Studio Emergency Startup Media Creator. Use another computer for that to avoid writing new data to the computer with the new Windows. Run the Creator and create a USB startup device. Then it asks to register, you may skip that step and work in the Demo mode.
Now we're ready to start file recovery.
File recovery
1. Start the Windows computer with R-Studio Emergency startup disk.
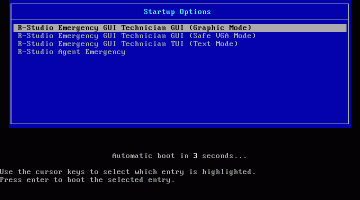
Fig.6. R-Studio Emergency startup
Click images to enlarge
Select R-Studio Emergency GUI (Graphic Mode) and press the Enter key on the keyboard.
When R-Studio Emergency finishes loading, it'll show the computer's disks.
2. Inspect the found hard disks and partitions.

Fig.7. Computer's disks in R-Studio Emergency
Click images to enlarge
3. Select the hard disk with new Windows and click the Scan button.
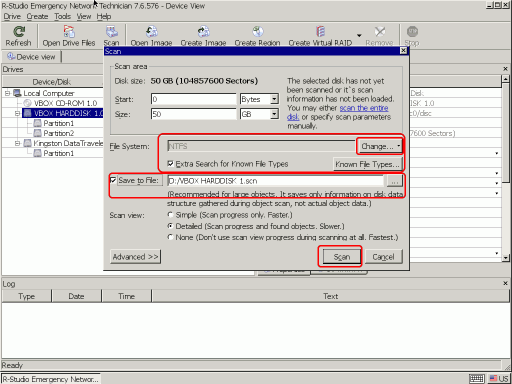
Fig.8. Disk scan parameters
Click images to enlarge
Click the Change button and leave only NTFS selected. Check that the Extra Search for Known File Types option is selected, too. Select Save to File and specify the external USB disk as the place to store scan information. It may be necessary to load it back if we have to interrupt file recovery process.
You may read more about scan parameters in R-Studio's on-line help: Disk Scan.
Then click the Scan button.
R-Studio will start scanning showing its progress.
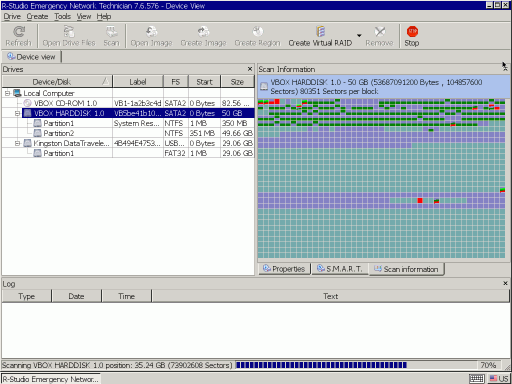
Fig.9. Disk scan
Click images to enlarge
When R-Studio finishes the scan, it'll show some found partitions
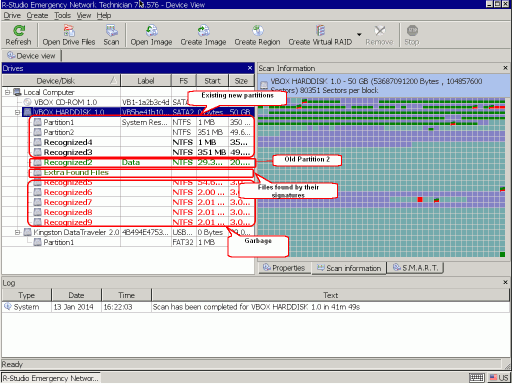
Fig.10. Disk scan results
Click images to enlarge
As expected, R-Studio found all the information about old Partition 2 and nothing about old Partition 1. We'll start file recovery from old Partition 2 as it's easy to find all files on it.
4. Double-click the partition and R-Studio will enumerate its files and show its file/folder structure.
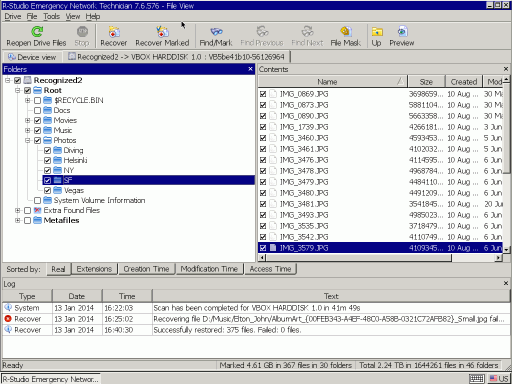
Fig.11. Files found on old Partition 2
Click images to enlarge
Now we need to decide if R-Studio Emergency can recover files from this partition and therefore should we buy it and register.
Go to the Photos folder and double-click a file to preview it.
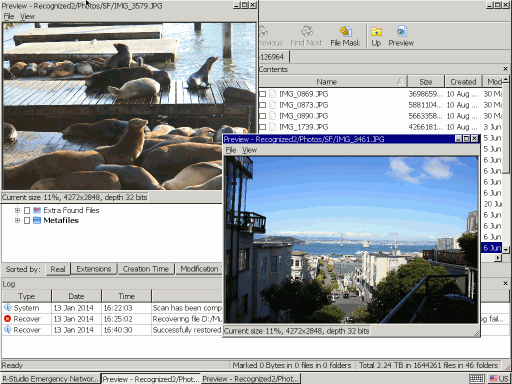
Fig.12. File preview
Click images to enlarge
If such preview is successful for several files, you may buy R-Studio and register it to be able to start saving recovered files.
5. Select files you want to recover and click the Recover Marked button.
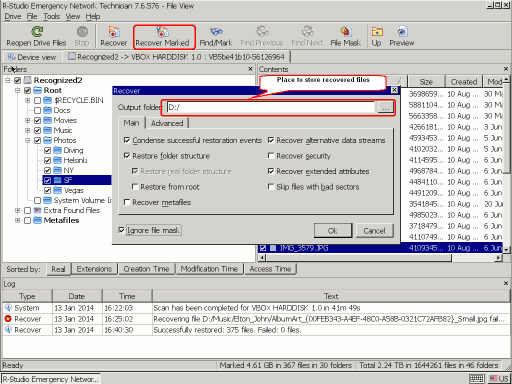
Fig.13. File recovery parameters
Click images to enlarge
You may see more about file recovery parameters on R-Studio's online help.
Specify the place to store recovered files and other parameters (if necessary) and click the OK button.
R-Studio will start recovering files and showing its progress.
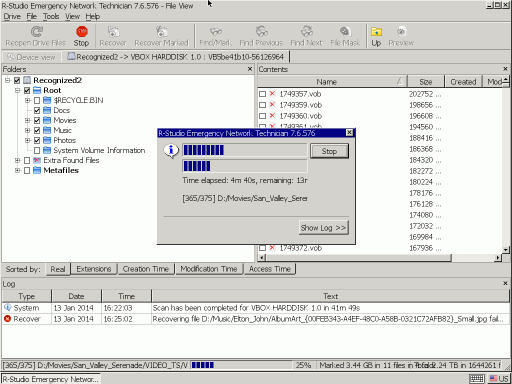
Fig.14. File recovery progress
Click images to enlarge
When this recovery process finishes, we may start file recovery from old Partition 1. Here the situation is much more tricky as R-Studio could not find any traces of old Partition 1 and we have to rely only on file recovery using file signatures.
1. Go back to the Device tab and double-click Extra Found Files. R-Studio will show found files sorted by their types.
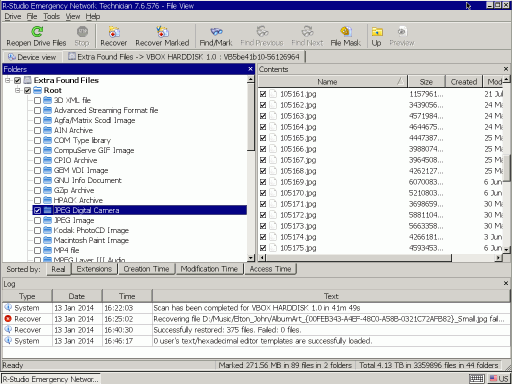
Fig.15. Files found by their signatures from old Partition 1
Click images to enlarge
2. Go to JPEG Digital Camera folder and double-click several files to see if it's possible to recover them.
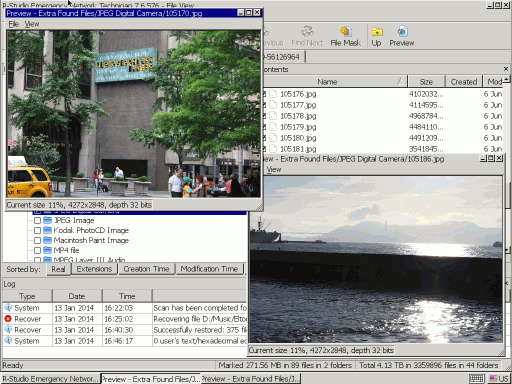
Fig.16. File preview
Click images to enlarge
As there are many files to recover and they don't have their original names, it would be too long to decide which files should or shouldn't be recovered. We'll recover all necessary folders and sort recovered files later.
3. Mark the necessary folders for recovery and click the Recover Marked button.
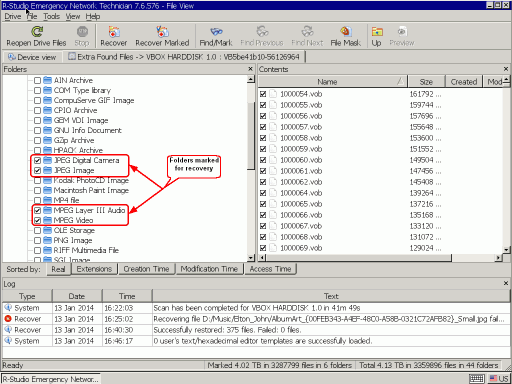
Fig.17 Folder marked for recovery
Click images to enlarge
4. Specify the place to store recovered files and other parameters as we did that for file recovery from old Partition 2, click the OK button and wait for recovery results. After that just turn the computer off and see what is recovered.
File recovery results
Now we can go to the disk with recovered files and inspect the results of our work.
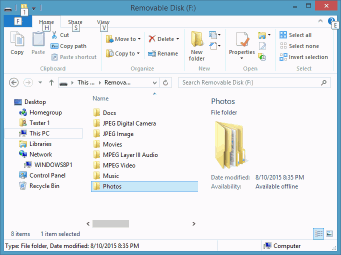
Fig.18 Disk with recovered filesy
Click images to enlarge
As expected, we have recovered all files from old Partition 2. For old Partition 1, the situation is not as good. We have recovered almost all jpg files, most mp3 files, and no video files.
- Data Recovery Guide
- Why R-Studio?
- R-Studio for Forensic and Data Recovery Business
- R-STUDIO Review on TopTenReviews
- File Recovery Specifics for SSD devices
- How to recover data from NVMe devices
- Predicting Success of Common Data Recovery Cases
- Recovery of Overwritten Data
- Emergency File Recovery Using R-Studio Emergency
- RAID Recovery Presentation
- R-Studio: Data recovery from a non-functional computer
- File Recovery from a Computer that Won't Boot
- Clone Disks Before File Recovery
- HD Video Recovery from SD cards
- File Recovery from an Unbootable Mac Computer
- The best way to recover files from a Mac system disk
- Data Recovery from an Encrypted Linux Disk after a System Crash
- Data Recovery from Apple Disk Images (.DMG files)
- File Recovery after Re-installing Windows
- R-Studio: Data Recovery over Network
- How To Use R-Studio Corporate Package
- Data Recovery from a Re-Formatted NTFS Disk
- Data Recovery from an ReFS disk
- Data Recovery from a Re-Formatted exFAT/FAT Disk
- Data Recovery from an Erased HFS Disk
- Data Recovery from an Erased APFS Disk
- Data Recovery from a Re-Formatted Ext2/3/4FS Disk
- Data Recovery from an XFS Disk
- Data Recovery from a Simple NAS
- How to connect virtual RAID and LVM/LDM volumes to the operating system
- Specifics of File Recovery After a Quick Format
- Data Recovery After Partition Manager Crash
- File Recovery vs. File Repair
- Data Recovery from Virtual Machines
- How to Connect Disks to a Computer
- Emergency Data Recovery over Network
- Data Recovery over the Internet
- Creating a Custom Known File Type for R-Studio
- Finding RAID parameters
- Recovering Partitions on a Damaged Disk
- NAT and Firewall Traversal for Remote Data Recovery
- Data Recovery from an External Disk with a Damaged File System
- File Recovery Basics
- Default Parameters of Software Stripe Sets (RAID 0) in Mac OS X
- Data Recovery from Virtual Hard Disk (VHD/VHDX) Files
- Data Recovery from Various File Container Formats and Encrypted Disks
- Automatic RAID Parameter Detection
- IntelligentScan Data Recovery Technology
- Multi-pass imaging in R-Studio
- Runtime Imaging in R-Studio
- Linear Imaging vs Runtime Imaging vs Multi-Pass Imaging
- USB Stabilizer Tech for unstable USB devices
- Joint work of R-Studio and PC-3000 UDMA hardware
- Joint work of R-Studio and HDDSuperClone
- R-Studio T80+ - A Professional Data Recovery and Forensic Solution for Small Business and Individuals Just for 1 USD/day
- Backup Articles
- R-Drive Image Standalone and Corporate license transferring
- Backup with Confidence
- R-Drive Image as a free powerful partition manager
- Computer Recovery and System Restore
- Disk Cloning and Mass System Deployment
- Accessing Individual Files or Folders on a Backed Up Disk Image
- Creating a Data Consistent, Space Efficient Data Backup Plan for a Small Business Server
- How to Move the Already Installed Windows from an Old HDD to a New SSD Device and Create a Hybrid Data Storage System
- How to Move an Installed Windows to a Larger Disk
- How to Move a BitLocker-Encrypted System Disk to a New Storage Device
- How to backup and restore disks on Linux and Mac computers using R-Drive Image
- Undelete Articles
- Get Deleted Files Back
- Free Recovery from SD and Memory cards
- R-Undelete: Video Recovery
- Recovery from an External Device with a Damaged File System
- File recovery from a non-functional computer
- Free File Recovery from an Android Phone Memory Card
- Free Photo and Video File Recovery Tutorial
- Easy file recovery in three steps
Rating: 4.8 / 5
R-TT may not be the easiest or most user-friendly solution, but the algorithm used for the renaming saved me THOUSAND of hours of opening ...
Bought it and 100% recommend it for anyone with a similar issue.
I was reluctant as it seemed pricey compared to other programs, but damn worth every penny. It managed to even find files I thought were wiped from existence.
Kudos to r-tools, thank you!
I`m an IT professional who has worked from home for over a decade. Early on in my career, I configured an HP ProLiant Server (Raid 1+0) as a workstation that I would remote into from my laptop. As technology evolved, I began to use it only for email and as a config file repository.
A short while ago, one of the drives degraded, but the HP ProLiant Server (Raid 1+0) still functioned fine on the remaining drive. I was complacent and didn`t replace the ...